Send(ing) it
I'm not the sharpest tool in the shed; The most intelligent person out there I mean. No, I'm not stupid by any means, I'm just not especially gifted in any one area. I know a lot about a lot I guess one could say.
One area that I'm reasonably proficient in is shooting. I say shooting and not guns because as far as guns in general go I'm not that proficient. I tend only to know about those I need to know about...I don't read books about them, unless I have those particular guns, but I shoot a lot, so shooting is my thing.
I was asked recently about guns by someone who has never held one. They raised an interesting question about my long-range shooting:
"When shooting at long range how do you know where to aim?"
It's actually really intelligent question and one I am able to answer reasonably easily. I'll try not to get too technical as many different factors come into play with a long range shot and will focus instead on a couple of the tools I use to assist in the process. I have taken a few screen captures which you will see below and will, as simply as possible, explain each image, some of the concepts and how it all comes together to assist the shooter in making the shot. I know you're all smart people however some of the concepts will be foreign to those who don't shoot, or don't shoot at long range.
This, in no way is designed to turn a novice into a shooter and is only an overview of the concepts I have taken years to learn.
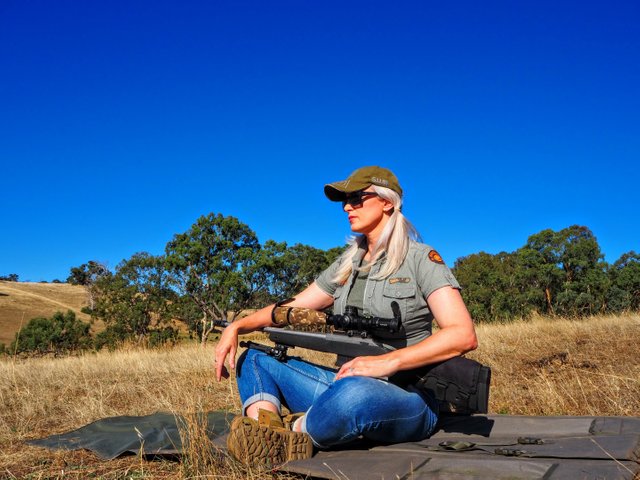
So, here goes...
Gravity
Gravity affects everything on earth including bullets. As soon as a bullet leaves the muzzle gravity exerts its force pushing (pulling?) it downwards to the earth. Of course, this means that the further the bullet travels the lower it drops until it eventually it hits the ground, or a target. Obviously if it was fired directly at a target, without the appropriate elevation adjustments, it will fall short and miss. So this means, to make accurate impacts at range, one must input/introduce certain adjustments to the shot to arc the bullet into the target - Essentially shooting high to sort of lob the bullet into the target.
The amount of arc, or elevation, depends on the range of the target; The further downrange the target is the higher the gun must be aimed to get the bullet there. A very simple concept so far.
Accounting for elevation and windage
There's also forces acting sideways upon the bullet, wind for instance, and it must also be adjusted for. We call that windage.
Coriolis affect also plays a part, that's the turning of the earth, but let's leave that one for now as it's a little complicated. I'll deal with it later.
Accounting for these two things is easy really. One simply increases elevation (point of aim) and holds aim into the wind with the understanding that the wind will blow the bullet back onto the target and gravity will exert its force on the bullet forcing it downwards.
This is where things get a little more complicated.
Knowing what elevation and windage to input depends on a lot of factors. *Very basically basically though:
- Wind speed and direction (called by the shooter)
- Altitude, humidity and temperature
- Azimuth (direction of shot by compass)
- Spin drift (Another complicated force)
- Coriolis and latitude (turning of the earth etc.)
Wind speed and direction
I determine this manually, meaning by myself without the use of a wind meter.
It's a skill I've learned over time and practice all the time. I look at the trees, grass, dust or sand blowing, hair or clothing blowing, mirage, feel it on my face...Basically any means possible to determine the miles per hour (mph) and direction (in degrees or as a point on a clock-face).
I have an accuracy of about (+/-) 1-2mph which is considered good. The more accurately I call the wind the better the shot will be. It's a skill I continually work on.
Altitude, humidity and temperature - "Density Altitude"
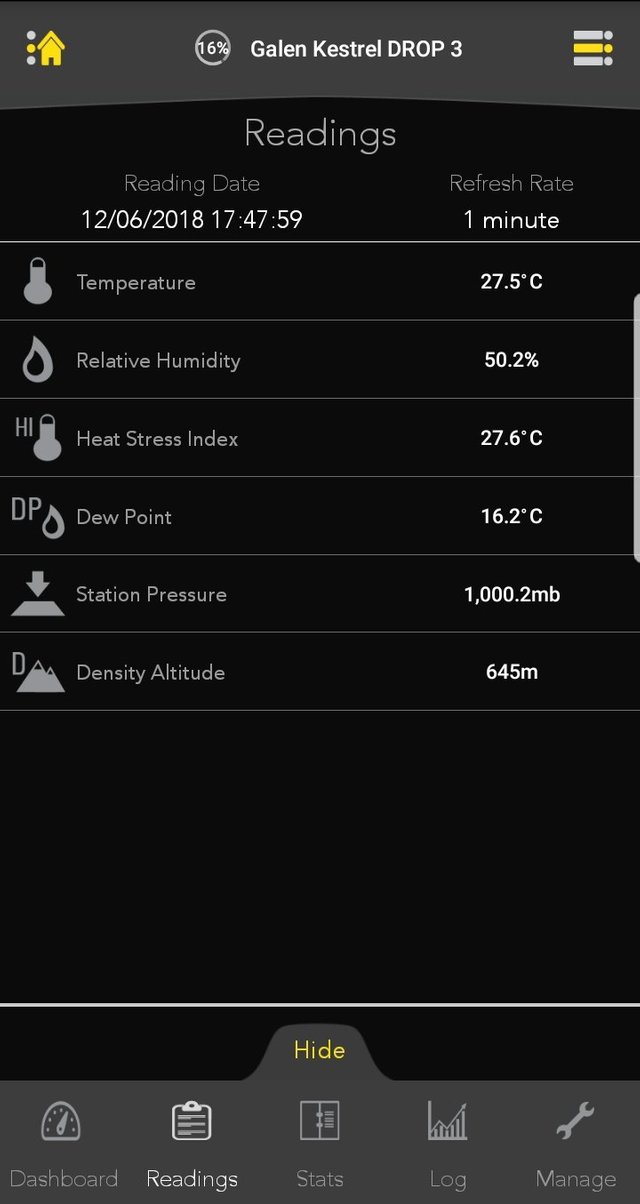
I use a device to measure and report this via bluetooth to my ballistics calculator. It's called a Drop3 made by Kestrel. It hangs on my back pack and takes a reading every 1 minute or so. Below is a snapshot of one of its screens showing some of the readings it takes.
You'll note there's a measurement at the bottom of the list called Density Altitude (DA) which is a measurement drawn from a complicated calculation of altitude, temperature and humidity all rolled into a single figure for ease of use. The software does this calculation. It means I only need to input the DA reading into my ballistics calculator and not all three.
Below you can see a reading of 645m DA.
This is a reading from inside my house because that's where I am currently. What it means is that if I was shooting right now the atmosphere here is the same as me shooting at an altitude of 645m.
Keep in mind that the higher the altitude the less elevation input is required as the air is thinner up high and drags the on the bullet less. At sea level the atmosphere is more dense (heavier as such) and more elevation would be needed for the same shot.
Keep in mind I could be shooting at sea level with a DA of 645m or way more...It depends on the other environmental factors combined as well. I have seen DA readings of minus 250m also. It's an atmospheric reading not an actual altitude reading.
Knowing the correct density altitude reading is critical to knowing how to adjust the shot to impact the target.
Azimuth/Coriolis/Latitude
This is pretty much the direction on the compass at which the shot is being taken; The location on the earth. It's important to know because as we all know the earth rotates west to east so...
Imagine me shooting towards the east (i.e. the west is at my back.) The earth is therefore moving the target away from me. If shooting at long range, say 1000m, the bullet will hit low, or may miss altogether if it's not accounted for. It could possibly hit high also, but let's not get too complicated. So, in this case additional elevation is required.
If I was shooting to the north (south at my back), the target is moving away from my bullet to the right (east). Make sense? In this case I would need to aim further right to make sure the bullet meets the target when the bullet gets to it. It gets even more tricky when the target is indeed moving in a different direction as well, say like a vehicle for instance. Can you see how it's get sort of complicated?
Spin drift
This is essentially the bullet drifting one way or the other depending on which way the barrel of the rifle twists - Sort of.
This is why that metric needs to be put into the calculator in the first place (barrel twist I mean). Right-twist means the bullet spins left to right for instance.
This will mean the bullet has slightly more surface area on the left as the bullet comes out of the muzzle (hole in the end of the barrel) pointing very, very, slightly up and to the right. That additional surface area on the left of the bullet catches more atmosphere and therefore the bullet is pushed to the right slightly.
OK, so there are other factors that go towards making a good shot, but these are the main ones and I don't want to get too complicated. I hope you're with me still however I assume no one will read this post all the way through and most have probably tuned out already. I'll plow on nonetheless.
Ballistics calculator
I mentioned a ballistics calculator earlier. It's a device that brings all the factors together, all the details about the bullet weight and length and the rifle and scope details; Muzzle velocity, scope height (from the centre of the barrel), offset, reticle type (reticle is the cross hairs in the scope) and so on. Loads of data! I use an App called StrelokPro available from the AppStore for Apple and Play Store for Android. There are others which I have used, but I like this one a lot.
StrelokPro sits on my Samsung S9 and, when I ask it to do so, will connect via bluetooth to the Kestrel D3 and pick up the environmental data it requires.
Below you can see a screen from StrelokPro, once connected to the Kestrel D3. Once I click the use these values tab it saves them to the ballistic calculator for use. In the field I would update every 30 minutes or so for the latest data and to account for shifting weather conditions.
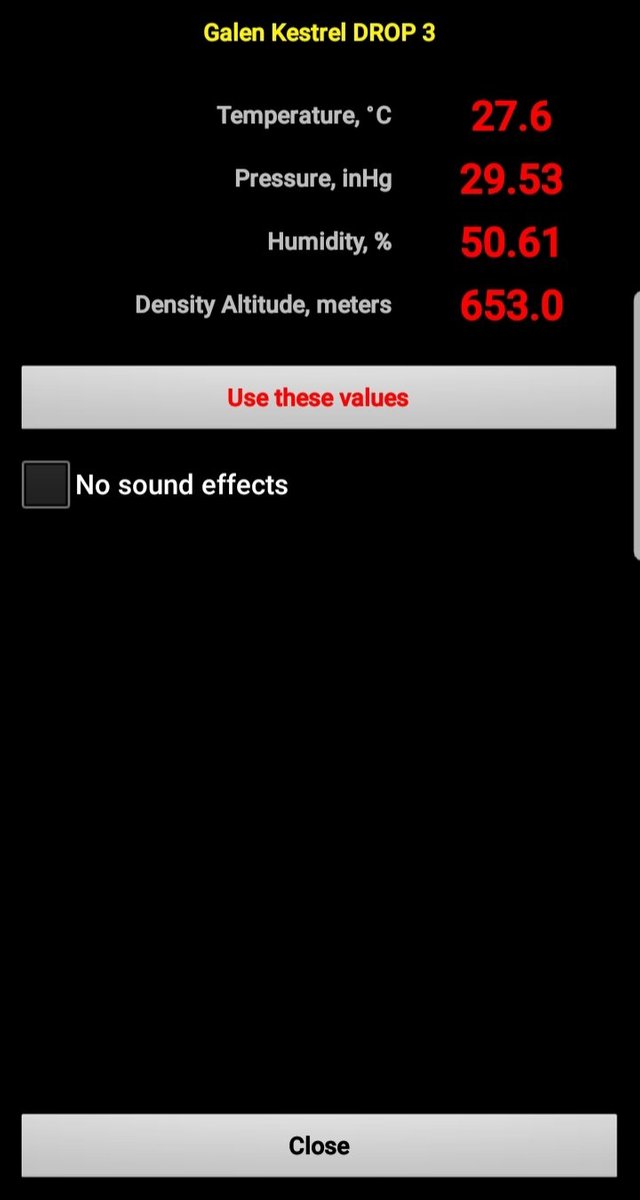
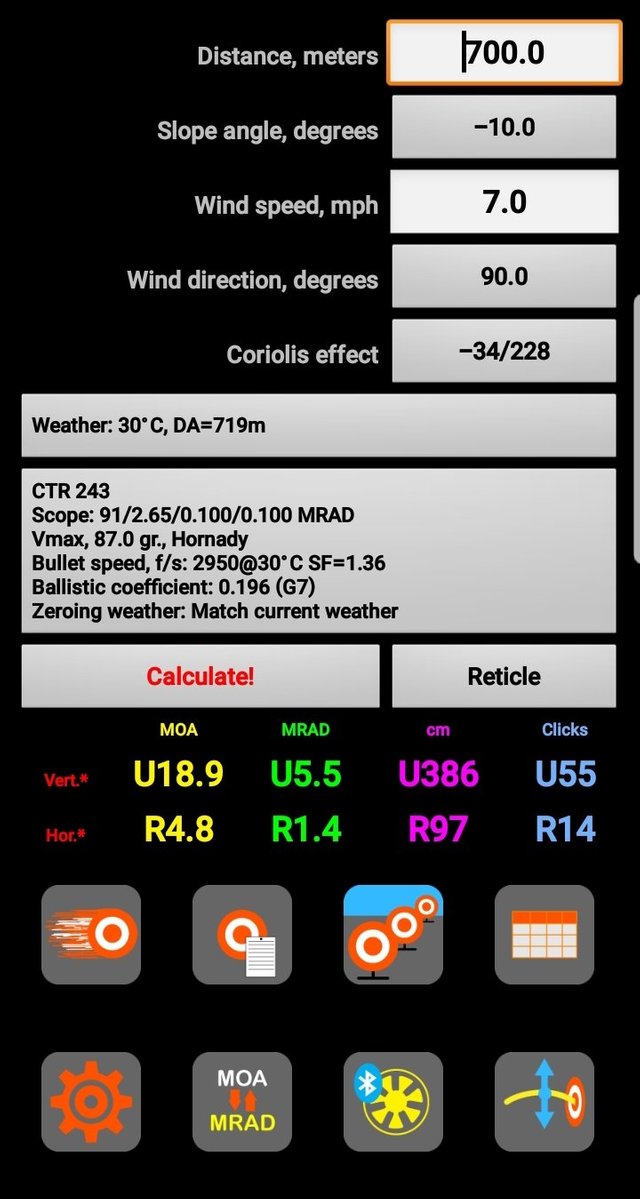
Once the data is imported I can start to input other data. Remember, the rifle and bullet data is already saved in there as a rifle profile. Prior to putting any other information I simply select the rifle profile (weapon system) I am using at the time. You can see some of the rifle/bullet details in the white box in the middle of the image below.
You will also see other white fields to the right of screen. In there you can see I have set 700m as the range, -10.0 as the slope angle (I'll talk about this later), 7mph as the wind speed, 90 degrees (full-value) as the wind direction and the Coriolis effect below which is taken from the phones' GPS. (Note: Full-value simply refers to a 90 degree wind having the maximum effect on windage.)
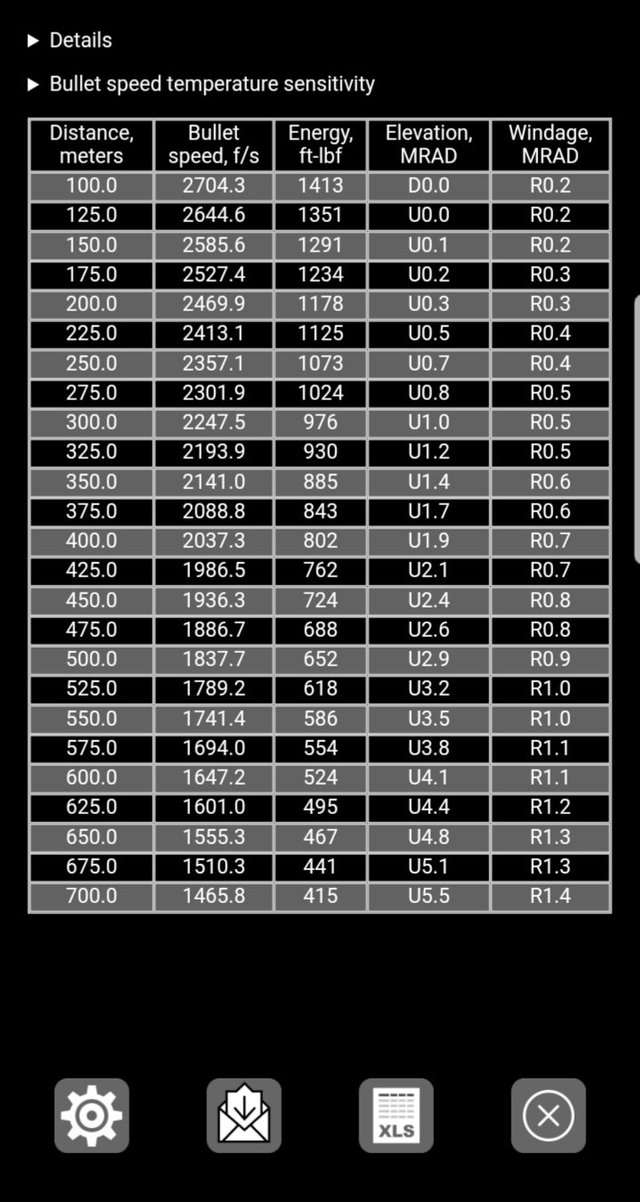
You'll also see some coloured numbers below. That is actually the field firing solution (FFS) for the 700m range. It's shown in MOA, MRAD, CM and CLICKS. I use MRAD on my scopes and so that's the relevant numbers for me - Up 5.5 and right 1.4 MRAD in green.
I actually don't use those figures though. I press the table icon in the lower right of the screen and it brings up a table with many field firing solutions. This will be demonstrated later below.
So, picking up on that table as below, you can see solutions that factor in all of the data I have inserted to the calculator, in 25m increments. The reason I do this is so that in the field I can very quickly refer to it and dial in the appropriate adjustments to the scope no matter what range the target is.
For instance I can take a shot at 700m dialling in 5.5MRAD of elevation and then one at 425M by dialling back to 2.1MRAD. It allows for faster shooting. (Note: I'll not explain the difference between MOA and MRAD in this post, it's too complicated and would make the post way too long. This is already 3100 words long.)
In this table you'll also note bullet speed and energy figures listed. This is important to know so that a shot isn't taken at a target that would not deliver an instant kill due to lack of energy. That would be cruel in a hunting or culling scenario. The higher the energy figure the more energy is imparted into the target. Of course, in a military situation this may not be considered because most often wounding is as effective, or more effective, than killing. But this post isn't about military shooting despite the principles being the same.
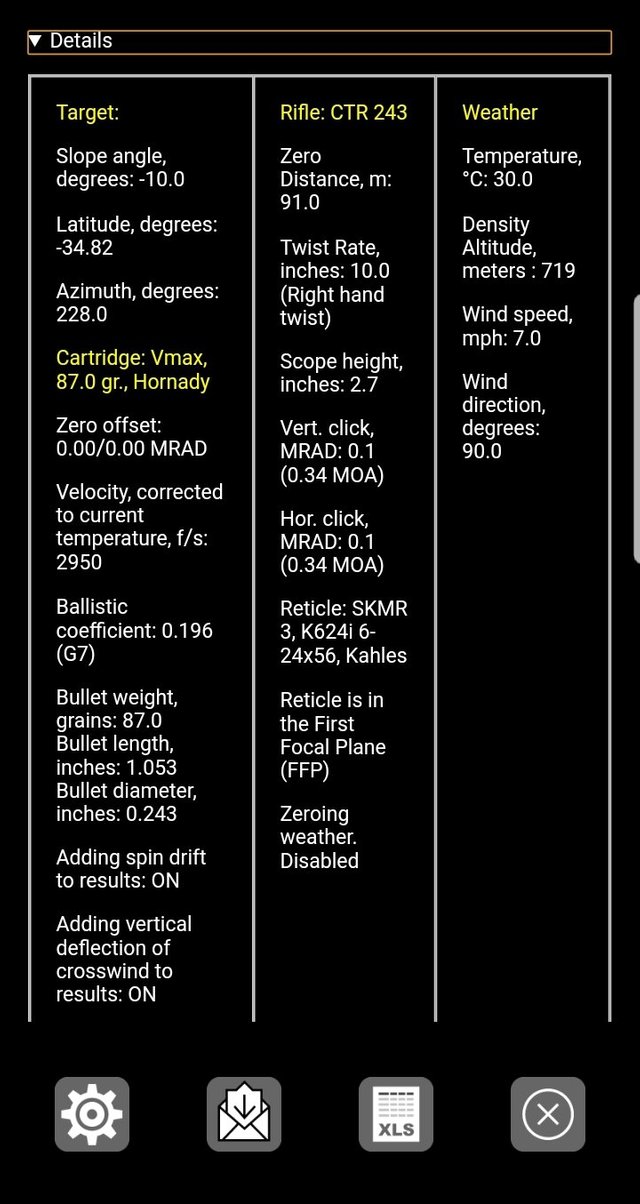
There is a screen that allows me to see all the details in a chart which you can see below. The chart outlines every detail relevant to the table above and factored into the FFS (Field firing solution.)
You can see the target, cartridge, rifle and weather detail shown. I generally wouldn't look at this information in the field but I may screen capture it for reference. I actually record every shot for future use. It's called DOPE, data of previous engagement, and can be useful in the advent of my phone battery dying. I could use a manual DOPE chart based on the environmental conditions and known data from previous engagements in similar conditions. I do this in competitions for very fast shooting sequences and in the field also at times depending on the situation and range.
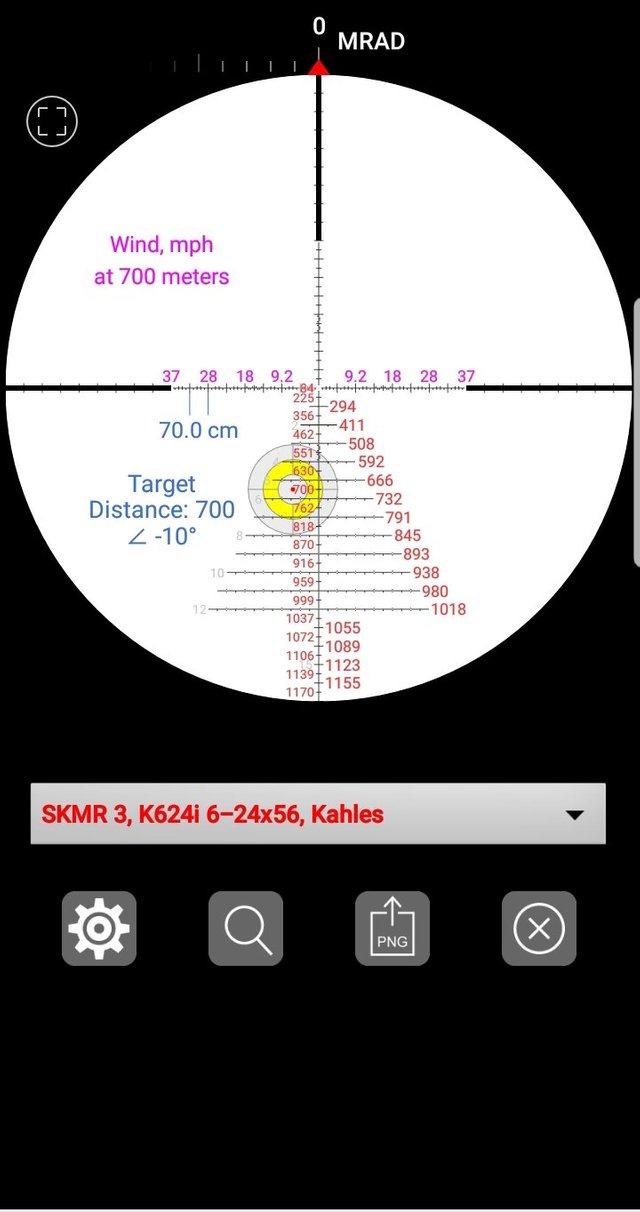
The below screen is not one I use much. It shows an image of the actual reticle (crosshairs thing) inside my scope. This is what I see when I look through the scope essentially. Obviously I'd see a picture of the scenery too, not the white background. All I would see is the black crosshairs also, not the red, blue or pink/purple numbers and words.
The red numbers show the hold-overs I would use should I decide not to dial in the windage and elevation to the actual scope turrets. Like I said, I don't use it although knowing how to use it is important in the advent of me having to do so.
If you are wondering, the scope is a Kahles 624i(6-24x56) with the SKMR3 reticle.
Ok, so I assume no one is reading this by now...But I'll go on because I want to...And can. Maybe I could direct someone here who asks the same question in the future.
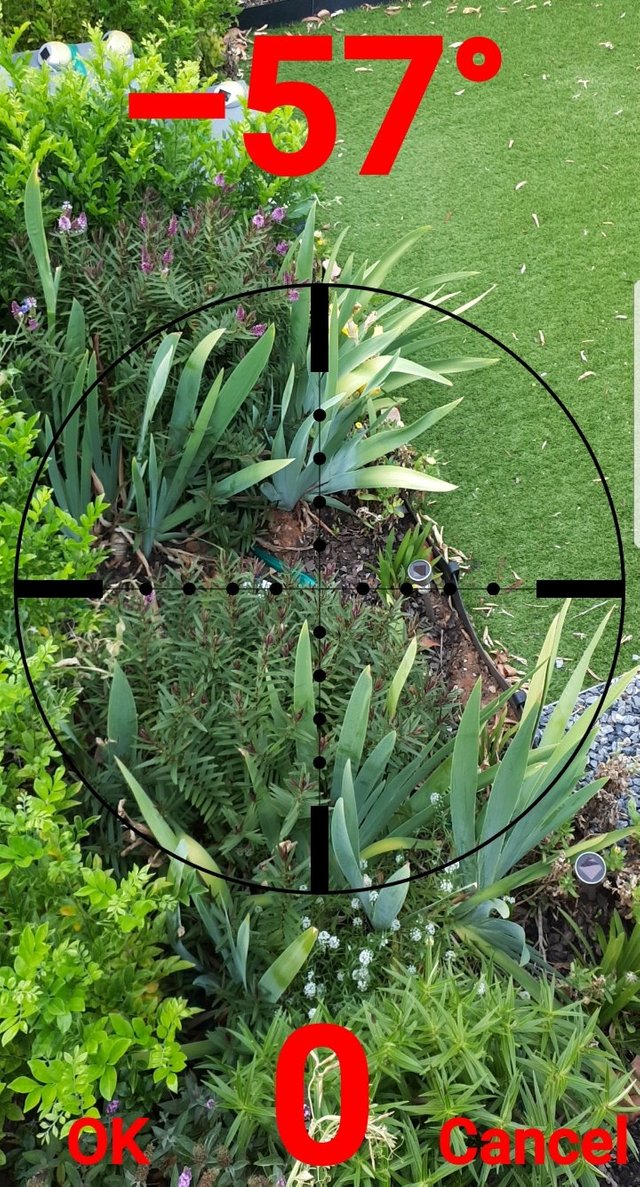
I mentioned slope angle earlier. What this means is the angle at which I'm taking the shot. If I was shooting from a ridge-top down into a ravine, for instance, the angle would change the elevation required. This is an important feature and the App has a cool way of obtaining the angle in degrees.
It has a screen which utilises the phone's camera and has a crosshairs overlaid on the screen. I simply point the crosshairs at the target and press OK to save the angle for use. That angle then get's factored into the FFS.
You can see this below done in my back yard. You'll see an angle of minus 57 degrees. (-57).
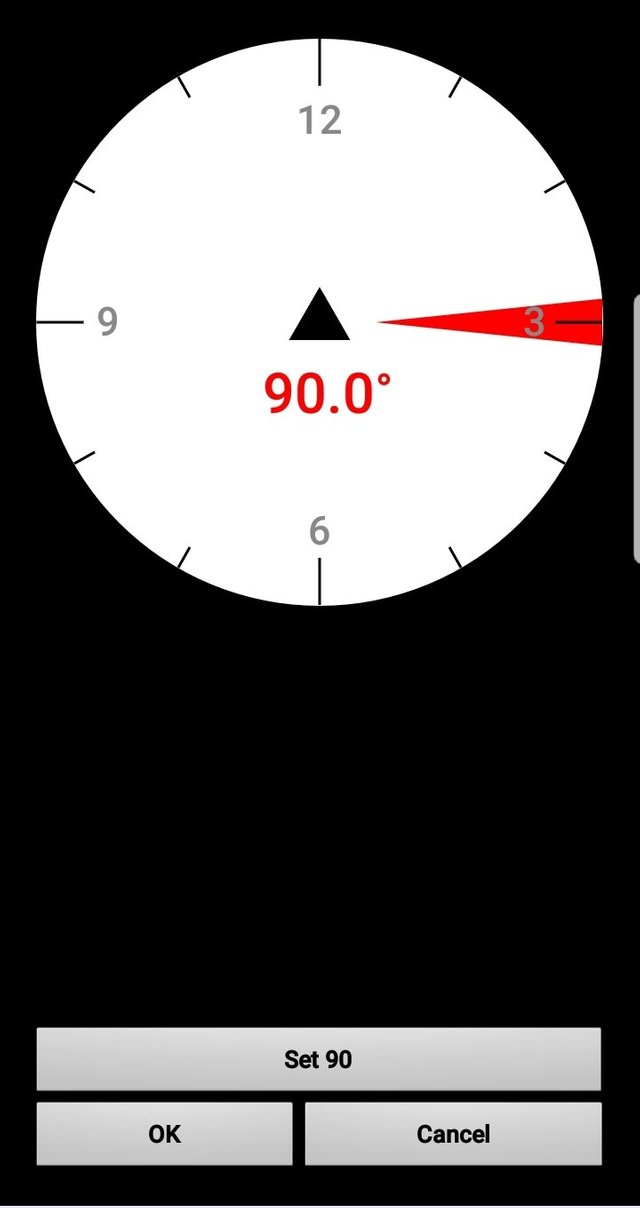
In addition to this, the wind angle needs to be plugged in. I can either type it or use the dial as below which is in fact what I do as it's easier.
Wind direction has different effects depending on the actual direction it comes from, basically, as below.
- 90 degrees: 100% effect (full-value)
- 45 degrees: about 50%
- 0 degrees: 0%
And as numbers on a clock face:
- 3 and 9 o'clock 100% full value
- 2, 4, 8, 10 o' clock 86%
- 1, 5, 7, 11 o' clock 50%
- 6 and 12 o' clock 0%
The ballistics calculator applies the right mathematics depending on the wind angle, and other factors of course. I also know how to work out the windage call in my head but the further the range the more inaccurate I get. I use simple formulas that only work out to about 650-700m or so.
Once the FFS (field firing solution) is available the input can be made and the shot taken. Sometimes, if time permits, I will dial it into the scope. Dialling elevation moves the crosshairs up so when I shoot at the centre crosshair the gun is actually shooting higher. Moving it left or right has the same effect but for the windage.
I also hold-over which I mentioned above. This means I use the little marks (hash marks) that appear on the main crosshair to hold the appropriate adjustment. In this case I would not be shooting at the centre of the cross hairs. I usually hold-over for windage and dial elevation if time permits. In a competition when time is a factor and there's multiple targets and ranges I would hold-over for elevation and windage. If a very long shot I would dial though.
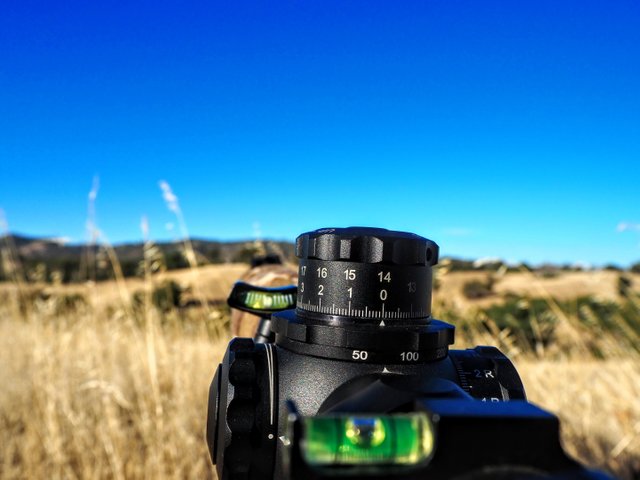
Below is an image of my actual scope. You can see it is currently on zero elevation. Each of those little marks move the scope 1/10th so 10 clicks equals 1MRAD. You can see the 1 marked there. Above the zero you can see 14 but the scope actually goes to 26MRAD. That means the scope goes around to 26MRAD in elevation. That's enough to dial out to over 1600m of range with the calibre and projectile I'm using.
The windage dial works the same but doesn't go as high. The horizontal dial below the elevation turret that has the 50 and 100 on it is actually the parallax dial, also essential to every shot.
Parallax is the displacement/difference in the apparent position of an object viewed along two different lines of sight. This dial removes (rectifies) it so that what I point the cross hairs at, and what my eye sees, is actually in the position I see it in. Critical. If parallax is out so will the shot be. It is adjusted depending on the range being shot, out to infinity.
The ballistics calculator is an integral part of the long-range process and really is a powerful tool. It does much more than I have explained here however essentially is designed to provide an FFS to assist the shooter. These systems are used in civilian and military applications. This system allows me to load multiple rifle profiles, back them up to Dropbox and download them at will. Sure, I can do without it to some degree however to shoot at long ranges it is as critical as the rifle itself.
Quite obviously there's a lot involved with making accurate shots, some of which I have touched on in this post. I know no one is actually reading this by now, so I could say anything I want however for me I like writing these sort of posts. It sort of reminds me how much I know and have acquired over my years of shooting. Sure, maybe these skills aren't transferable into mainstream society however I have them and that's what counts.
To shoot well a person needs to know a lot of things and bring them all together in that one smooth squeeze on the trigger that sends the projectile downrange to meet its target. This post touches on some of them and within that some there are other things as well. I also make my own ammunition which is a whole other thing again, just as complex, and quite critical to repeatable accuracy.
I sometimes get called a redneck (sometimes in jest) for being a shooter. I get called cruel for culling animals or hunting too. I have also been called ignorant for my hobby because it involves guns but it don't mean nothin'; I just roll on and do what I do.
I am not cruel nor ignorant of course but trying to change someone's perception about my hobby, or guns, is a waste of my life. I just focus on my hobbies, those people I value and to designing and creating my ideal life. Shooting is a part of that life and so I put effort into it. I apply effort into everything I do really, why wouldn't I? I'm proud of what I have learned and achieved in shooting, just as much as I am of other achievements in my life...But you'll never know because you stopped reading way back up at the top.
Tomorrow isn't promised - Design and create your ideal life, don't live it by default
An original post written by a human
Discord: galenkp#9209 🇦🇺
This is a reworked post from a couple years ago. I've added several hundred words to total 3296, changed some images and sharpened it up for @nonameslefttouse #showcase-sunday concept.
I did read the whole post and often thought the way TV and Movies describe it is way to simplistic.
Thanks mate, it's 3200 words so I wouldn't be surprised if people skim. I write it for myself anyway.
Yes, it's such a complicated thing it's difficult to sum it up in a TV show or movie. I've only touched on a few concepts here but hoped to lay it out quite clearly in a way people could follow.
Long range shooting brings a lot of elements together and I've written about most over the time. Even the ammunition used makes a big didference; I make my own which brings better accuracy and repeatability and just that element can become complicated to explain.
Many parts come together to get a projectile down range accurately and I find it all really interesting. If it was simply pointing a gun and pulling a trigger then everyone could do it...But it's not. I'm pleased to have these skills, proud of them.
Thanks for commenting, I really appreciate it...And you reading it all too mate. Good work!
!ENGAGE 25
@mytechtrail you have received
25 ENGAGEfrom @galenkp!View and trade the tokens on Steem Engine.
wow, there is a whole lot to it huh? I have only ever shot clay pigeons and that was a lot of fun but I would say it was significantly less complicated because we had to just be aimed in its general quadrant to at least "wing" it.
Hi there, yes there's quite a lot involved with long range shooting. I guess it's like anything, really. Shotgunning for clays isn't quite as complicated although there's certainly skill involved there too; A person will do a whole lot of missing if some of the elements aren't applied. I wrote a post about it a few posts back in The PEW. (Shot gunning for clays, I mean.)
Thanks for replying, and taking the time to have a look at my post in the first place.
!ENGAGE 25
@sports.guy55 you have received
25 ENGAGEfrom @galenkp!View and trade the tokens on Steem Engine.
Kestrel eh!
This is an awesome post mate. It's a total top donk in depth guide into the long range shooting malarkey.
I knew it already because of the black ops, but we don't talk about that. :0D
Thanks mate.
People see me shoot and figure it's a simple matter of pointing and pulling the trigger but in reality it's far more scientific than that. This post introduces some of the concepts. It's far more complicated in real life of course and there's a lot of other elements to it...But of course your black ops deployments would mean you're all over it. What happens on black ops deployments stays on black ops deployments though, right? Lol.
Thanks for commenting Boom.
!ENGAGE30
I read all the way through :)
Thanks for the deep dive. Is there an appreciable reduction in the effect of gravity at higher altitude or does altitude really only affect air pressure?
That's a legit question.
As far as I know, gravity, the effects of it, remain the same at greater altitude, at least until one gets into space, but shooting in space brings issues all of it own of course, just ask Han Solo.
The air is thinner up high though and so less elevation input will be required as discussed in the post. That's the beauty of the density altitude measurement...It represents conditions with humidity and temperature co-factored with altitude leaving the shooter only one figure (DA).
To my knowledge physical altitude does not affect the force of gravity, but will greatly affect the shot in other ways.
I just ran some figures on StrelokPro for you...Same everything, only changed the density altitude. as you can see. Look at the elevation dial in MRAD.
700m range, DA-250: U6.3MRAD
700m range, DA 200m: U6.1MRAD
700m range, DA 1250m: U5.6MRAD
700m range, DA 2500m: U5.2MRAD
These figures are obviously for the particular rifle system, calibre and load I have worked up for it, but tells the story. Not adjusting elevation dial (or hold) at that range will mean a miss, quite clearly.
I know clocks run slightly faster at extreme elevation, than those at sea level; due to reduced gravitational pull. I think that's more at an atomic level and over a longer period, than something that would affect a bullet over less than a second in the air.
It's really interesting I think and something I would love to test first-hand. The highest I've shot, in actual physical elevation, is around 1200m above sea level but I've seen density altitudes of far more than that. It would be fun doing physical tests, although my ballistic and mathematical skills only go so far, and so I have to rely on other people's DOPE.
I didn't know about the clocks. I mean if one gets high enough then gravity will be less obviously, as atmosphere changes to space...But I'm not sure at what altitude the effect takes place...And if a person could physically shoot at that altitude anyway? I think at about 10,000m alt, the ambient temp is around -50°C.
Enjoyed every word (read your 'e-book', LOL), keep it up! Sharing.
Found an interesting .308 ballistic point:
https://www.federalpremium.com/reloading/bullets/terminal-ascent-component-bullet/11-PB308TA1.html
In mine it will make about 2500 fps. The Ballistic Coeficient is .520, on a 175 grain point; with impressive expansion.
I bought the calculator, but I am still working to download it. The Kestrel will be my next purchase, once I get the ballistic calculator running.
:)>Thanks for the link, I'll have a look. I don't have a .308 anymore but I like to keep up with what's going on around the place. It will be interesting to see how you go with the polymer point. I tried them in my .308 a while back but got better performance from the 155gr. scenar.
There's different Kestrels but after using the 5700 for a long time I settled for the much cheaper Drop (D3). Does what I need it to.
It is advertising, but these tips are supposed to be stable until they impact. I have several .308's but it should load into my 300 win mag, That is my goal. I don't know how fast a 155 gr would be out of that tube....
I looked up the D3, following your recommendations! Besides, cheaper sounds better, LOL.
I just bought a 4 WD farm vehicle for the homestead, so I will need to build back up my mad money.
:)>For me the D3 works fine as all I really need is the DA reading. I know the 5700 does way more but it is stuff I'm not really that interested in. The worst case scenario is that the D3 doesn't work for you and you pass that on to your son and get the more expensive unit. I think you'll be happy with D3 though.
Save up your penny's mate, get it when you can. (The 4x4 is a buggy?)
Yes, a two seater with a dump bed; for moving dirt for the Wallipini on the homestead. To save my back, LOL!
If the D3 works for you, I bet it will work just fine for me too. But he would love it if I passed it on.
:)>lol...ignorant redneck! That's the highest compliment coming from those people. Excellent tutorial sir galenkp, how long did it take you to put this together?
Thanks mate. Umm, this took about an hour to write then about 25-40 minutes to proof read, clean up etc. It's not one for everyone I guess, but I figured a few may be interested enough to skim-read it.
It's a masterpiece and you doing it in an hour just confirms that you're a writing machine! lol.
It's just a matter of typing, all of the information is in my head. I'd not call it a masterpiece but appreciate the sentiment.
Ok I'll give you that but for just spending an hour on it I think it's amazing. lol.