Programming in Arduino Uno: Introduction using an example of reading an analog port and digital output.
What Will I Learn?
The user will learn:
Know the tools offered by the Arduino programming platform.
Carry out the first project with an example of reading analog value and writing in a digital port.
Establish communication with the serial monitor with specific functions.
Requirements
Install the Arduino software.
Have the Arduino Uno card.
Basic knowledge of programming.
Difficulty
- Basic
Tutorial Contents
Greetings, this is a contribution from @gasuba to Utopian. For this opportunity I want to introduce you to the tools that the Arduino program offers, for the different applications that are required. In this tutorial, an example will be used to familiarize the user with the software and hardware offered by Arduino. The following steps describe the sequence to carry out the first project:
Step 1.
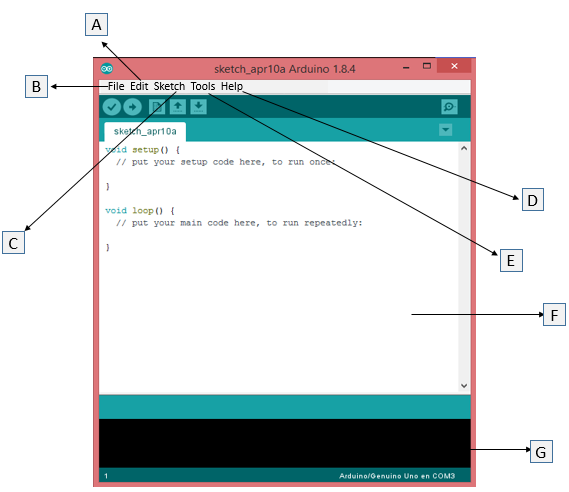
The main window for programming the cards of the Arduino family is shown below with the description of each of its parts:
A: It allows editing the program when it refers to the way of presenting it and some tools to paste copy HTML code among others.
B: You will find the functions such as opening, saving and closing a project, as well as opening some examples that this platform brings by default and which can be of great help to the user such as: analog, digital ports, communication, sens management control, technology GSM, SD among others.
C: Check and compile the program to be able to record it to the Arduino platform, it allows to include already established libraries and to be able to import another library in the add library option.
D: It offers a help menu for any concern that may arise to the user when programming.
E: It allows to select the Arduino board that we are going to work, according to the platform that is available.
F:Arduino IDE for the programming of the platform.
G: Error generator or satisfactory code. Here it is important to observe the message in order to compile and record our program to the card.
You can download Arduino: Arduino
Step 2.
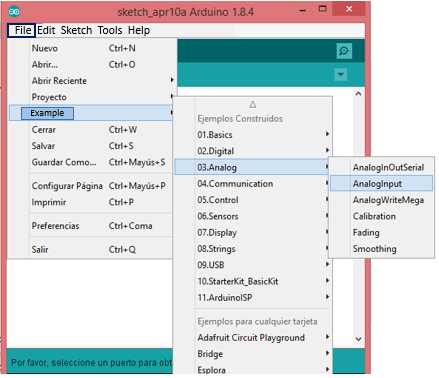
To start our first project, we can think of some application that allows us to read an analog port of Arduino. First we open Sketch of Arduino and we are located in literal B of the previous figure and we select in the option Analog-AnalogInput examples, as shown in the following figure:
Step 3.
In our project we will use the Arduino Uno platform, we will read an analogous port of the Arduino Uno, but before we will see the available pins of the card, to decide which pins we want to program, both to read and to write in the ports:
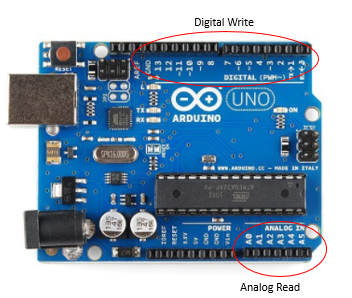
In the Analog Port we will choose pin A2 to read, then we establish a condition to activate or deactivate the output port. Finally, the values read from the analog port will be shown on the serial monitor:

Step 4.
We declare the input variables (floating) and Arduino output (integer):
float PinA = A2;
int PinD=7;
Step 5.
We declare an auxiliary variable to assign the value that will be read by port A2:
float Value;
Step 6.
We declare ports as inputs and outputs. We must do this inside the void setup function. The pinMode function is used to assign each port as input or output. To establish the communication of the serial monitor we place Serial.begin (transmission speed).
void setup() {
  pinMode (PinD, OUTPUT);
  Serial.begin (9600);
}
Step 7.
Within the void loop function, we program all those actions that we want the Arduino platform to perform. First of all you want to read the analog port A2, for this the function analogRead (Port you want to read) is used. To observe the values of the analog port in the serial monitor, we place the function Serial.println (analogous variable that we want to see), this is done within the void loop ():
 void loop() {
Value = analogRead (PinA);
Serial.println(Value);
}
Step 8
Then we establish a condition to activate the output port, in this case it will be that the values read by the analog signal are less than 1. To perform this step we require the function: digital Write (). We set a delay time to give the opportunity to change the state of the output signal. The code shown below is included within the void loop ():
if(Value<1){
digitalWrite (PinD, HIGH);
delay (250);
}
else{
digitalWrite (PinD, LOW);
delay (250);
}
Step 9.
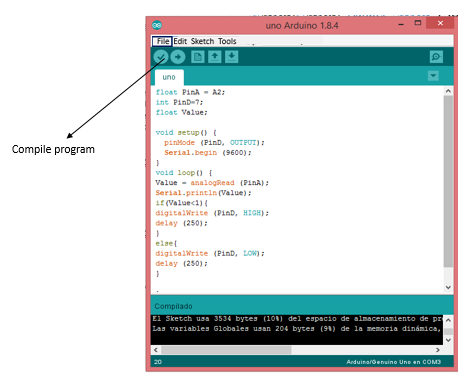
To finish we observe all the code in the programming sketch and press compile the program. We observe the error generator and observe that the message is of satisfactory code, as shown in the following figure:
Step 10.
We select the card we have available, in this case Arduino Uno, observe the following figure:
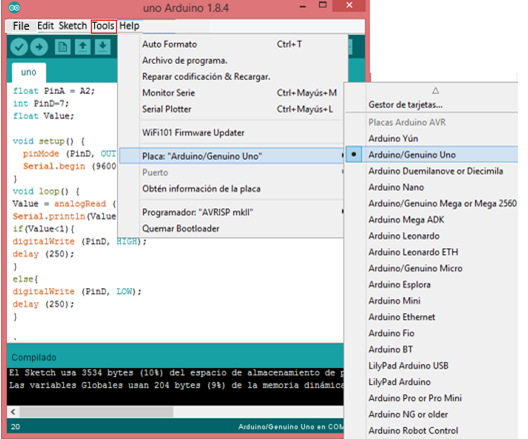
We select the communication port of the Arduino Uno card, located in Tools-Port.
Thank you for your time and attention ... I hope this tutorial is of great help to you ... See you in the next tutorial.
Posted on Utopian.io - Rewarding Open Source Contributors
Mi apoyo desde el TopFive #Steemfamily
Hola.. te dejo mi apoyo por formar parte del top5 de #Steemfamilyhi
Saludos!!
Need help? Write a ticket on https://support.utopian.io.
Chat with us on Discord.
[utopian-moderator]
Mi apoyo Top Five #steemfamilyhi ;)
Buen post, @gasuba, saludos

apoyada desde #steemfamilyhi
( )
)
Este post es apoyado por el trial de steemfamilyhi
#jga #angeluswins #uniazul #hendersonp
Si quieres unirte al trial búscanos en steemauto / curation trial ----- steemfamilyhi
Mi apoyo #topfive #steemfamilyhi
Congratulations! This post has been upvoted from the communal account, @minnowsupport, by gasuba from the Minnow Support Project. It's a witness project run by aggroed, ausbitbank, teamsteem, theprophet0, someguy123, neoxian, followbtcnews, and netuoso. The goal is to help Steemit grow by supporting Minnows. Please find us at the Peace, Abundance, and Liberty Network (PALnet) Discord Channel. It's a completely public and open space to all members of the Steemit community who voluntarily choose to be there.
If you would like to delegate to the Minnow Support Project you can do so by clicking on the following links: 50SP, 100SP, 250SP, 500SP, 1000SP, 5000SP.
Be sure to leave at least 50SP undelegated on your account.
Apoyandote desde el top 5 de #steemfamilyhi