MY BLOG : Animals and Wildlife Photography تصوير الحياة البرية و الحيوانات
Hello stemian
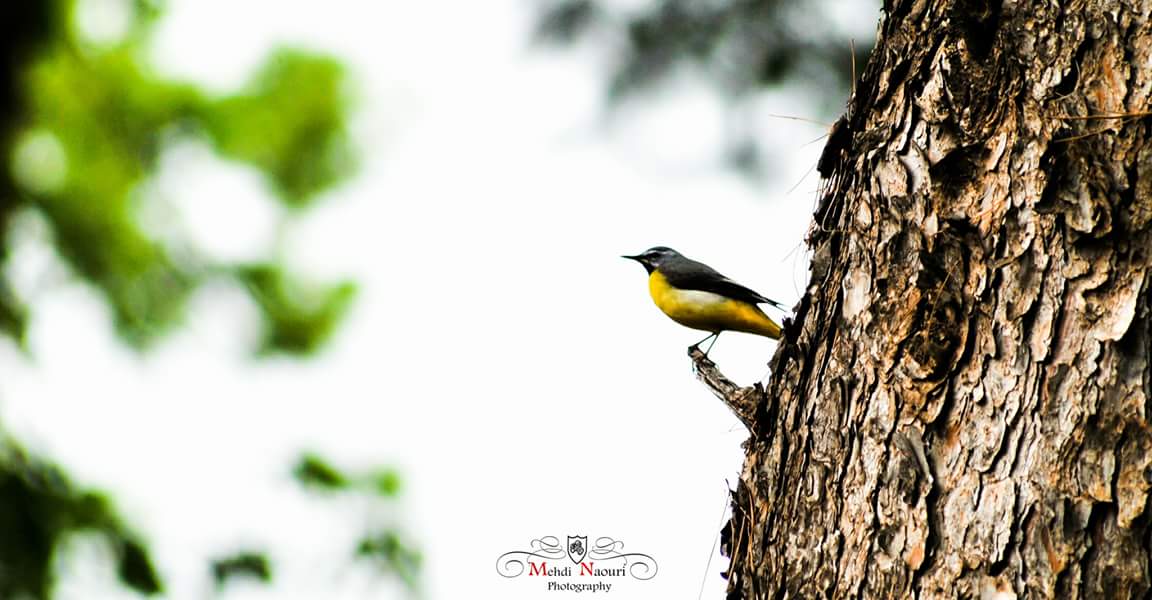
Photography of wildlife and animals is very similar to sports photography animals can not predict the movement and be relatively distant and we look at when shooting animals on the shot and the right angle of photography. So you have to take many pictures and work to capture good moments by waiting and watching the animal.
Tools needed
When filming animals you will need Telephoto lens for approximation. Because you can not get close to the animal. In case you will be photographed in the public park maybe 70-200mm lens will meet the purpose. If you shoot birds or distant animals in the prairie, you will need a lens that is about as large as 400 mm or more.
When shooting animals, you will not be able to use lighting tools. In the event of low light conditions or if you want to isolate the background behind the animal, you will need to use the largest possible lens aperture.
Configure the image
Animal photography is very similar to sports photography. Animals can not be predicted to be relatively distant. So you have to take many pictures and work to capture good moments by waiting and watching the animal. As an example when a bird is caught on a fish.
Make sure that the eyes of the animal appear in the picture because the eyes give the spirit of the picture and that the sunlight is on the face of the animal and that the backlighting is not greater than the lighting of the animal.
Use Zoom to exclude unwanted elements from the image frame and to limit the scene to the image's target. Consider using the rules of composition such as the principle of vacuum or triangulation or filling the frame as possible.
Adjust the settings
If you are shooting a lot of animals like birds, you should use shutter priority because you will not have time to change settings much. If the goal is to shoot the bird in the sky, for example, you should use a speed like 1/1000 and above. Here, too, you need to put the focus type on the mode that searches for movement because you will not be able to manually select the focus point. And also put the shutter to the continuous mode with the use of type Jpeg images to take as many images as possible to reach the required expressions.
If you want to shoot a bird on a branch of a tree or a sitting animal that does not move very much, in this case you need to isolate the background, so you should use the priority of the aperture and use a relatively narrow field depth.
Image processing

When you start the process, import the images into the Lite-Rom program and sort them out so that you can take into account the images that contain the distinctive shots and critical moments as an example when the bird hit the prey. And be careful to select images that contain the eyes that are visible and lit properly.
Adjust the Exposure light and remove lens errors, and then adjust the image configuration according to one of the configuration rules by cropping tool and adjusting the horizon.

السلام عليكم معشر الستيميت
اليوم سأتحدث لكم عن موضوع جديد و معلومات جديدة حول التصوير الفوتوغرافي :
تصوير الحياة البرية و الحيوانات يشبه بشكل كبير التصوير الرياضي فالحيوانات لا يمكن التنبؤ بحركتها و تكون بعيدة نسبياً و نبحث عند تصوير الحيوانات على اللقطة و الزاوية المناسبة للتصوير. لذلك عليك بأخذ العديد من الصور و العمل على اقتناص اللحظات الجيدة عن طريق الانتظار و مراقبة الحيوان.
الأدوات اللازمة
عند تصوير الحيوانات ستحتاج إلى عدسة تيليفوتو Telephoto من اجل التقريب. لأنك لن تستطيع الاقتراب من الحيوان. في حال كنت ستصور في الحديقة العامة ربما العدسة 70-200mm تفي بالغرض. أما في حال تصوير الطيور الطائرة أو الحيوانات البعيدة في البراري فإنك ستحتاج إلى عدسة خاصة بتقريب كبير مثل 400 mm أو اكثر.
لن تستطيع عند تصوير الحيوانات استعمال ادوات اضاءة لذلك في حال ظروف الاضاءة المنخفضة أو في حال الرغبة بعزل الخلفية خلف الحيوان ستحتاج إلى استعمال اكبر فتحة عدسة ممكنة.
تكوين الصورة
تصوير الحيوانات يشبه بشكل كبير التصوير الرياضي فالحيوانات لا يمكن التنبؤ بحركتها و تكون بعيدة نسبياً و نبحث عند تصوير الحيوانات على اللقطة و الزاوية المناسبة للتصوير. لذلك عليك بأخذ العديد من الصور و العمل على اقتناص اللحظات الجيدة عن طريق الانتظار و مراقبة الحيوان. كمثال عند انقضاض الطائر على سمكة.
احرص على ظهور اعين الحيوان في الصورة لأنه الاعين تعطي روح الصورة و أن تكون اضاءة الشمس تقع على وجه الحيوان و ان لا تكون اضاءة الخلفية اكبر من اضاءة الحيوان.
قم باستعمال الزوم لاستبعاد العناصر الغير مرغوب فيها من إطار الصورة و لحصر المشهد لهدف الصورة. و قم بأخذ بعين الاعتبار بتطبيق قواعد التكوين مثل مبدأ الفراغ أو قاعدة التثليث أو ملئ الاطار حسب الإمكان.
ضبط الاعدادات
في حال كنت تقوم بتصوير حيوانات كثيرة الحركة مثل الطيور فعليك استعمال افضلية الغالق shutter priority و ذلك لأنك لن تجد الوقت لتبديل الاعدادات كثيرا. اذا كان الهدف هو تصوير الطائر في السماء مثلا فعليك استعمال سرعة مثل 1/1000 فما فوق. و هنا ايضا عليك وضع نوع التحكم بالتركيز على الوضع الذي يبحث عن الحركة لأنك لن تستطيع تحديد نقطة التركيز يدوياً. و كذلك قم بوضع الغالق إلى الوضع المستمر مع استعمال نوع صور Jpeg حتى تأخذ اكبر عدد ممكن من الصور للوصول إلى التعابير المطلوبة.
أما إذا كنت ترغب بتصوير طائر على غصن شجرة أو حيوان جالس لا يتحرك كثيراً فإنك في هذه الحالة تحتاج إلى عزل الخلفية و لذلك عليك استعمال اولوية فتحة العدسة و استعمال عمق حقل ضيق نسبياً.
معالجة الصورة
عند بدء المعالجة قم باستيراد الصور إلى برنامج اللايت روم و فرزها بحيث الاخذ بعين الاعتبار الصور التي تحتوي على اللقطات المميزة و اللحظات الحاسمة كمثال عند انقضاض الطائر على فريسته. و احرص على انتقاء الصور التي تحتوي على العيون الظاهرة و المضاءة بالشكل الصحيح.
قم بضبط اضاءة الصورةExposure و ازالة اخطاء العدسة ثم قم بضبط تكوين الصورة حسب أحد قواعد التكوين عن طريق اداة القص Cropping و ضبط الافق.
شكرا على المشاركة الجميلة و الصور الاكثر من راءعة
أرى أنك بدأت تضيف لمسة من صورك لهذا المجتمع
مشاركة جميلة و معلومات اجمل