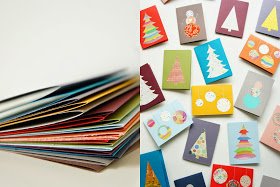
Winter congratulations + tutorial HANDMADE ! 🎅🎄🎁✉
This Christmas bustle and the winter holidays will swallow us. :) The world has no time to enjoy the smooth running of the seasons and the holidays. It was not good for October that the next holiday was on the list, although there are still a few weeks until then. As a conveyor we have to act. We are listening to Christmas music before the time (I, right now, but I will change the post, otherwise I risk boredom), we make the fir tree (here I have some patience, but the neighbors have already started the lights), we make plans for the few days off at the end of the year, we make too long lists of unnecessary gifts, we ruin our appetite and we scatter the aroma of Christmas once with plenty of oranges all around, and others like this. We send congratulations with warm thoughts to our loved ones.Well, the latter is approved, especially when they are made by hand, in the house and it's nice to be sent out in advance. So with this tutorial I'll be in the mood of preparations for Christmas.
I loved making congratulations when I was little. What I did not have was too many choices, so I was "forced" to be creative and to make them myself - of colored paper, petals and dry leaves, drawn with a pencil or a caricature and scissor-cut. But the most beautiful memory is that I enjoyed doing it, but then I read the smile of joy on the faces of those who received them. The times now allow you to choose from kind and kind of congratulations, which more beautiful, more colorful, more dirty, with the wishes already written on them. There are also the electronic ones, but the one sent by the postman seems to me a little more beautiful, though rarer today.
My desire to create my own congratulations to my loved ones came from the mix of childhood memories, the lack of time to cram the shelves of too busy stores during this period, the enthusiasm to create handmade things, but something else. The colorful touches of the little artist. In fact, the idea came to me when I scratched both white papers in watercolors. I almost instantly noticed that these greetings would come out with some kind of greeting cards. So in the next few days (ah, or even weeks, that we stretch our business) we go to work. I will describe the process in simple tutorial steps, for who knows, maybe I inspire you to be creative and to discover how easy (and perhaps even cheaper) it is to make your own congratulations. But you are free to play with other ideas, models.
Required:
• paper in various colors, these will actually be greeting cards
• thinner colored paper, painted in various colors (I used a dirty one, another one I painted in strips, another splashed), old magazine pages, books, newspapers or anything else (even family photos) that you want to make cuts
paper bonding agent
• a pencil, a line, a radius, some thin-topped carts
scissors
• optional: special paper knife, circle cutter, paper cutter, rubber holder
and more optional: needle in various colors, sewing machine
Dimensions of greetings are free choice. However, I did not want to waste the paper so I chose to split A4 sheets in two and create A6-sized greeting cards (A5 seemed too big). Depending on these dimensions, I also created the cutouts.
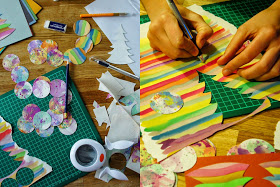
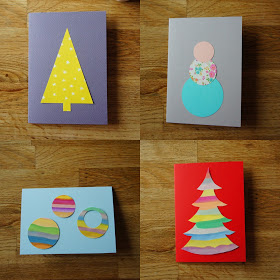
For cuts I've been thinking about some specific winter holidays - fir, globes and snowman. As firs we chose two patterns - one with branches, for which I made a hand print from a recycled cardboard and another more geometric, which I cut directly from the prepared sheets (here the paper knife helped me, but it's ok and scissors).
I then cut the shapes of pines and muuulte circles, of different sizes. Then I cut circles into circles. If the scratches in the image above make no sense, they, after the cuts, have even become beautiful and interesting. 
And the voila, now remains assembled. I've made the cuts and cartons come out exciting color combinations, a little contrasting and then I stick them.

Hmm, you say, since you have not sent a real congratulation? With a little bit of will and time, you can even create some very good ones to pleasantly surprise your loved ones. My instructions above are just an example, you do not have to follow them exactly, that's why I have not put the exact details, you will surely make some beautiful ones, because you will do it with your own hands, and that's already a thing to admire.
Congratulations!