Part 2: Deploying smart contracts in the Browser
The goal is to build out a mini Remix type tool that you can use to interact with your Ganache blockchain instance (formally TestRPC) using Web3JS and SolcJS to compile our solidity contracts. Part 1 is required in order to continue.

Prerequisites:
You should have a basic understanding of the Ethereum blockchain technologies and the programming language Solidity.
Tech Stack:
I'm using a Mac.
NodeJS — is a JavaScript runtime built on Chrome’s V8 JavaScript engine you’ll need at least version 6.9.1.
Ganache-cli— is a Node.js based Ethereum client for testing and development. It uses ethereumjs to simulate full client behavior and make developing Ethereum applications much faster. It also includes all popular RPC functions and features (like events) and can be run deterministically to make development a breeze.”
$ npm install --global ganache-cli
- In order for the snippets in this post to work, Part 1 should be completed.
Summary:
Part 1 gave us a basic understanding of how Solidity contracts are compiled. The EVM doesn’t translate solidity code as is, so we have to compile the solidity down to EVM bytecode, which gives us a bunch of information about the contract. There are two properties we need to deploy a contract. We used the SolcJS library to get these properties from our contract:
ABI — The Application Binary Interface is the standard way to interact with contracts in the Ethereum ecosystem, both from outside the blockchain and for contract-to-contract interaction.
Once we have these props we can deploy our contract. To deploy a contract, we must create a transaction. Lets explore what this means.
Getting Started:
Ganache CLI:
In our terminal, type the command ganache-cli -u 0. The command starts up the Ganache blockchain and unlocks the first account. We unlock the first account so we can sign transactions. After running the command your terminal will have the Ganache blockchain listening on port 8545:
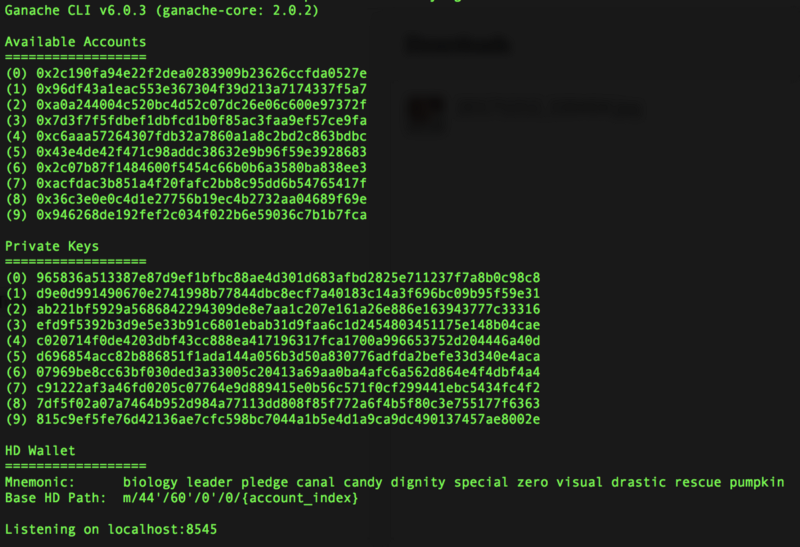
We have 1 wallet with 10 accounts. Each account has a balance of 100 ether each. There’s 10 private keys for our 10 accounts/addresses. There’s a mnemonic passphase for the wallet and the base hd path.
Web3JS:
We’re going to continue working in the index.js file that we started in part 1. At the very top of this file, place the snippet below:
if (typeof web3 !== 'undefined') {
  web3 = new Web3(web3.currentProvider)
} else {
  // set the provider you want from Web3.providers
  web3 = new Web3(new Web3.providers.HttpProvider("http://localhost:8545"))
}
Here we’re instantiating a web3 object that we’ll be using to deploy our contract. Web3js is a wrapper around the JSON-RPC protocol. Heres what the docs say:
“JSON-RPC is a stateless, light-weight remote procedure call (RPC) protocol. Primarily this specification defines several data structures and the rules around their processing. It is transport agnostic in that the concepts can be used within the same process, over sockets, over HTTP, or in many various message passing environments. It uses JSON (RFC 4627) as data format”. — Docs
Web3JS is going to allow us to interact with the blockchain (Ethereum node) from our web app. In our case, the Ganache blockchain. JSON-RPC uses a data type called JSON. It’s based on JavaScript objects in how its formatted (key/value pairs). Web3js is going to expect JSON and send JSON back to us from the Ganache blockchain formatted in a particular way.
Accounts:
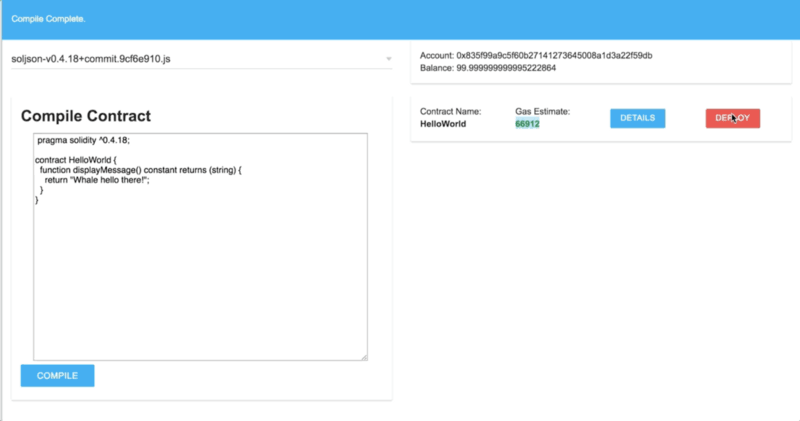
When deploying a contract it costs gas, but where does this gas come from? When deploying to the Ganache blockchain the gas that is consumed comes from the first account. You can use any one of the 10 accounts provided by the test chain, we’ll use the first. We’ll display the first account by its public hash and the balance.
<div class="mui-col-md-6">
  <div class="mui-panel">
    <div id="account-addresses"></div>
  </div>
</div>
Place this code snippet in the same container as the select menu. This will be our account address and balance container.
function getAccounts() {
  const ethAccount = web3.eth.accounts[0]

  return document
    .getElementById('account-addresses')
    .innerHTML = `<div>
        Account: ${ethAccount}
        <br />
        Balance: ${balanceInEth(ethAccount)}
      </div>
    `
}

function balanceInEth(address) {
  return web3.fromWei(web3.eth.getBalance(address).toString(), 'ether')
}
On Line 2 we get the first account from the accounts array that web3.eth returns from the blockchain. Once we have that we call web3.fromWei() which will turn the results of our web3.eth.getBalance(address) method, into its ether readable denomination, Wei with 18 zeros.
The last step here is to call the getAccounts() function in our window.onload method right before the BrowserSolc.getVersions(CALLBACK) function.
Contract Creation Transaction:
Before we deploy any contracts its important to understand what that means. When deploying Solidity contracts it costs gas and the Ethereum blockchain needs to keep track of who spending that gas to deploy that contract. The way to accomplish this is to create a transaction. Let see what are the parameters of a transaction call:
from: Is the person or key that is signing this transaction, its the users address hash.to: In our case this param is left blank because we’re creating a contract and not sending any ether.gas: The amount of gas that you’re willing to pay for the transaction/contract creation.data: This is going to be the bytecode of the contract we want to deploy.
We will be using the JSON-RPC call eth_sendTransaction through the web3js object.
To the Javascript
We’re going to add a deploy button right next to the details button when listing out compiled contracts:
function renderContractList() {
  const contractListContainer = document.getElementById('contract-list')
  const { contracts } = compiledContract

  Object.keys(contracts).forEach((contract, index) => {
    const label = `contract-id-${contract}-${Math.random()}`
    const gas = contracts[contract].gasEstimates.creation

    createContractInfo(gas, contract, label, function (el) {
      contractListContainer.appendChild(el)
      const btnContainer = document.getElementById(label)

      btnContainer.appendChild(
        buttonFactory('primary', contract, contracts[contract], 'details')
      )

      btnContainer.appendChild(
        buttonFactory('danger', contract, contracts[contract], 'deploy')
      )
    })
  })
}
Go ahead and replace the function with the same name with this modified version. It adds the DEPLOY button to our contract UI.
Recap of what this function does. The renderContractList function renders out all the contracts from the compiledContract global variable. The contracts are objects with each of those objects being a value with the contract name being the key.
To the Browser:

Now when you go back to the browser and re-compile the contract we used in part one, you’ll see a red DEPLOY button next to the blue DETAILS button. When we click the button we’ll get a prompt asking us “are you sure you want to deploy?”. If the user clicks yes, then we’ll deploy. Heres a contract if you need one to compile:
pragma solidity ^0.4.18;

contract HelloWorld {
  function displayMessage() constant returns (string) {
    return "Whale hello there!";
  }
}
Back to the index.js file:
function deployContractEvent(name, contract) {
  const comfirmMsg = `
    Contract: ${name.substring(1)}
    Network: ${currentNetwork()}
    Confirm to deploy with these settings.
  `
  if (!confirm(comfirmMsg)) return

  const { bytecode, interface } = contract
  const newContract = web3.eth.contract(JSON.parse(interface))
  const options = { from: web3.eth.accounts[0], data: bytecode, gas: 1000000 }

  newContract.new(options, newContractCallback(name))
}
The first step of the deploy feature is a function called deployContractEvent(contractName, contract). First the function asks you to confirm a contract deploy and shows you what network the contract will be deployed to.
function currentNetwork() {
  const network = web3.eth.getBlock(0).hash
  const main = '0xd4e56740f876aef8c010b86a40d5f56745a118d0906a34e69aec8c0db1cb8fa3'
  const test = '0x41941023680923e0fe4d74a34bdac8141f2540e3ae90623718e47d66d1ca4a2d'

  switch (network) {
    case main:
      return 'Main Net'
    case test:
      return 'Ropsten Network'
    default:
      return 'TestRPC Testnet'
  }
}
This is the function that will tell us what network our web3js object is interacting with. The only way to check the network/blockchain you’re on is to query the genesis block. There is a couple test ethereum blockchains out there, here we’re only checking for two (MainNet: (not a test network), Ropsten) or defaulting to our Ganache chain if the hashes don’t match up.
Back to our deployContractEvent function:
After we give the user a way to confirm if they want to deploy a contract, there are 3 variables declared:
bytecode: I mentioned in detail about the bytecode property in part 1, but the bytecode is going to be sent as the data field in a transaction.interface: Theinterfaceandabiare synonymous with each other. Theinterfaceis going to be used to create our contract, online 11we take thatinterfaceand pass it as a param to thecontract(JSON.parse(interface))method.newContract: This variable is the result of ourcontract(JSON.parse(interface))method call. Thecontract()method then returns an object with theeth,abi, andnewproperties.
On line 14 of the deployContractEvent code snippet we call the new method off of the newContract variable. This will create a transaction and deploy the contract to the blockchain. The new methods first param is the options object that is needed in order to create a transaction in the EVM:
from: I mentioned this property a bit earlier. We set this property toweb3.eth.accounts[0]which is the first account in theaccountsarray. This is the account that is going to spend thegasto deploy a contract.data: This is going to be the contract
bytecodewe want to deploy.gas: This is the
gaswe want to spend to deploy a contract.
The second param that the new method takes is a callback. This callback is going to return the deployed contract. Once we have this deployed contract we will want to render it. But we want some additional information before we do that. Lets take a look at how we do this.
new Contract Callback:
function newContractCallback(name) {
  return (err, contract) => {
    getAccounts()
    if (!err) {
      !contract.address
        ? status(`Deploying contract..`)
        : renderContract(contract, name)
    }
  }
}
The newContractCallback takes a param name. The name param is needed to render out the contract’s name. The newContractCallback returns a function that expects the params err and contract. The function that is returned is going to get fired twice:
The first time the function is called the contract has no address. It only has the transaction hash that’s creating thee contract. This is when the
status(MESSAGE)function is called.The second time it fires is when the contract is mined to the blockchain. When it’s mined the address of the contract is returned.
The contract param is the information about the contract that was deployed to the Ganache blockchain. We’ll pass contract variable to the renderContract function.
function renderContract(contract, contractName) {
  status(`Contract Deployed...`)
  const { transactionHash, address } = contract

  web3.eth.getTransaction(transactionHash, (err, transaction) => {
    if (!err) {
      const props = { ...transaction, ...contract, }
      const details = {
        blockNumber: transaction.blockNumber,
        contractName,
        address,
      }

      createContractPanel(details, panel => createContract(props, panel))
    }
  })
}
Above we call renderContract with two arguments, contract and contractName. On line 2 we call status(‘Contract Deployed.’) to update our ui about the recently deployed contract. On line 3 we take the transactionHash and address off of the contract object. Next we make another call to the blockchain, using the transactionHash, but this time we don’t create any transactions so the call is free. When we called the contract’s new method it returns the info about that contract from the blockchain. I want a little bit more info than that, so I query the entire transaction with web3.eth.getTransaction(HASH, CALLBACK).
Displaying the Contract and Transaction:
When the transaction returns, thats when we have all the data we’ll need to display about our contract and how it was created. If you remember part 1, we compiled our contract and that told us everything we needed to know about a contract before its deployed, now we have information we want to know after the contract is deployed. Lets take a look at that:
Contract Name: The name of the contract we deployed.
Block Number: The number of the block the transaction/contract creation was confirmed/mined in.
Contract Balance: The contracts ether balance if it has any.
Contract Address: This is where the contract is located at and it’s a hash that allows the contract to store ether inside of it.
Nonce: Nonce is apart of mining. Mining is the process of repeatedly aggregating transactions, constructing a block and trying different nonces until a nonce is found that satisfies the proof of work condition.
TransactionIndex: An integer of the transactions index position in the block.
Gas: This is gas provided by the sender.
Gas Price: The gas price provided by the sender in Wei.
Hash: This is the transaction hash of the created contract.
Block Hash: Hash of the block where this transaction was in. nullwhen its pending.
From: Address of the sender/creator of the contract.
Input: This is the data sent along with the transaction.
Contracts also have methods. We’ll need to handle that also. Our HelloWorld contract has one method displayMessage which only returns a string.
Displaying the Contract:
function createContractPanel(contract, callback) {
  const div = document.createElement('DIV')
  div.className = 'mui-panel'
  div.innerHTML = `
    <h3>
      <strong>Contract: </strong>
      ${contract.contractName}
    </h3>
    <p>
      <strong>Block Number: </strong>
      ${contract.blockNumber}
    </p>
    <p>
      <strong>Contract Balance: </strong>
      ${balanceInEth(contract.address)}
    </p>
      <strong>Contract Address: </strong>
      ${contract.address}
    </p>
  `

  callback(div)
We create a panel for our contract info to be displayed in. The information above is all the same properties we talked about , but I want to talk a bit about line 15. We created the balanceInEth function earlier. balanceInEth reads the balance of a account/address and returns the value in an ether readable denomination. Since contracts have addresses we can also check their balance at any time.
function createContract(contract, panel) {
  const propHandler = lists => props => {
    if(!filterProps(props[0])) {
      const container = categorizeContractProps({
        key: props[0],
        value: props[1],
        ...lists
      })

      container.append(createContractElement(props, container))
    }
  }

  createPropsContainers(panel, lists => Object
    .entries(contract)
    .forEach(propHandler(lists))
  )
}
When our createContractPanel‘s callback is fired, inside of the callback we call the createContract function which takes the panel that was created, along with the contract. Inside of this function we call createPropsContainers, this function takes the panel we create for our contract and creates sub-panels for our props. Three sub-panels our created:
Prop Panel: props that are not hashes.
Hash Panel: props that are hashes.
Function Panel: props that are functions.
There’s no reason to create these panels and put them in this order, other than readability in our UI display.
function createPropsContainers(panel, callback) {
  document.getElementById('contractFunction').appendChild(panel)
  const propsList = createPanelContainer('props')
  const hashList = createPanelContainer('hashes')
  const functionList = createPanelContainer()
  const banner = '<H3><strong>Contract Functions: </strong></H3>'
  functionList.innerHTML = banner

  panel.append(propsList)
  panel.append(hashList)
  panel.append(functionList)

  callback({ propsList, hashList, functionList })
}

function createPanelContainer(label) {
  const notProp = label !== 'props' || label !== 'hashes'
  const el = notProp ? 'UL' : 'DIV'
  const key = notProp ? 'listStyleType' : 'marginLeft'
  const list = document.createElement(el)

  list.className = notProp ? 'mui-row' : 'mui-panel'
  list.style[key] = notProp ? 'none' : 0

  return list
}
Once we create the sub-panels we append them to the main-panel and pass them to the callback.
Back to our createContract function.
Once we create the panels, we need to filter our props to insert them into the proper panel. We call Object.entries(CONTRACT) on the contract we got earlier, this gives us back an array of arrays, with the sub-arrays having two indices with the first being the key to the second being the value. We call categorizeContractProps and pass some params to it.
function categorizeContractProps(params) {
  const hashNames = {
    'hash': 'hash',
    'blockHash': 'blockHash',
    'input': 'input',
    'from': 'from',
  }

  if (hashNames[params.key]) {
    return params.hashList
  }

  if (typeof params.value === 'function') {
    return params.functionList
  }

  return params.propsList
}
This function returns the right container for the right prop based on some conditions. The hashes with hashes, the functions with the funcitons and everything else put into one
Back to the createContract function after we pick a container for our prop, we call filterProps(CONTRACT_KEY) to only render the contract props that we want to see.
function filterProps(prop) {
  const excludes = {
    '_eth': '_eth',
    'abi': 'abi',
    'allEvents': 'allEvents',
    'to': 'to',
    'value': 'value',
    'blockNumber': 'blockNumber',
    'address': 'address',
    'transactionHash': 'transactionHash',
  }

  return excludes[prop]
}
The function above is basically a list of props we don’t want to render to the screen.\
_eth: A list of methods provided to you by the web3js object. We don’t need these they are not apart of the core functionality of our contract.
abi: I explained a lot about the abi in part 1, but basically this is rendered in our UI when we compile the contract, therefore we don’t need it in two different areas of our application.
allEvent: This is a method that will fire every time there’s an event omitted from this contract of any kind. Something that is incrediblely useful, but will save it for another post.
to: This is usually the receipt of an ether transaction but since there is no ether being sent the value is 0x0which is the hex value for nothing in the EVM.
value: This is the value transferred in wei, if any.
and the last two props are the blockNumber and hashes from the contract that are already being displayed in the UI in some manner or another.
Back to the createContract function once more, on line 10 of that snippet, we call createContractElement:
function createContractElement(contractProp, container) {
  return typeof contractProp[1] === 'function'
    ? createContractFunction(contractProp, container)
    : createContractProp(contractProp, 'P')
}

function createContractFunction(contractFunc, container) {
  const name = contractFunc[0]
  const func = contractFunc[1]
  const btn = document.createElement('BUTTON')
  btn.className = 'mui-btn mui-btn--primary mui-col-md-2'
  btn.innerText = name

  const eventHandler = () => {
    const div = document.createElement('DIV')
    div.className = 'mui-col-md-3'
    div.innerHTML = `<br /> "${func()}"`

    container.appendChild(div)
  }

  btn.addEventListener('click', eventHandler)

  return btn
}

function createContractProp(contractProp, element) {
  const className = 'mui-col-md-2 mui-panel'
  const name = contractProp[0]
  const value = contractProp[1]
  const hashesNames = {
    'hash': 'hash',
    'blockHash': 'blockHash',
    'input': 'input',
    'from': 'from',
  }

  return hashesNames[name]
    ? createContractHash(name, value, 'LI')
    : createContractHash(name, value, 'P', className)
}
Now once we’ve checked which contract prop is going into which panel, we now actually create the props as elements in the DOM. If the props is a function then we create a button element, if its a prop on our hashNames list then we create an LI element or if its anything else creates a P tag element with a class of mui-col-md-2 mui-panel.
function createContractHash(name, hash, tag, className) {
  const el = document.createElement(tag)
  const value = name === 'input'
    ? `<br/><textarea style="width: 100%;">${hash}</textarea>`
    : hash

  el.className = className
  el.innerHTML = `<br/><strong>${name}</strong>: ${value}`

  return el
}
This snippet of code is creating elements like normal, the only prop that gets a special element of <textarea></textarea> is input, only because of the character length of that prop.
Last Steps:
deployContractEvent(contractName, contract)
In the buttonFactory function, there’s a line of code with the string DEPLOY BUTTON, replace the string with the function above. All of the good work that was done is now being called with the contractName and contract as params.
Now for our last snippet of the day, we’ll make it tough.
<section id="contractFunction" class="mui-container"></section>
Place this line of code right underneath the first and only <section> tag of our index.html file and that’s it.
To the Browser:
Most, if not all, the code we typed out executes on a single click. The deploy button:
It’s a little hard to tell from the GIF, but right when you click the deploy button the account balance on the Ganache net goes down a bit. I explained this before but basically the gas cost from the transaction/contract creation was taken from the first account in the web3js accounts array. But before that the confirmation box showed up asking the user if they want to deploy to the test net. Once a user confirms that they want to deploy the contract, the transaction is sent to the blockchain to be mined. We can see the confirmation in the terminal where the user is running their blockchain. Lets check that out:

From the image above you can see a couple JSON_RPC calls being made. You can also see the Transacion with all of its info. If you took your transaction hash from you terminal and compared it side by side with the transaction hash in the browser, you’d see it’s identical. They’re actually the same hash with the one in the browser being a reference of the hash on the blockchain. Right before the transaction you can see the eth_sendTransaction RPC call being made. That call is what creates the contract. More info on JSON-RPC.
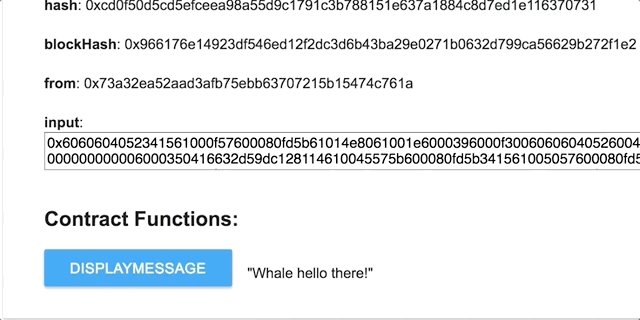
The contract also had a method you could use. From the example above you can see that methods value being returned, “Whale hello there!”. If we bop on back over to our terminal, we see an eth_call.

eth_call is another JSON-RPC method. Its does not cost gas to run, but you can specify gas just in case this method calls another function that actually needs to have gas to run. Sometimes when you call contract methods they call other contract methods and these methods might cost gas, so its important that your account for this.
Conclusion:
Deploying contracts can be costly. Not only do contracts cost gas, they cost time and effort. Security loopholes can appear anywhere in you contract if great care is not taken. There is just a different type of care that has to be taken when writing these contracts. Money can be lost, along with trust. The approach most people are taking, is this “Game Theory Approach”. In certain contracts you’ll have to think about the different incentive’s for the different actor’s and even actor’s that are external to the core system. If you miss something important, some sort of attack vector/elbow, or even an actor playing perfectly fine with in the system can bring it all down to a crash if its in their best interest.
“With great contract’s, comes great responsibilities”. — Somebody
Next Steps:
Phew! In the next part of this series will see how to persist the contracts so they’re still there when we refresh, we’ll do this without a database. Will also see how to deploy our app without having a centralized server.
Linkedin | Github | Twitter | Meetup | Slack
====================================================================================================
Hi! I am a robot. I just upvoted you! I found similar content that readers might be interested in:
https://medium.com/@JusDev1988/part-2-deploying-smart-contracts-in-the-browser-with-web3js-and-vanilla-javascript-f85214113fec
Hey Cheetah thats also mine.
@jusdev89 you were flagged by a worthless gang of trolls, so, I gave you an upvote to counteract it! Enjoy!!
Congratulations @jusdev89! You have received a personal award!
Click on the badge to view your Board of Honor.
Do not miss the last post from @steemitboard:
Congratulations @jusdev89! You received a personal award!
You can view your badges on your Steem Board and compare to others on the Steem Ranking
Do not miss the last post from @steemitboard:
Vote for @Steemitboard as a witness to get one more award and increased upvotes!