PART 4 : [DIY Game Series] Create a simple game with JavaScript
[DIY Game Series with @zulman]
Hello guys, welcome back again. Let's continue our game development article. In today's DIY Game Series, I am going to continues the game that we have created in the previous two part of this article. This part might be the last part for this game development. In the future, perhaps I will continues to created another game, and off course, we are only going to use HTML, CSS, and JavaScript in order to create our game. In this part 4, we are going to add something more to our existing game to make it more interesting. Before we continues about what we are going to do, let's recall what we already have in our game.
What do we have so far:
- Window area, character(in form of rectangle) and obstacle.
- Character can be controlled using up and down arrow keys.
- The obstacle is already moving towards the character.
- The logic has been applied where the game will over if the character hit the obstacle.
- Multiple obstacles has been added.
- Random size obstacles has been implemented.
So, In this part, Things that we are going to do in this part are as follows:
- Implemented the Score for one gameplay.
- Applying a little bit style to make the game more interesting.
Before we are going to continue, If you have not read my previous DIY Game Series article, you can find all in the link below:
Well, without further ado, let's start.
1. Implement Score.
Alright, our game that we have created so far is already playable. But, there is something missing. It is the score line. There is no score that say how good the player is. So, to make the game more interesting and the player could tell how good they are when playing the game, we are going to implement the score line. The score that we are going to implement here is how long the player can stay alive. In another word, how long the player can avoid obstacles. In order to implement the score feature, we can do it with the following step.
- Because we want to implement the score, it means we are going to add another object to our game area, so we need to declare a variable to hold the value. So, go ahead and declare a variable. Let's say
var myScore; - Once the variable is declared, we need to create the object in our "startGame" function. To do that, add the following code inside the "startGame" function.
myScore = new character("15px", "verdana", "white", 180, 20, "text"); - Next, we need to change our character function a little bit, We need to add another parameter in the function to hold our score. Let's add
typeas the new parameter. Now our character function should look like this:function character(width, height, color, x, y, type). Then inside the function we need to add this line.this.type = type; - Then, inside our character function, we need to change a bit in our update function. Our update function inside the character function should be looked like this:
this.update = function() {
    ctx = windowArea.context;
    if (this.type == "text"){
      ctx.font = this.width + " " + this.height;
      ctx.fillStyle = color;
      ctx.fillText(this.text, this.x, this.y);
    } else {
      ctx.fillStyle = color;
      ctx.fillRect(this.x, this.y, this.width, this.height);
    }
}
- Now, the last thing we need to do is to update the score in our updateGameArea area function. Add this two line to the function.
myScore.text="SCORE: " + windowArea.frameNo;
myScore.update();
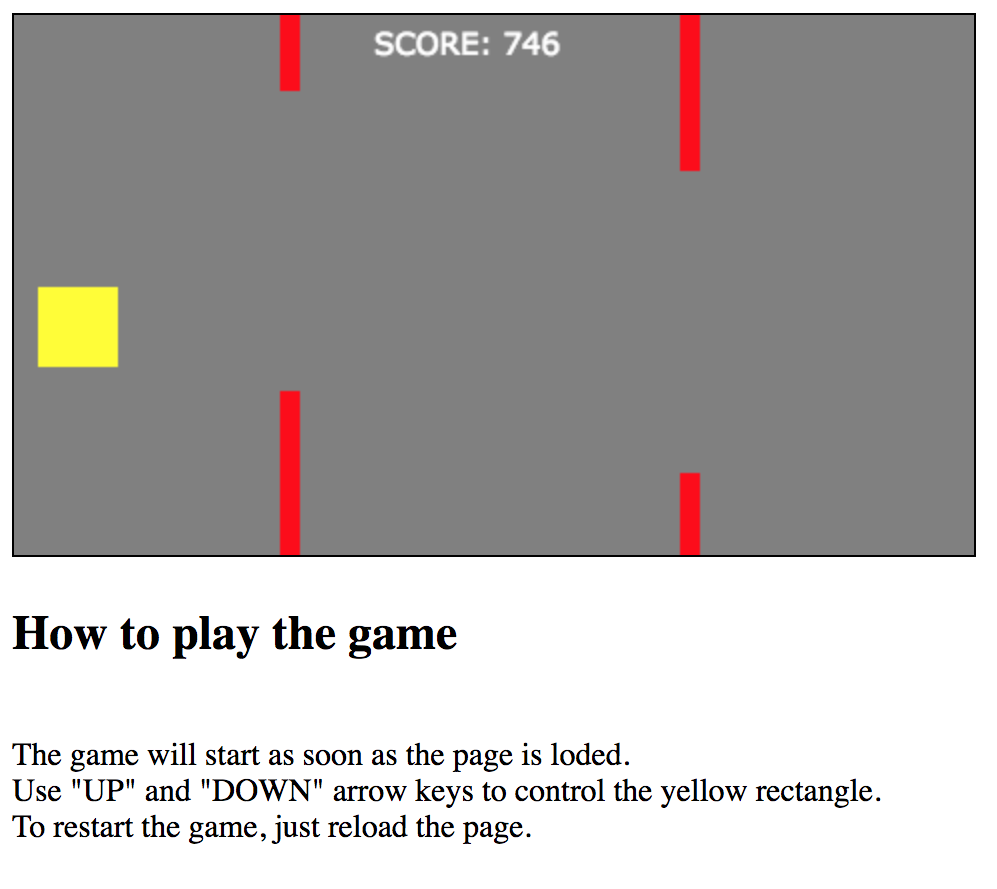
Now, if you run the code, you will see the score in our windowArea as the picture showed below:
2. Styling our game.
Now, we have implement the score. Next, we are going to style our game, a little bit. The style that we are going to do are as follow:
a. Change our yellow rectangle to an image (e.g, Spaceship Image)
b. Give background to our windowArea.
c. Put all content in the middle of the page.
Alright, as the list above, let's start doing it one by one.
a. Change our yellow rectangle to an image (e.g, Spaceship Image)
First off all, let's download the image that we want to put as our character (Yellow Rectangle). For this article, I use a space ship image. Go ahead and download the image from here: Spaceship. Once you download the image, make sure you put the image in the same folder as the html file. Now, let's start changing our JavaScript code.
- First we need to do is to change myCharacter variable's value in startGame function to be like this:
myCharacter = new character(40, 40, "space.png", 12, 122, "image");. 'space.png' is the name of the image that we download before. - Next, we need to add a little bit of code to our character function. We need to add the following condition to our character fucntion.
if (type == "image") {
    this.image = new Image();
    this.image.src = color;
}
- Then, inside the character function, in
this.update = function()we need to change it to be like this:
this.update = function() {
    ctx = windowArea.context;
    if (type == "image") {
        ctx.drawImage(this.image,
            this.x,
            this.y,
            this.width, this.height);
    }else if (this.type == "text"){
      ctx.font = this.width + " " + this.height;
      ctx.fillStyle = color;
      ctx.fillText(this.text, this.x, this.y);
    } else {
      ctx.fillStyle = color;
      ctx.fillRect(this.x, this.y, this.width, this.height);
    }
}
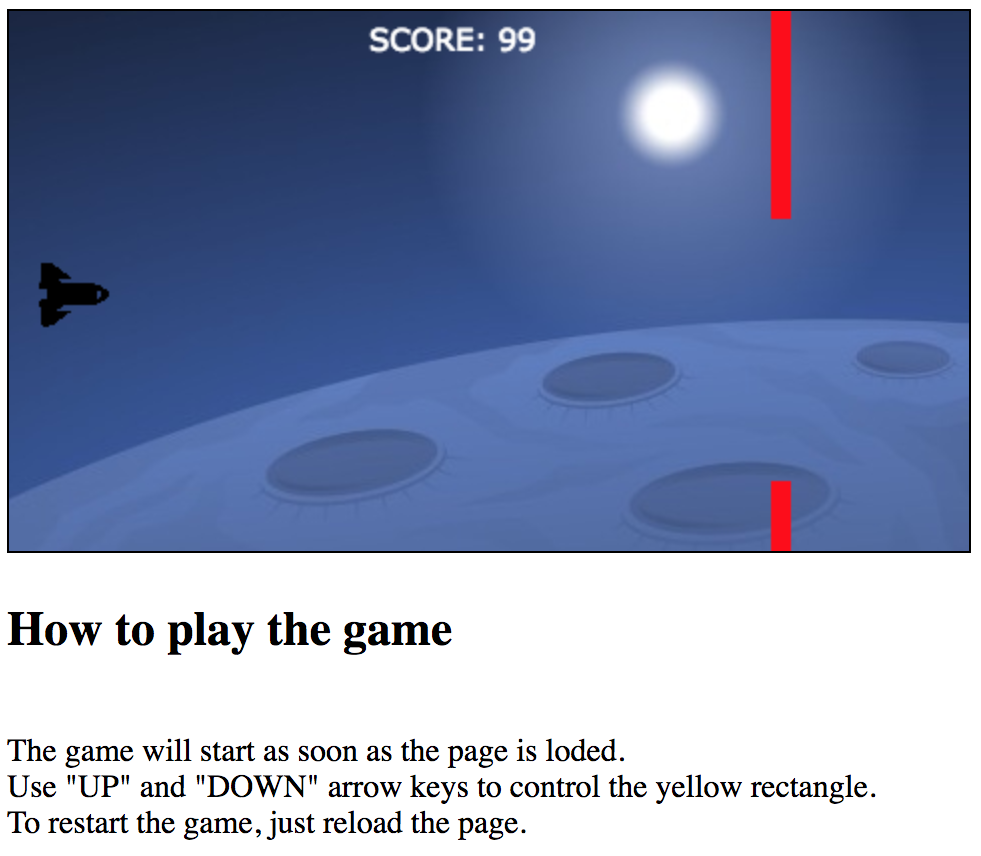
Now, if you run the code, you will see that our yellow character has changed into a spaceship as shown in the picture below.
b. Give background to our windowArea.
Now, to give the background to our windowArea or game area, we are going to use CSS. If we want to make the background move, we can do that with JavaScript. But here, I am going to make it very simple. To do this, first we need to download the image that we want to put as the background. As an example, here I have an image with the name "background.jpg". To change our background. in <style></style> tag. We change a style of our canvas by as follow:
canvas {
    border:1px solid black;
    background-image: url("background.jpg");
}
If you run the code, you will see the background now has changed as shown in the picture below.
c. Put all content in the middle of the page.
Now, to make our game a little bit tidier, we are going to put all the content at the middle of the page. We also going to use CSS to do this. It is very simple. We just need to add the following css code to in our <style></style> tag.
html, body {
  height: 100%;
  margin: 0;
}
body {
  display: flex;
  flex-direction: column;
  align-items: center;
  justify-content: center;

}
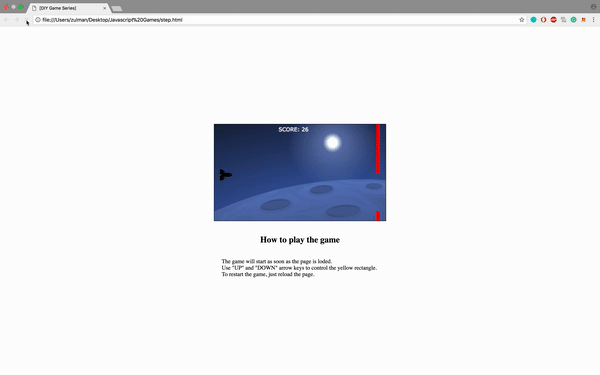
Now, our final game will look something like the image below:
If you like to try to play it, I have put these game in my Github page. To try to play it, just click the link below.
Play The Game
Our final HTML file now should look like this:
<!DOCTYPE html>
<html>
<head>
<title>[DIY Game Series]</title>
<style>
html, body {
  height: 100%;
  margin: 0;
}
body {
  display: flex;
  flex-direction: column;
  align-items: center;
  justify-content: center;

}
canvas {
    border:1px solid black;
    background-image: url("background.jpg");
}
</style>
</head>
<body onload="startGame()">
<script>

var myCharacter;
var myObstacles = [];
var myScore;

function startGame() {
    myCharacter = new character(40, 40, "space.png", 12, 122, "image");
    myScore = new character("15px", "verdana", "white", 180, 20, "text");
    windowArea.start();
}

var windowArea = {
    canvas : document.createElement("canvas"),
    start : function() {
        this.canvas.width = 480;
        this.canvas.height = 270;
        this.context = this.canvas.getContext("2d");
        document.body.insertBefore(this.canvas, document.body.childNodes[0]);
        this.frameNo = 0;
        this.interval = setInterval(updateGameArea, 20);
        window.addEventListener('keydown', function (e) {
            windowArea.key = e.keyCode;
        })
        window.addEventListener('keyup', function (e) {
            windowArea.key = false;
        })
    },
    clear : function(){
        this.context.clearRect(0, 0, this.canvas.width, this.canvas.height);
    },
    stop : function() {
      clearInterval(this.interval);
    }
}

function character(width, height, color, x, y, type) {
    this.areaofthegame = windowArea;
    this.type = type;
    if (type == "image") {
        this.image = new Image();
        this.image.src = color;
    }
    this.width = width;
    this.height = height;
    this.speedX = 0;
    this.speedY = 0;
    this.x = x;
    this.y = y;
    this.update = function() {
        ctx = windowArea.context;
        if (type == "image") {
            ctx.drawImage(this.image,
                this.x,
                this.y,
                this.width, this.height);
        }else if (this.type == "text"){
          ctx.font = this.width + " " + this.height;
          ctx.fillStyle = color;
          ctx.fillText(this.text, this.x, this.y);
        } else {
          ctx.fillStyle = color;
          ctx.fillRect(this.x, this.y, this.width, this.height);
        }
    }
    this.newPos = function() {
        this.x += this.speedX;
        this.y += this.speedY;
    }
    this.crashWith = function(otherobj) {
        var myleft = this.x;
        var myright = this.x + (this.width);
        var mytop = this.y;
        var mybottom = this.y + (this.height);
        var otherleft = otherobj.x;
        var otherright = otherobj.x + (otherobj.width);
        var othertop = otherobj.y;
        var otherbottom = otherobj.y + (otherobj.height);
        var crash = true;
        if ((mybottom < othertop) || (mytop > otherbottom) || (myright < otherleft) || (myleft > otherright)) {
            crash = false;
        }
        return crash;
    }
}

function updateGameArea() {
  var x, height, gap, minHeight, maxHeight, minGap, maxGap;
  for (i = 0; i < myObstacles.length; i += 1) {
      if (myCharacter.crashWith(myObstacles[i])) {
          windowArea.stop();
          return;
      }
  }
  windowArea.clear();
  windowArea.frameNo += 1;
  if (windowArea.frameNo == 1 || everyinterval(200)) {
      x = windowArea.canvas.width;
      minHeight = 20;
      maxHeight = 200;
      height = Math.floor(Math.random()*(maxHeight-minHeight+1)+minHeight);
      minGap = 50;
      maxGap = 200;
      gap = Math.floor(Math.random()*(maxGap-minGap+1)+minGap);
      myObstacles.push(new character(10, height, "red", x, 0));
      myObstacles.push(new character(10, x - height - gap, "red", x, height + gap));
  }
  for (i = 0; i < myObstacles.length; i += 1) {
    myObstacles[i].x += -1;
    myObstacles[i].update();
  }
  if (windowArea.key && windowArea.key == 38) {myCharacter.speedY = -1; } //up
  if (windowArea.key && windowArea.key == 40) {myCharacter.speedY = 1; } //down
  myScore.text="SCORE: " + windowArea.frameNo;
  myScore.update();
  myCharacter.newPos();
  myCharacter.update();
}

function everyinterval(n) {
    if ((windowArea.frameNo / n) % 1 == 0) {return true;}
    return false;
  }

</script>
  <br><h2>How to play the game</h2>
  <br>The game will start as soon as the page is loded.
  <br>Use "UP" and "DOWN" arrow keys to control the yellow rectangle.
  <br>To restart the game, just reload the page.
</body>
</html>
Alright, that is all for this DIY Game Series article. For next article, perhaps we are going to create another game with JavaScript. So, do not forget to follow for me @zulman.
Notice:
This is could be not the best article about creating game with Javascript. I am currently starting to learn javascript and what I share here is something that I have learnt. Perhaps, you will find some similarities with the source in term of the code. Remember that I write the article as my experience in learning javascript. If you want to learn more about javascript and html game, you can go to the original source as the link in the reference.
Reference : Here