How to Create Your Own Crypto Token - Crypto Academy / S5W2 - Homework Post for @reddileep
Introduction
It's another wonderful time to write at the Academy for week 2 of season 5. Today, I will write a homework task having read the lecture about "How to create your own crypto token", it's quite an interesting piece and I will be laying my hands on it. In this piece, I will highlight distinctive differences between coins and tokens, discuss several tools to create a cryptocurrency, and precisely, a token would be created, and so on. Let's get to it.
Made in Canva
1- Introduction to how to create own cryptocurrency (Differentiating between Token and Coin)
Creation of cryptocurrency requires proper analysis before a user decides on what to do, as such, it is important to define a few things like the Use case of the project you intended to create, its legality in your region, the tokenomics which encompasses the supply of the token, how you intend to distribute your token, basically, the economics of the token and so on. Above are a few things to define before proceeding to the creation of a cryptocurrency.
Now that we have defined a few things about our cryptocurrency, then we would talk about the classification of cryptocurrency which are Token and Coin, an issuer determine which of the two he/she is looking forward to creating. Let's talk about them briefly.
Token
Token is a classification of cryptocurrencies that are built on an existing blockchain. In this case, issuers that choose this type of cryptocurrency don't have to develop a new blockchain for the project rather have it deployed on an already existing blockchain and the choice of the blockchain solely depends on the issuer. Examples of Tokens are BTT (BitTorrent- built on the Tron blockchain), HT (Huobi Token- built on the Ethereum blockchain) and so on.
Coin
Coin is the classification of cryptocurrencies that are built on their own blockchain. In this case, the issuer builds a blockchain, the coin is deployed on the blockchain, and this makes the coin the native coin of the blockchain. To create this type of cryptocurrency, the issuer must have enough experience in the creation of a blockchain or rather employ a team of capable hands to make it work. Examples of Coins are ETH [Ethereum- built on own blockchain (Ethereum)], BNB [Binance Coin- built on own blockchain (Binance Smart Chain)], ALGO [Algorand- built on own blockchain (Algorand)] and so on. Let's look at the distinctive differences between the two.
Distinctive difference between Token and Coin
| Token | Coin |
|---|---|
| It requires technical know-how about blockchain to create a coin, skills like coding are required. | To create a Token, It doesn't require any coding skills, the definition of the token Use Case, tokenomics, and so on, is enough while the issuer makes use of an existing code and deploy the project. |
| It's built on an existing blockchain. | Coin is built on its own blockchain. |
2- Demonstration of the setup of the Tools required for the Process of Token creation
For token creation in this context, I will be using the Binance Smart Chain. And in this section, I will be using the MetaMask wallet for the explanation which will encompass the setting up of the wallet, adding the Binance Smart Chain Mainnet and depositing BNB (Smart Chain) to take care of gas fee.
How to Create a new Metamask wallet
In this section of the task, the steps that are involved in the creation of a new Metamask wallet would be given in a few points that follow.
- The process to creating a new MetaMask wallet starts from the official website https://metamask.io/. And from the homepage, select Download at the top of the page to download the extension. As such, on the next interface, I selected Install MetaMask for Chrome. See the screenshots below.

Select- Download | Source-MetaMask
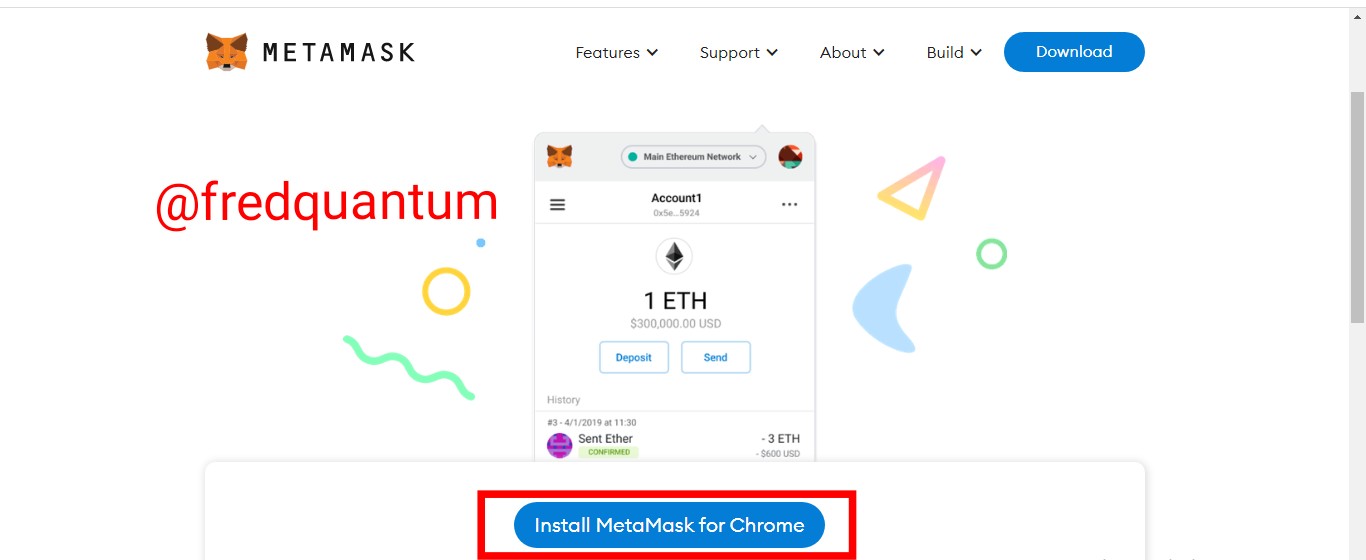
Select- Install MetaMask for Chrome | Source-MetaMask
- On the store page, I clicked the Add to Chrome button and confirmed the Add Extension on a popped-up window. See the screenshots below.
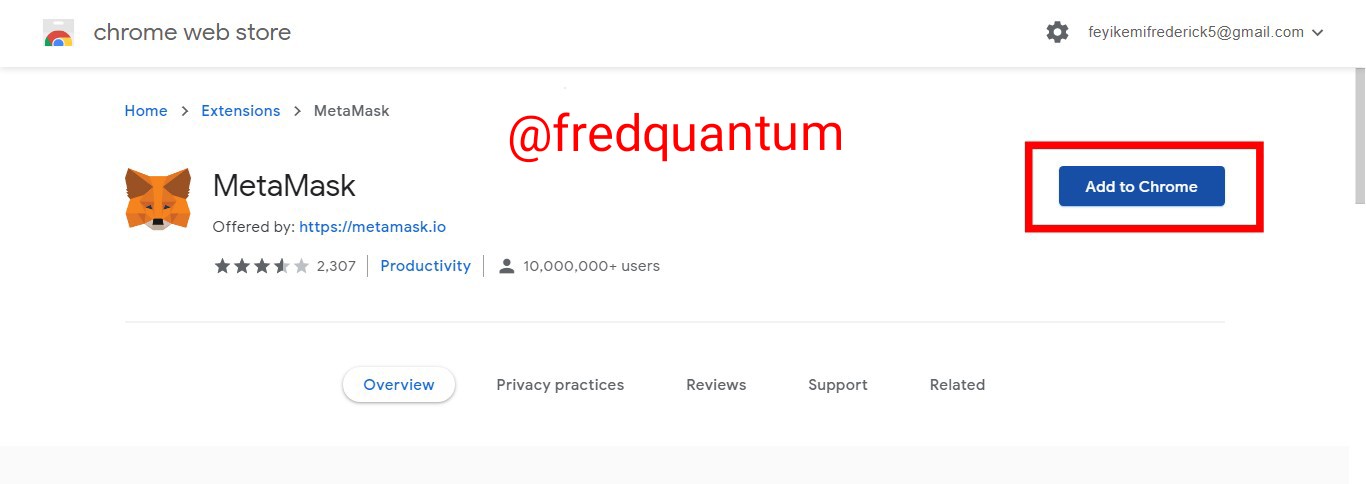
Select- Add to Chrome | Source-MetaMask
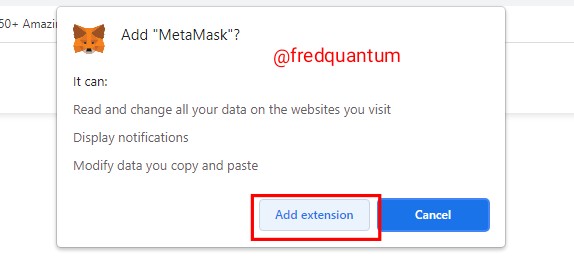
Select- Add Extention | Source-MetaMask
- To create a new wallet on MetaMask, I selected the extension at the top of the page. The extension is opened now, and I selected the Get Started button to proceed. On the next interface, I chose to Create a wallet. See the screenshots below.
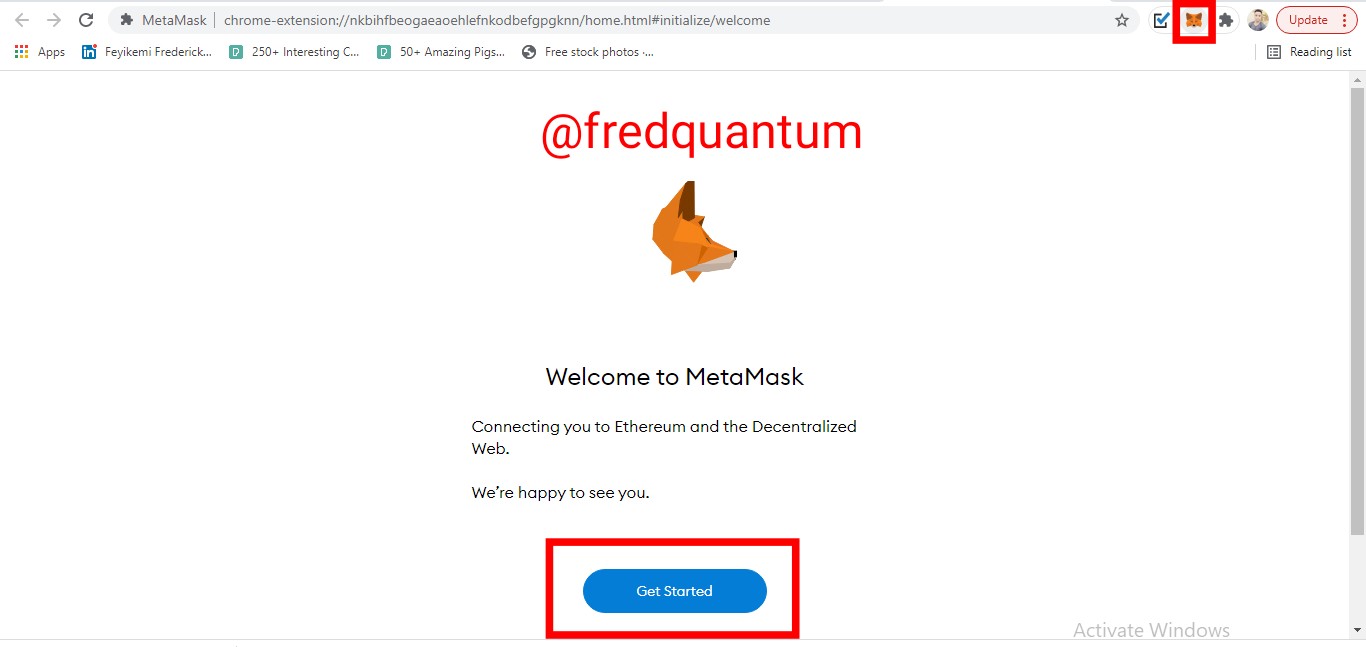
Select- Get Started | Source-MetaMask
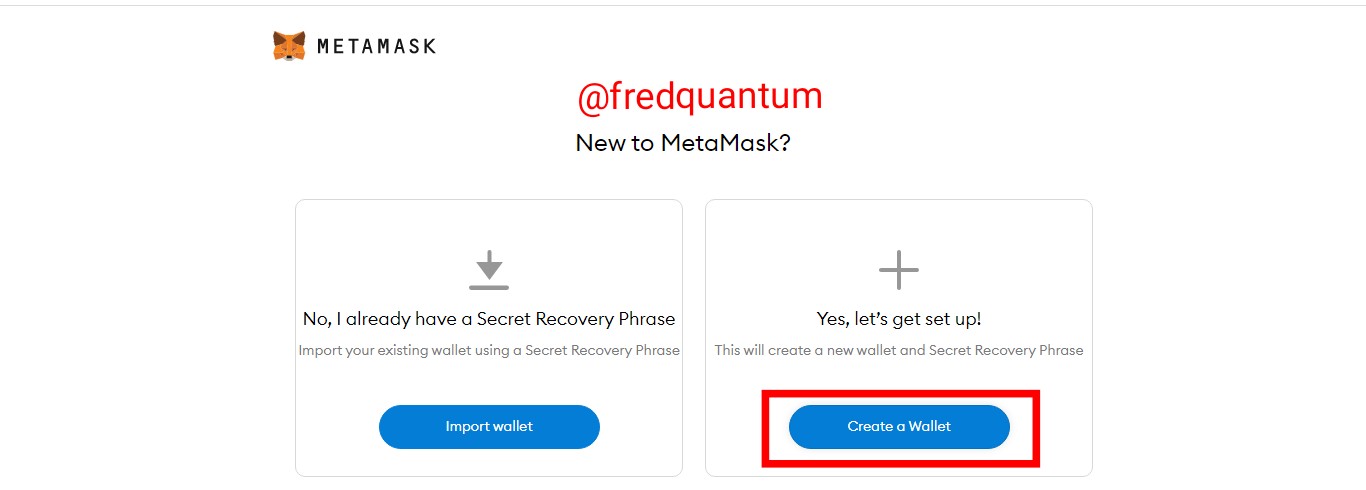
Select- Create a wallet | Source-MetaMask
- On the next interface, I agreed to the terms of use which was followed by creation of password and then, hit the create button. See the screenshots below.
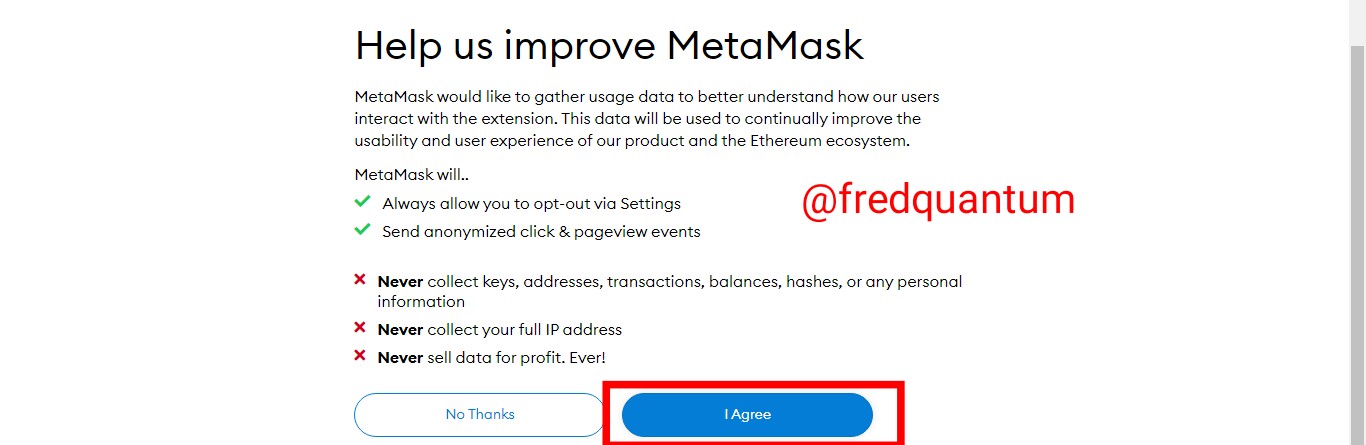
Select- Agree on | Source-MetaMask
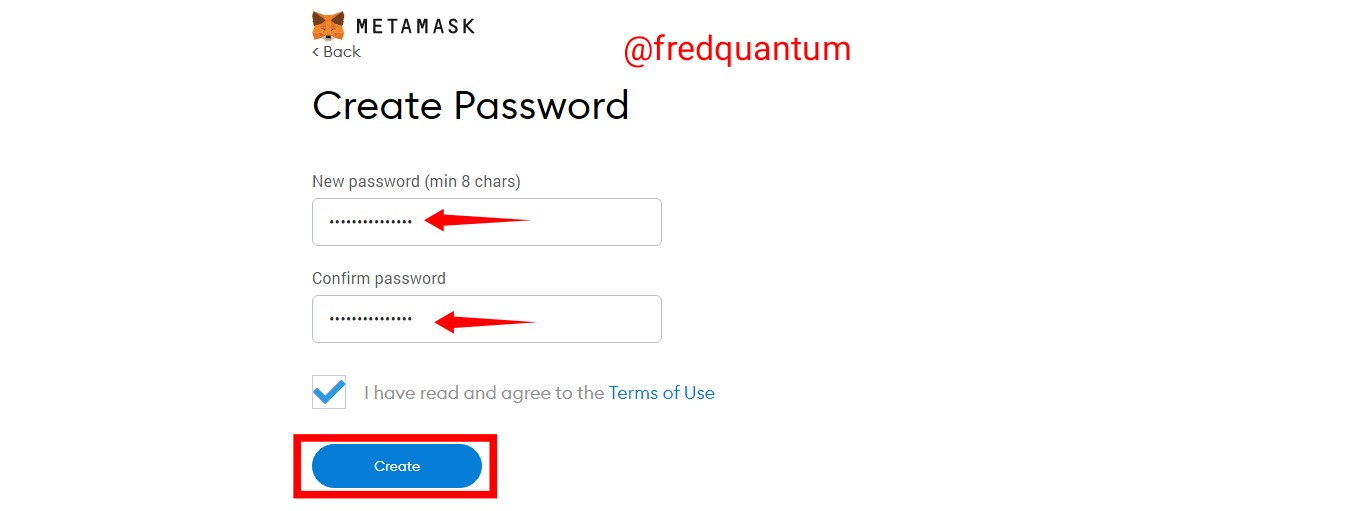
Select- Create | Source-MetaMask
- It's time to backup the recovery phrase, I clicked to reveal the secret, wrote the secrets down, and clicked on the Next button. See the screenshots below.
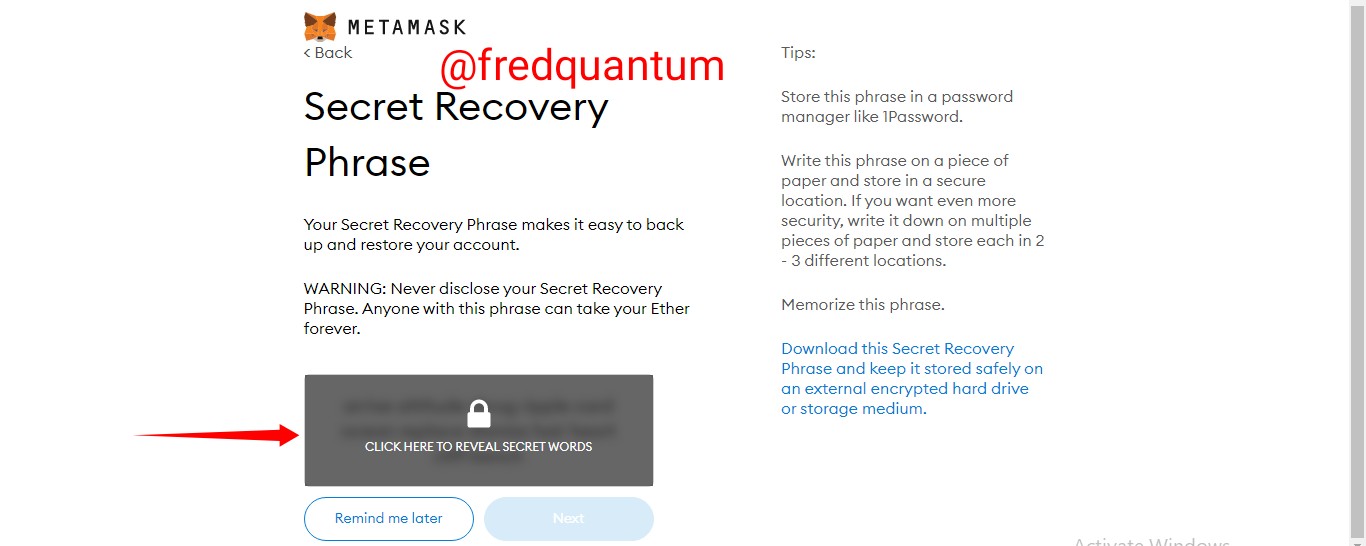
Select- Reveal Secret | Source-MetaMask
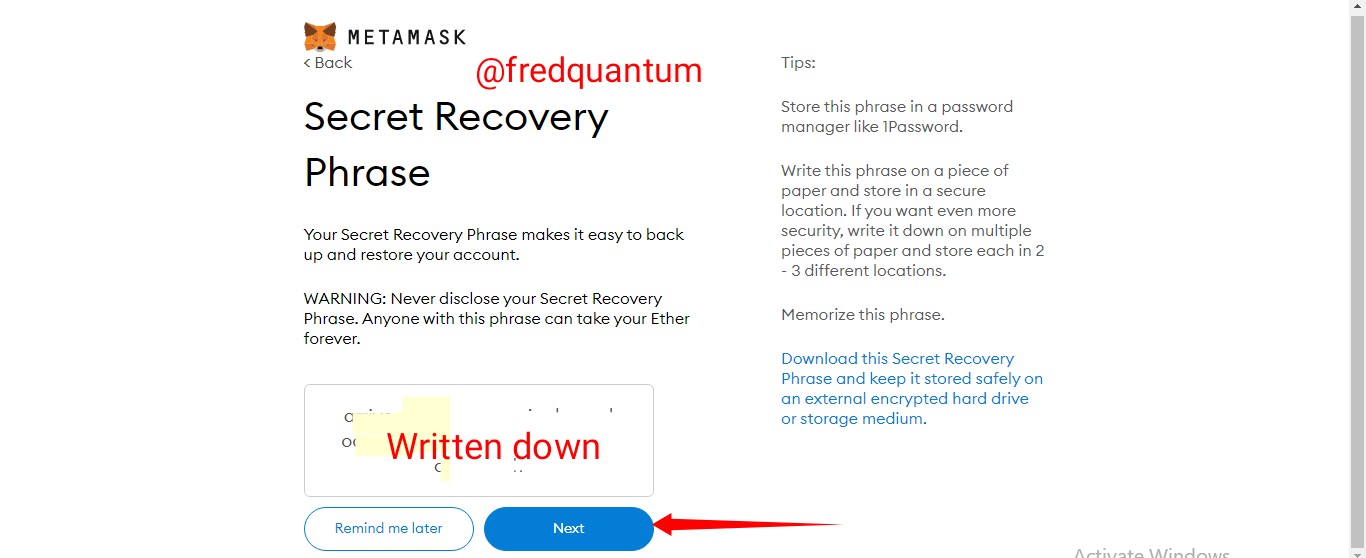
Select- Next | Source-MetaMask
- On the next interface, I am required to input the secret words in order, I did that and clicked the Confirm button. The wallet setup was completed. See the screenshots below.
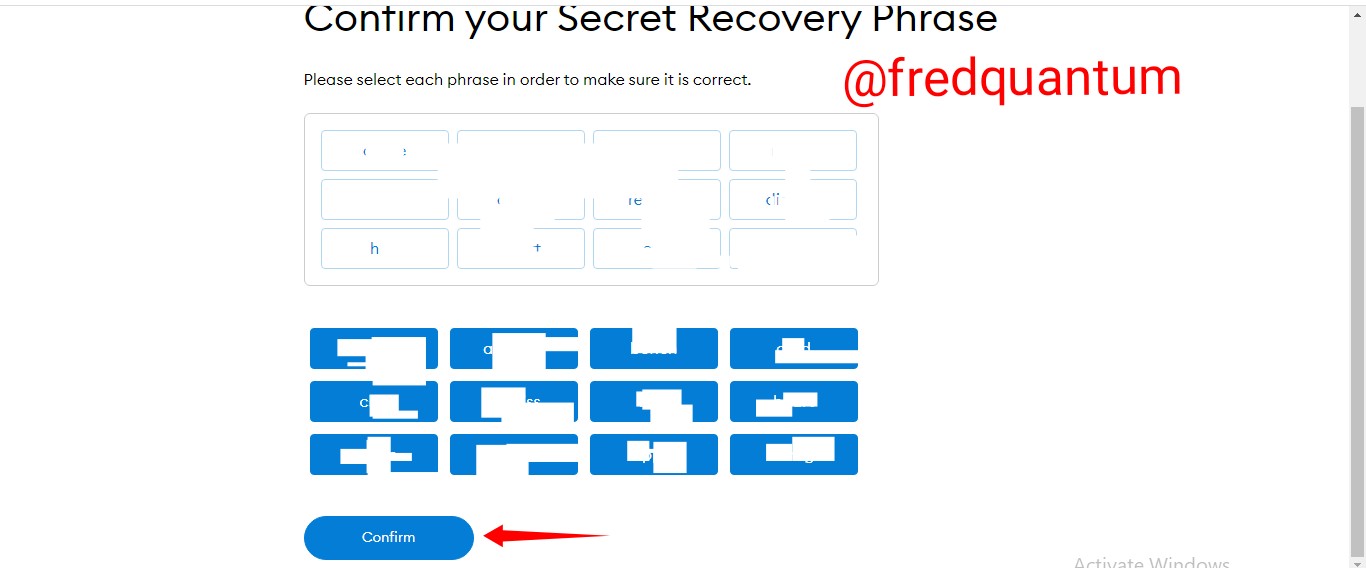
Select- Confirm | Source-MetaMask
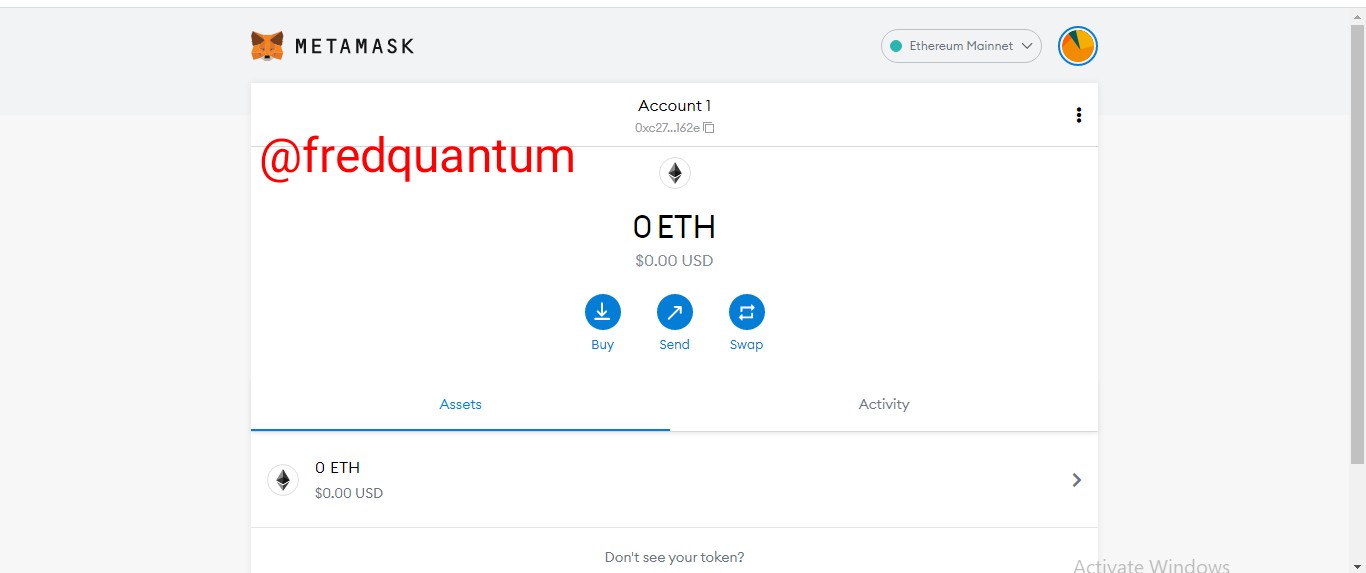
Wallet is Ready | Source-MetaMask
How to Add Binance Smart Chain Mainnet to the MetaMask
- To add the Binance Smart Chain Mainnet to the MetaMask wallet, the process starts by selecting the network's drop-down button at the top of the page, then selected Add Network.
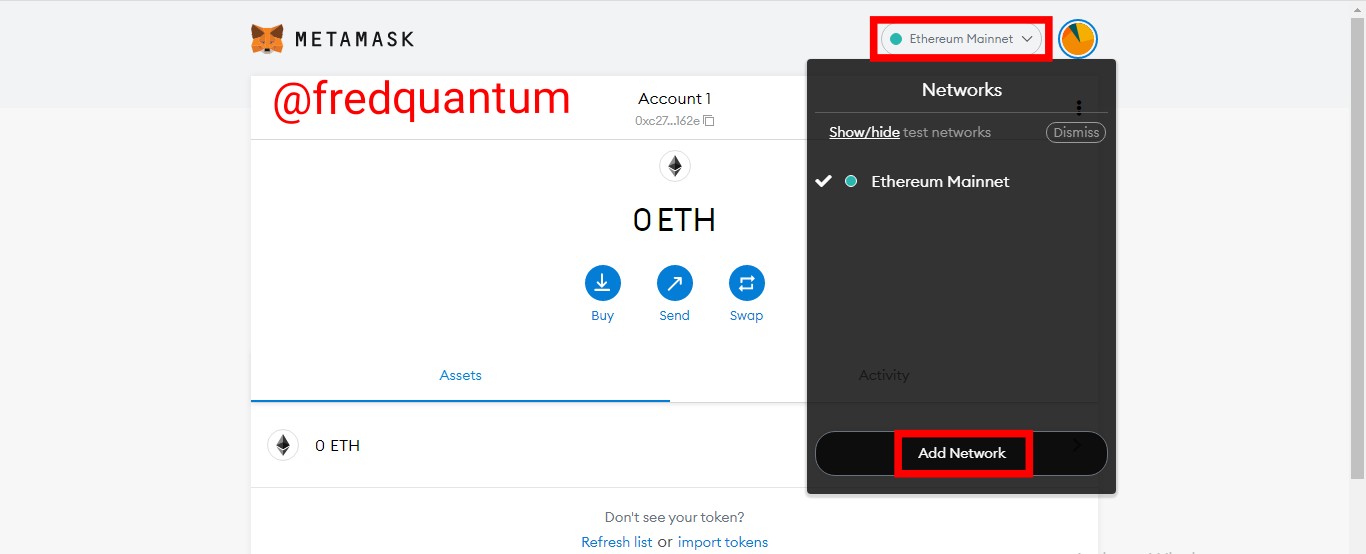
Select- Add network | Source-MetaMask
- Now at the network-adding page, below are the inputs in the quest to add the Binance Smart Chain Mainnet;
- Network Name: Binance Smart Chain Mainnet.
- New RPC URL: https://bsc-dataseed.binance.org or https://bsc-dataseed1.ninicoin.io. (I opt for https://bsc.dataseed1.ninicoin.io).
- Chain ID: 56.
- Symbol: BNB.
- Block Explorer: https://bscscan.com.
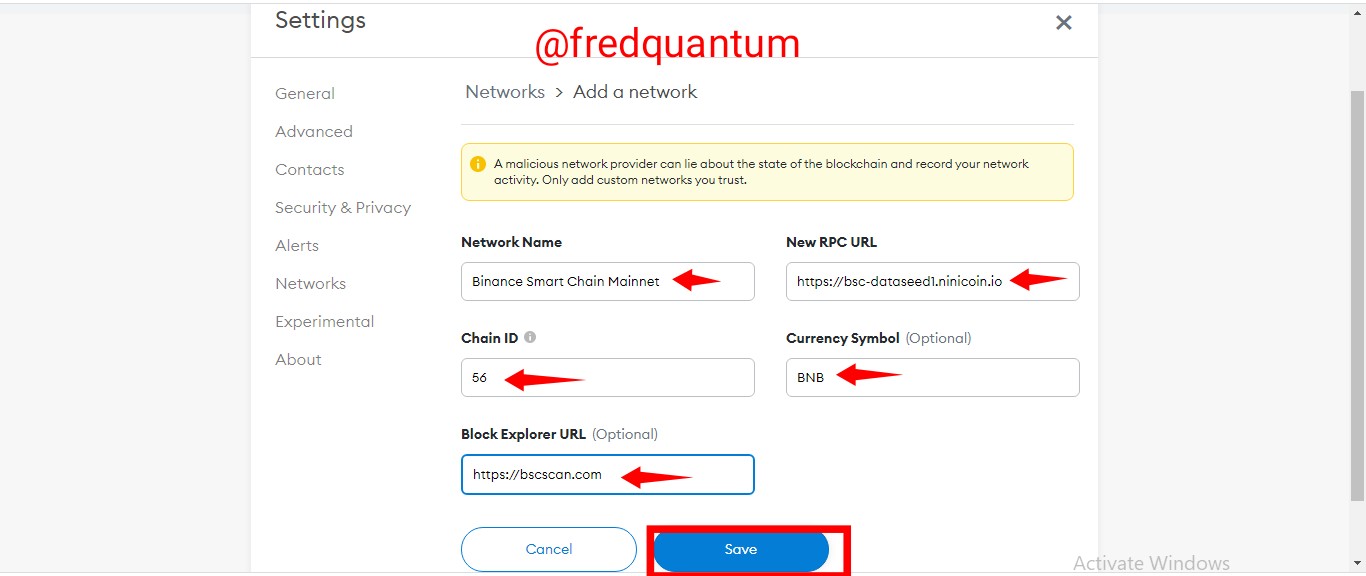
Select- Save | Source-MetaMask
- I've been able to add the network, Binance Smart Chain Mainnet.
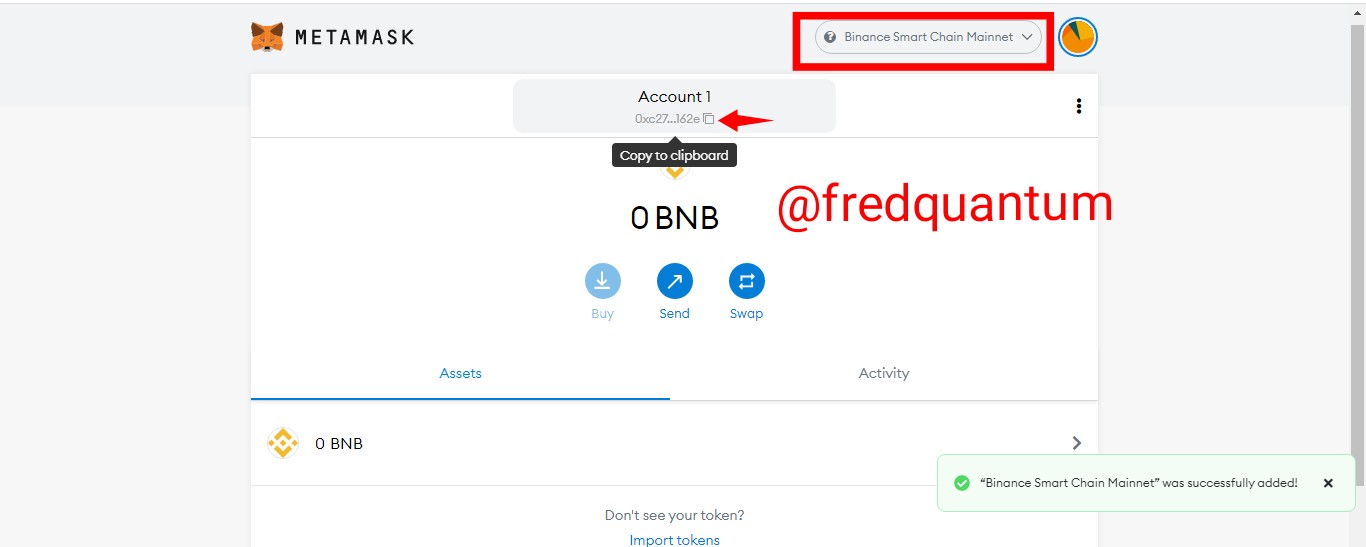
Smart Chain Added | Source-MetaMask
- To deposit BNB into the newly added Smart Chain wallet, I launched my BNB wallet from an exchange, inputted the address, amount (0.027 BNB ~ $16) to be sent excluding withdrawal fee and confirmed the withdrawal.
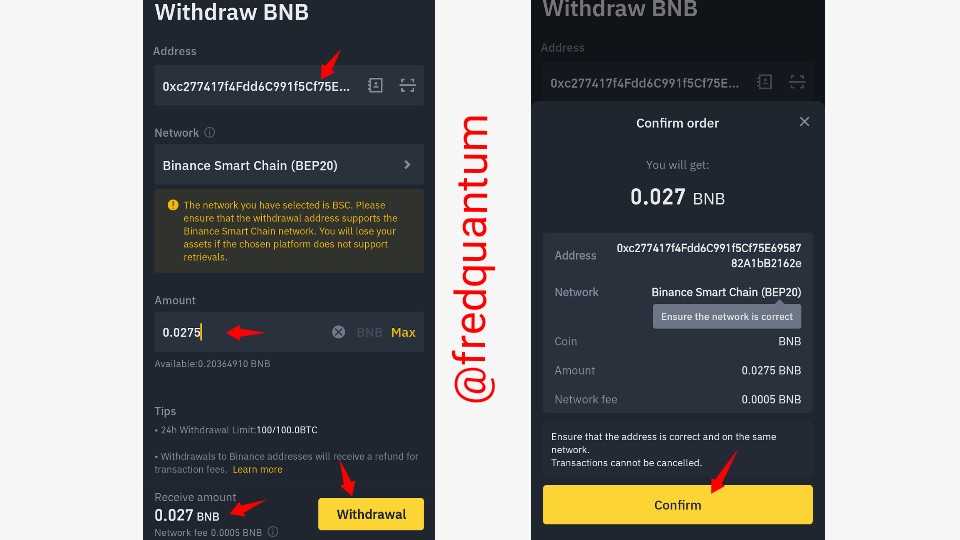
BNB withdrawal | Source- Binance
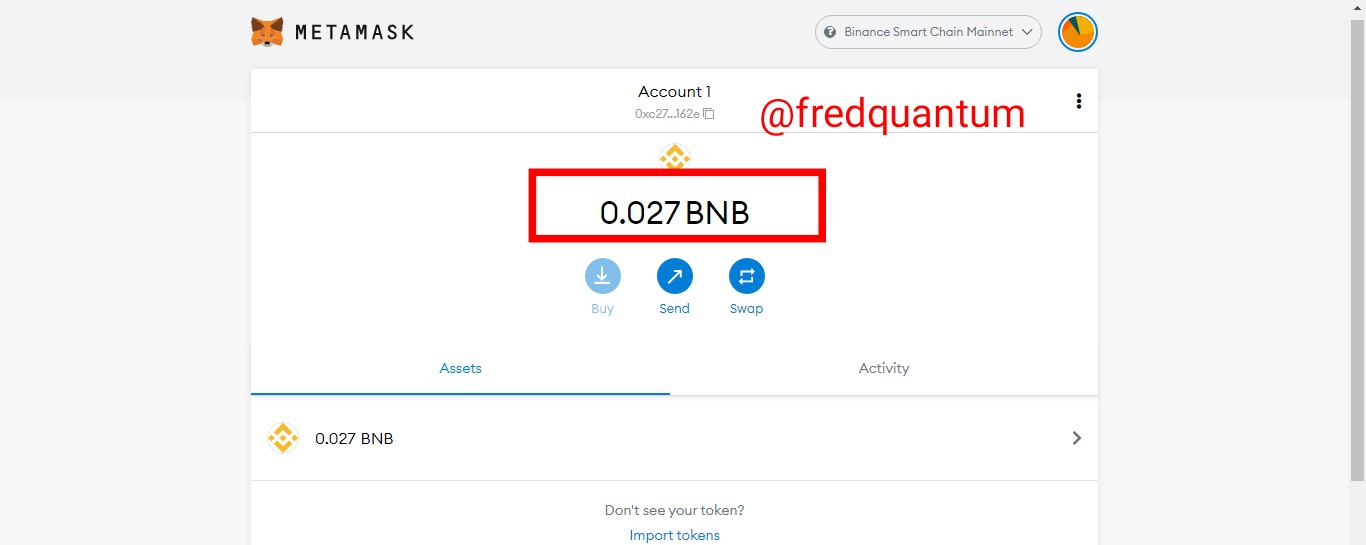
Smart Chain Balance | Source-MetaMask
3- Remix IDE
Remix IDE (Integrated Development Environment) is smart contracts application on the Ethereum blockchain which is compatible with Web and Desktop, as such it allow developers to easily make use of the open-source code to write new contracts for a project, modify existing smart contracts and deploy the contract. Its use is not limited to Ethereum blockchain alone rather it can be used for the aforementioned purposes on every other blockchain like Ethereum, that is, blockchains that are compatible with smart contracts and an example is the Binance Smart Chain.
The use of different plugins of Remix IDE ease the work of developers and as well can be utilized by the developers who don't have a solid background in coding to easily develop a new project and deploy it on the blockchain.
How to Download the Source Code
In this case, we are aiming at building a new cryptocurrency on an existing blockchain (Binance Smart Chain), as such, we would be downloading an existing source code that would be modified to preference. Let's see a few steps involved in creating downloading the source code.
- The first step is visiting https://docs.binance.org/ and on the landing page, under the table of content, I selected BEP 20 Asset which was followed by selecting the option Issue BEP20 on the details of BEP20.
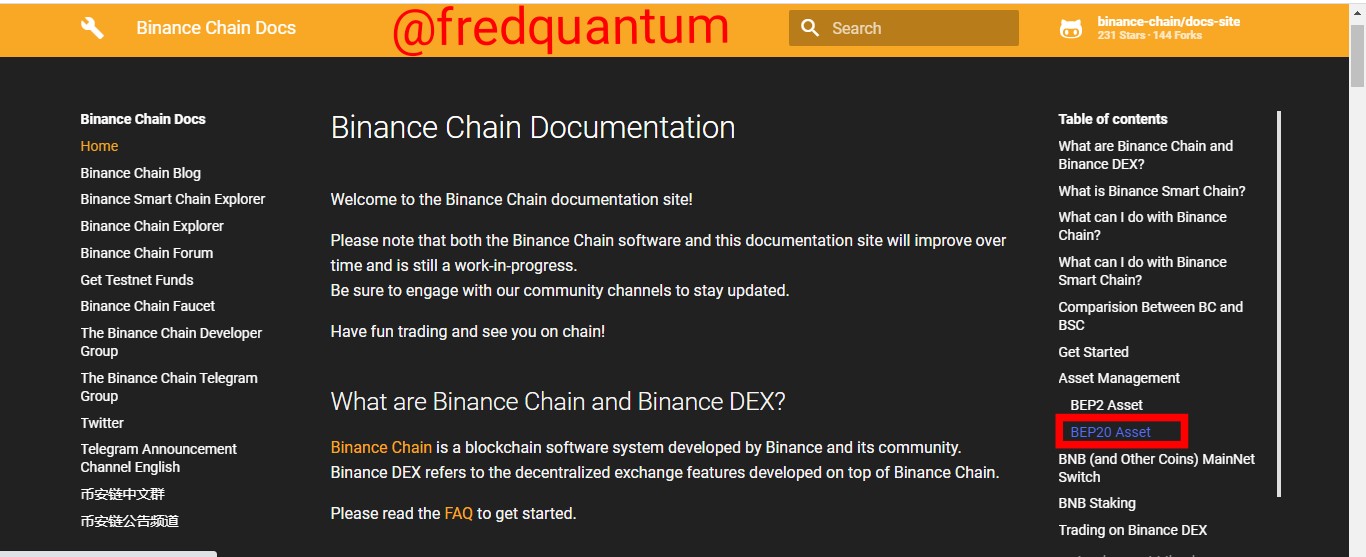
Select- BEP20 Asset | Source-https://docs.binance.org/
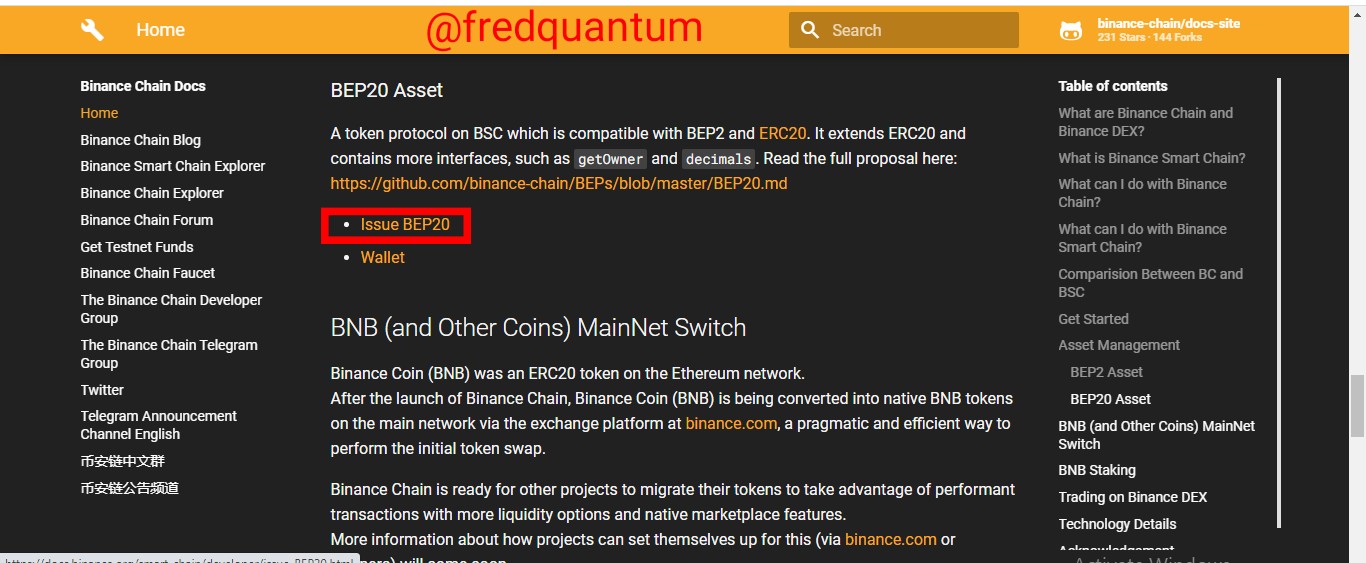
Select- Issue BEP20 | Source-https://docs.binance.org/
- On the next interface, I scrolled down to locate the ...the contract code from the BEP20 token template and hit here button. By so doing, the contract code was downloaded to my PC and ready for use.
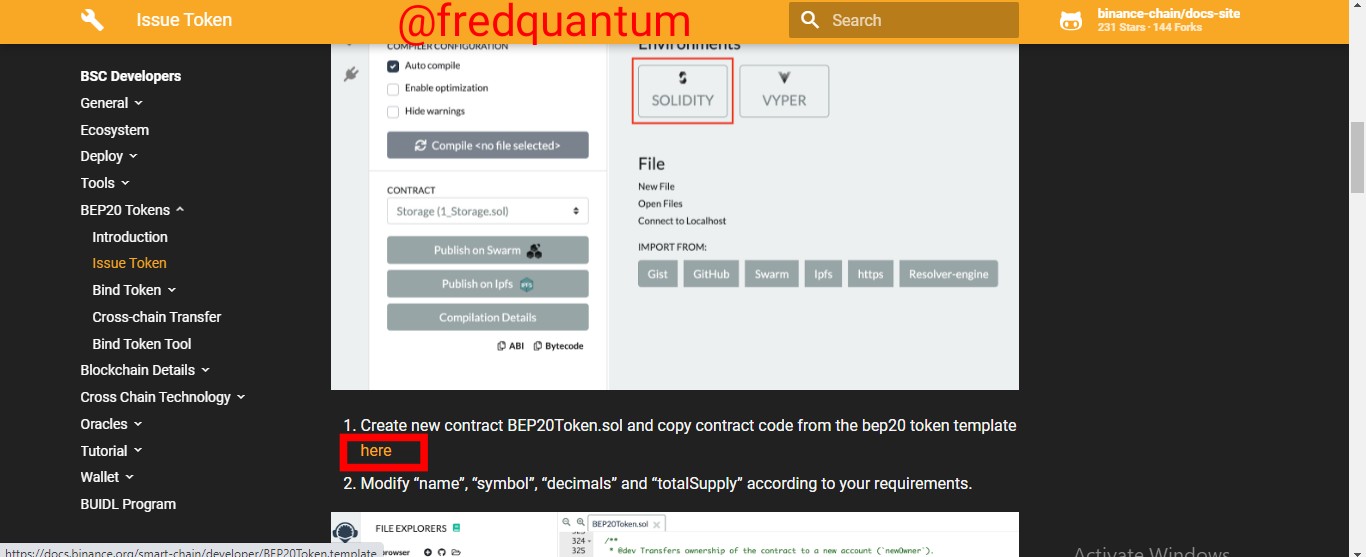
Select- Here | Source-https://docs.binance.org/
4- Customizing the Source Code according to the Project's definition
At a point in this context when I was explaining Remix IDE, I highlighted that it's compatible with both Web and Desktop, and for this section of the task, I will be using the web Remix IDE to edit the contract code to my project's taste. Let's see the steps.
- The process starts by visiting https://remix.ethereum.org/. Let's take a look at what the landing page looks like.
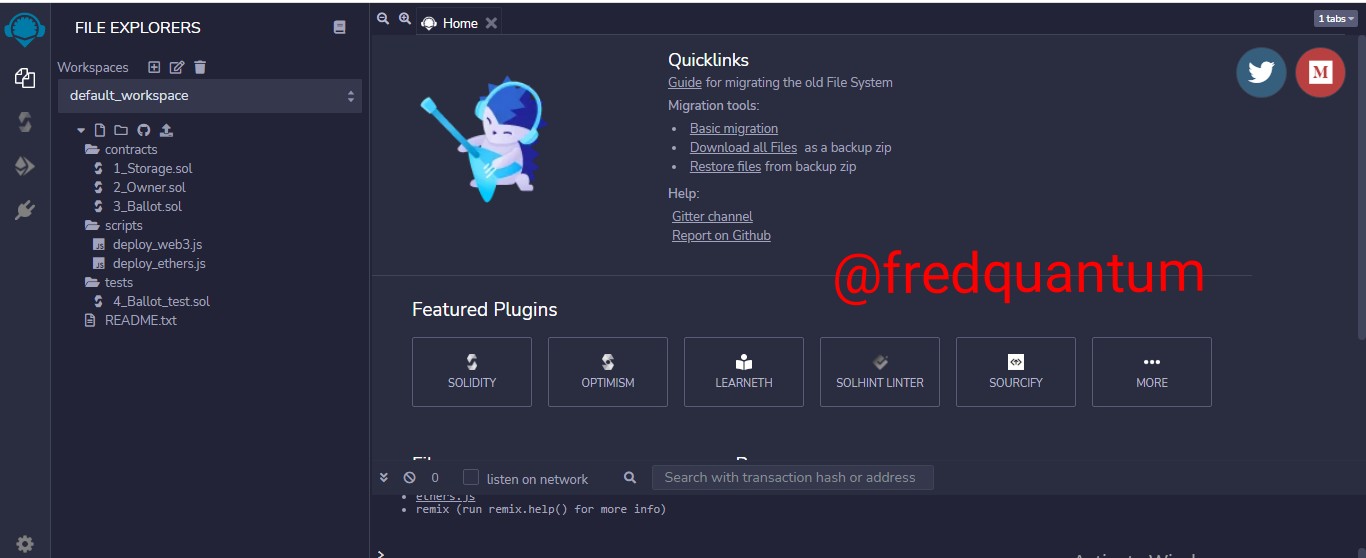
Remix IDE landing page | Source-https://remix.ethereum.org/
- Now to the creation of a new file under Contract, I right-clicked and selected the option New File. Also, I renamed the file to BEP20 Token.sol, basically, BEP20 Token is the name of the file. Let's see the screenshots below.
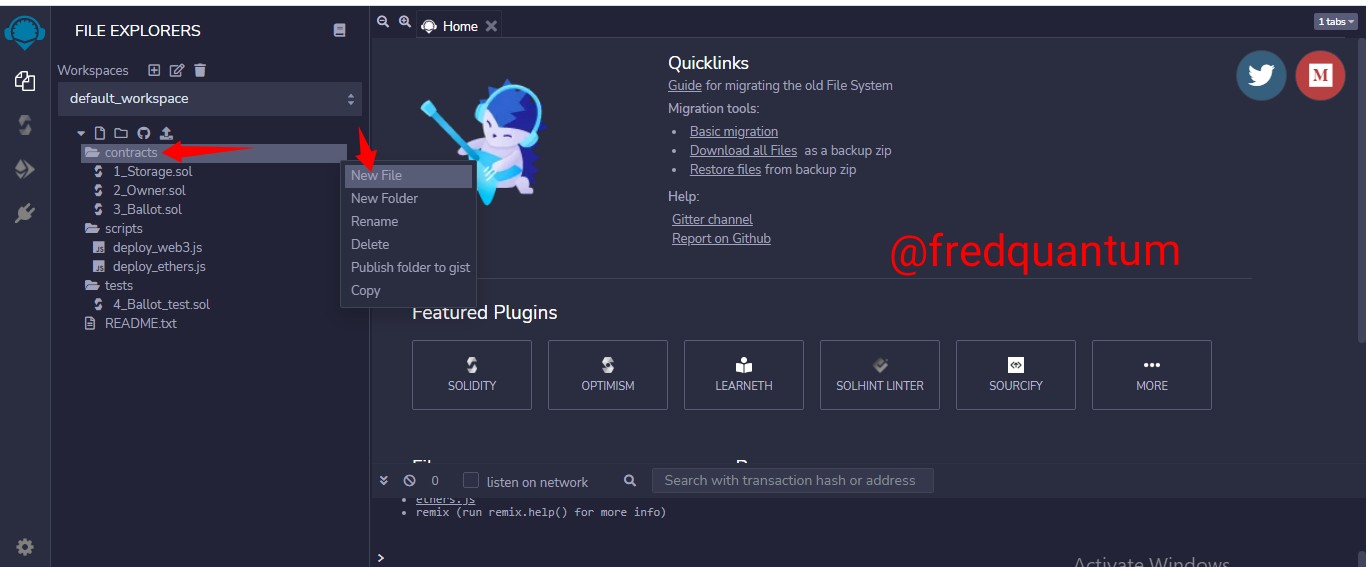
Select- New file | Source-https://remix.ethereum.org/
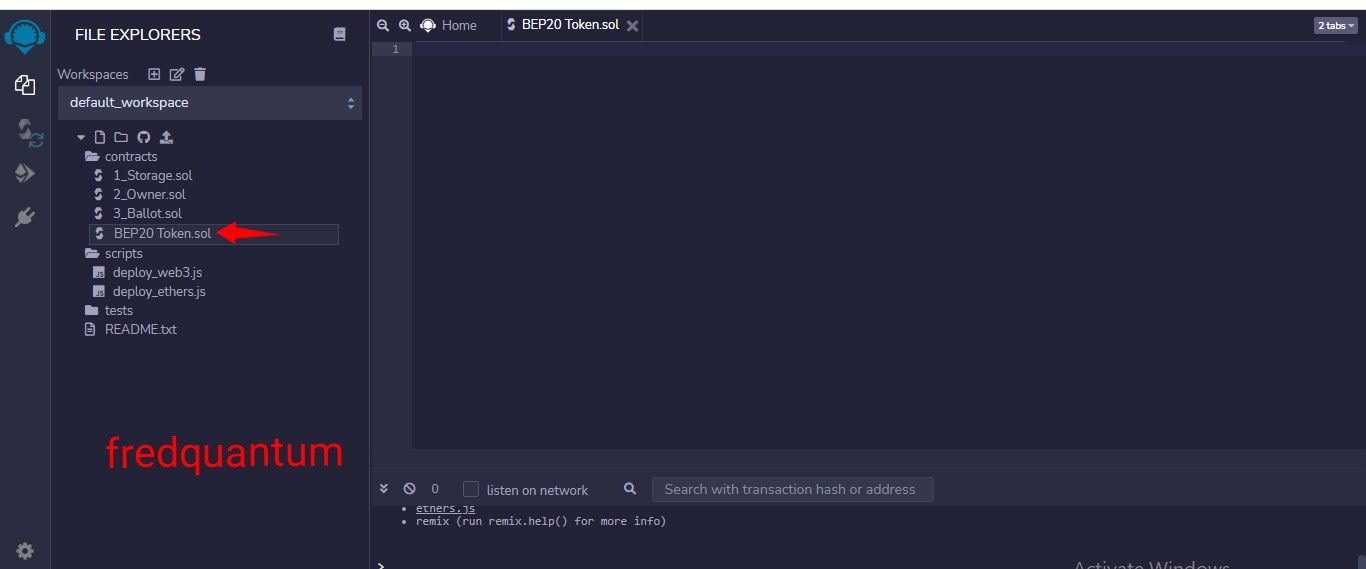
Rename- BEP20 Token | Source-https://remix.ethereum.org/
- I opened the contract code, BEP20 Token Template downloaded earlier, using my PC's notepad.
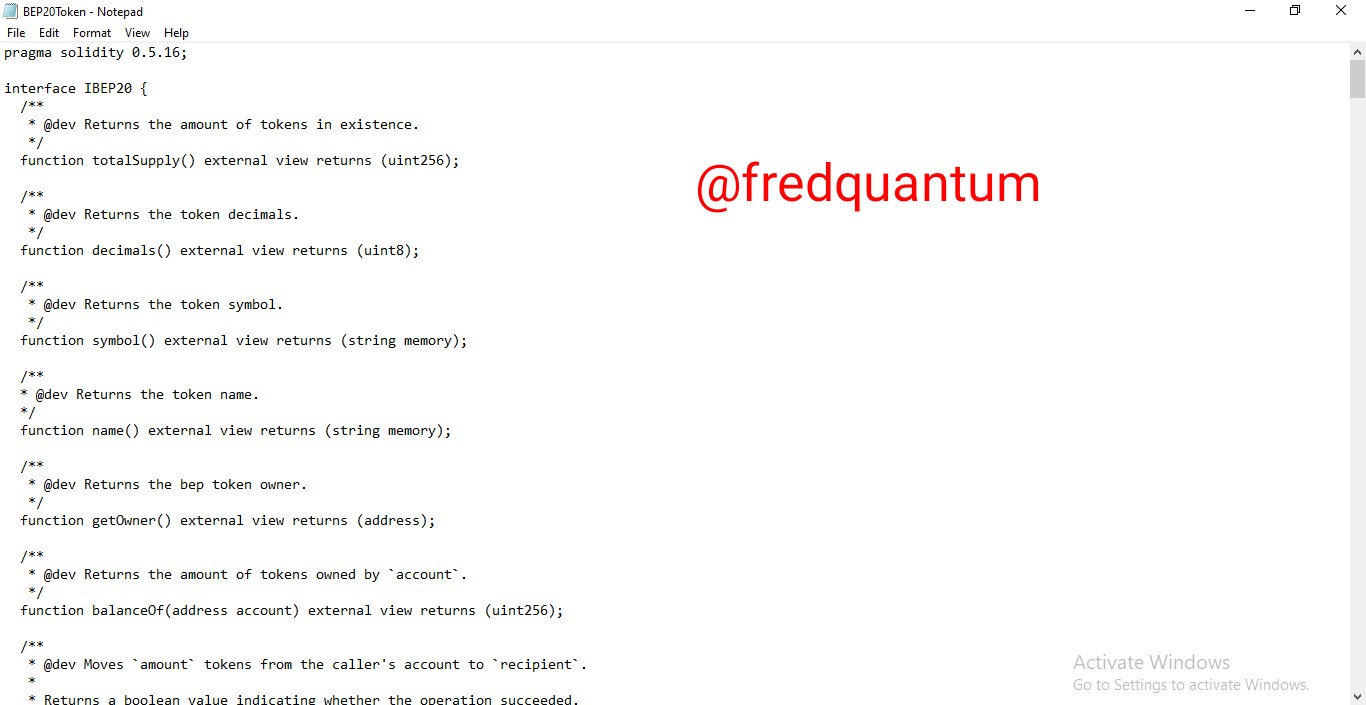
BEP20 Token Template | Source- PC's Notepad
- I copied the contract code from the notepad above and pasted it into the new file created on the web Remix IDE.
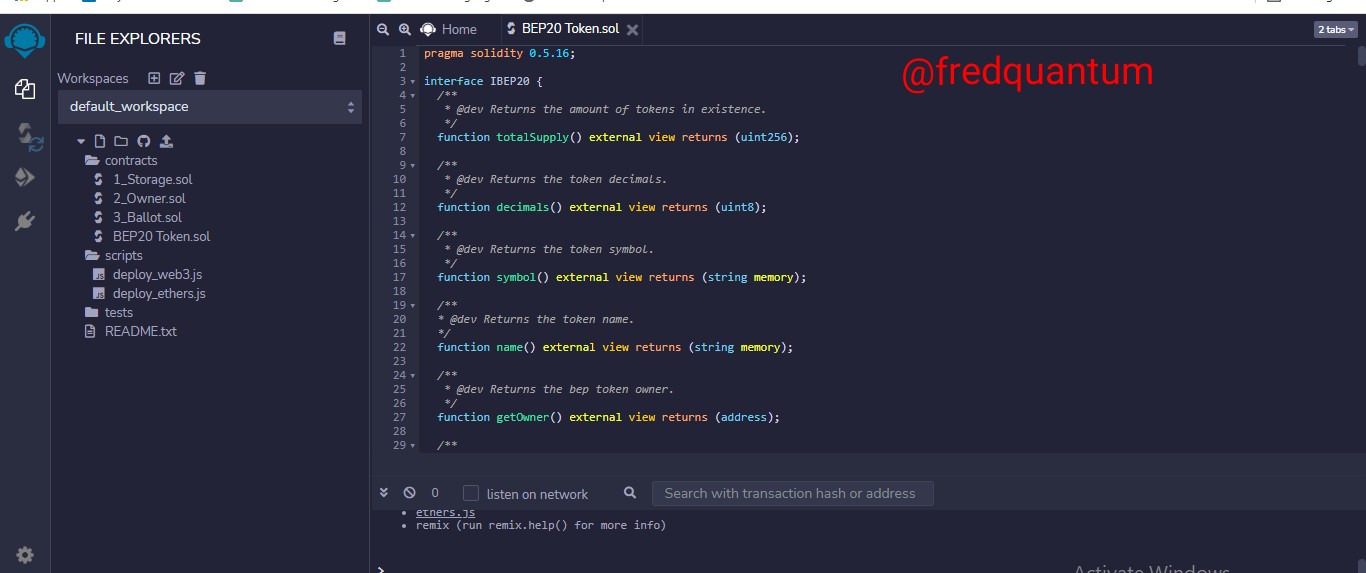
BEP20 Token Contract Code | Source-https://remix.ethereum.org/
- name: This is the name of the token we are about to create. Every cryptocurrency has names like Ethereum, Bitcoin, Algorand and so on, likewise, in the line of the code, we have to assign a distinctive name for the new project.
- symbol: Symbol in this context simply means the short form of representing the token. For example, the symbol for Bitcoin is BTC, Binance Coin is BNB and so on, in this case, it's important to add a preferable symbol for the new token we are about to create.
- decimals: Decimals is also a very important feature to consider in this context, which simply means the least fragmented quantity of the token that could be purchased, in order words, how the token can be divisible. For example, a token with 18 decimals means if one can't afford a whole of the token, one can still buy its fragments up to 0.000000000000000001 (18 decimals).
- totalSupply: Total supply simply means the total quantity of the tokens that would be created and made available at this particular time.
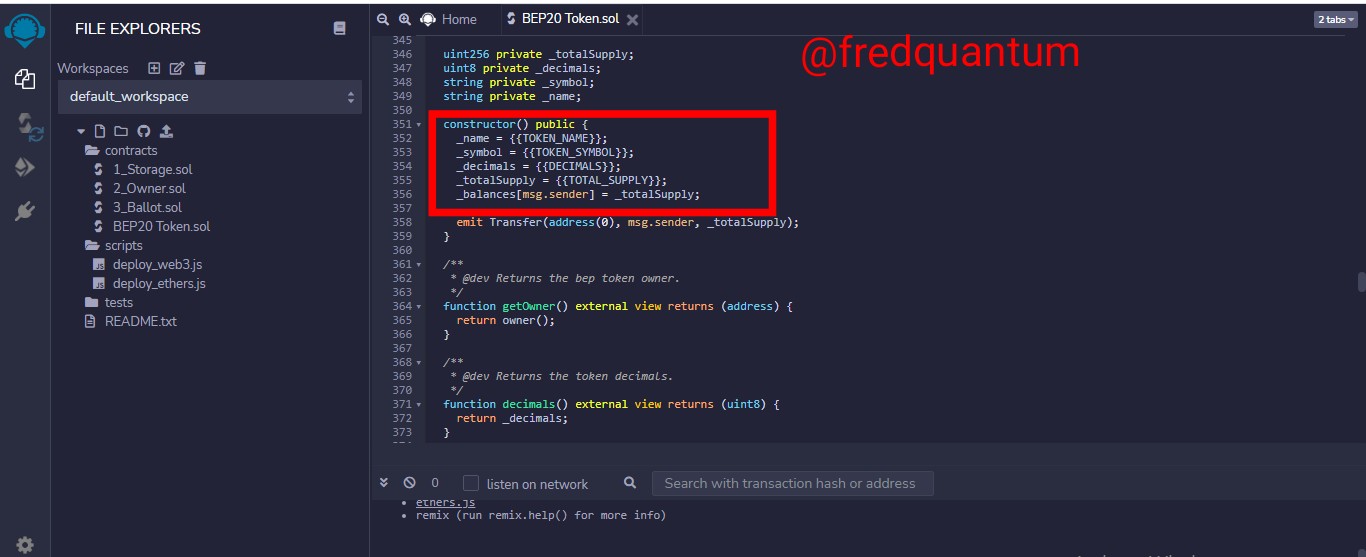
BEP20 Token Contract Code | Source-https://remix.ethereum.org/
- name: "Vanguard";
- symbol: "VGD";
- decimals: 18;
- totalSupply: 10000000 * 10 ** 18;
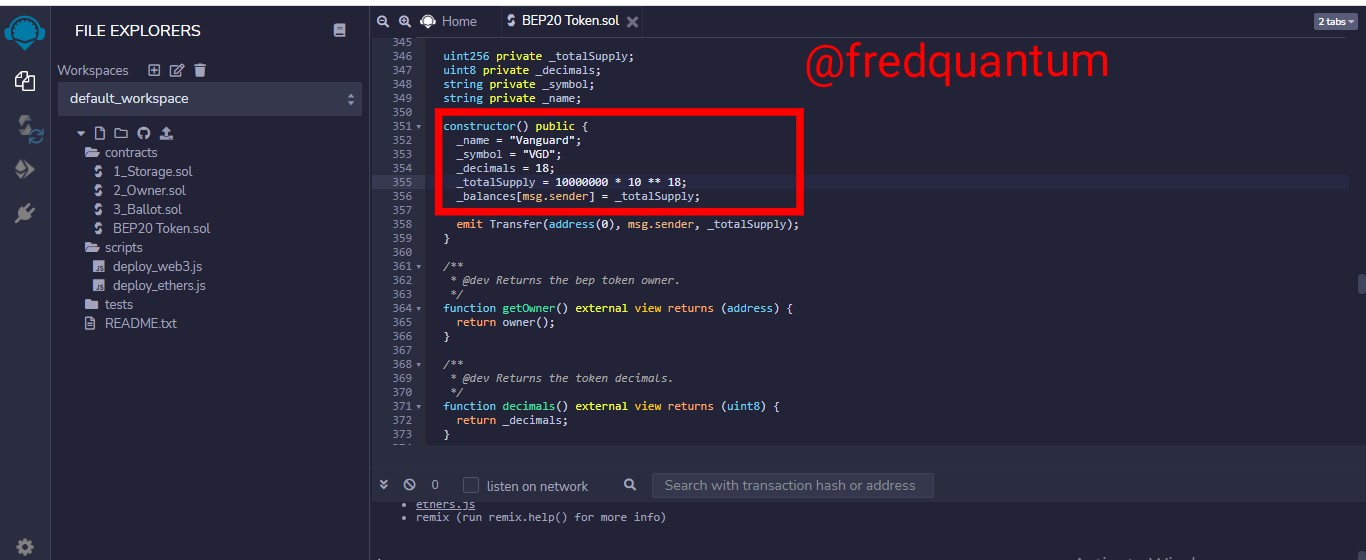
BEP20 Token Contract Code | Source-https://remix.ethereum.org/
After successful customization of the contract code, the next thing is to click on Solidity Compiler from the left on the window and I selected Compile BEP20 Token.sol (The project's file). See the screenshot below.
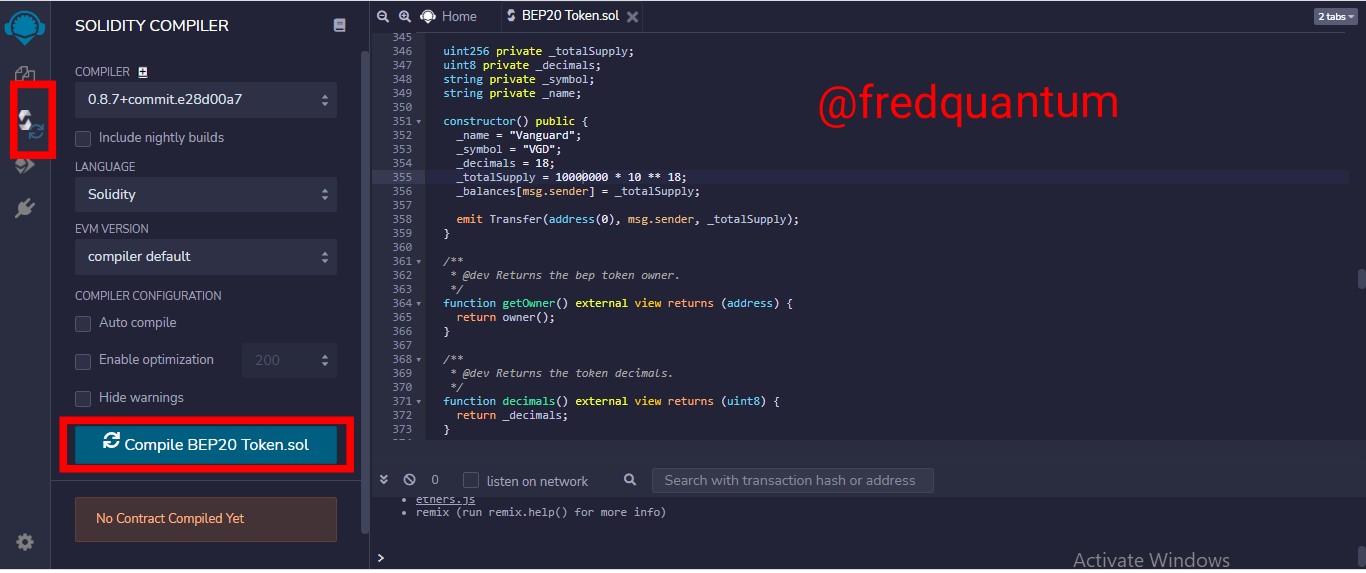
Compile BEP20 Token | Source-https://remix.ethereum.org/
The file was successfully compiled, now I will head to deploy the project. From the left window, I selected Deploy and Run Transactions and clicked the Deploy button.
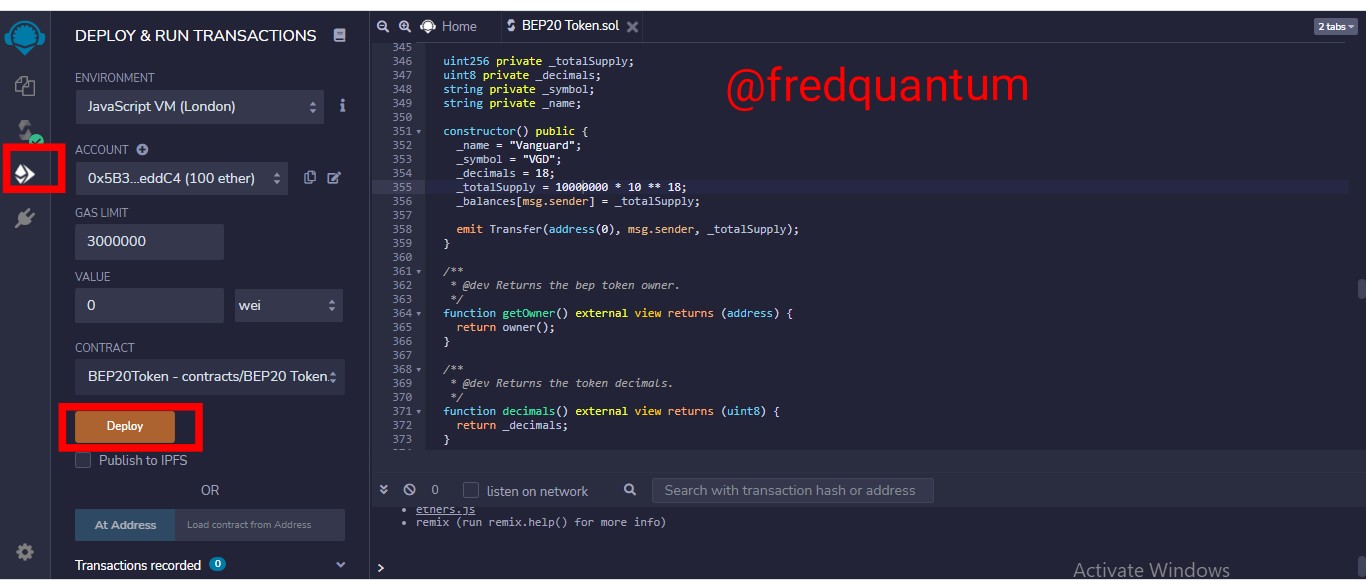
Deploy | Source-https://remix.ethereum.org/
After the deploy action, we can see the details of the project like; name, symbol, owner name, decimals, total Supply, and so on. See the screenshots below.
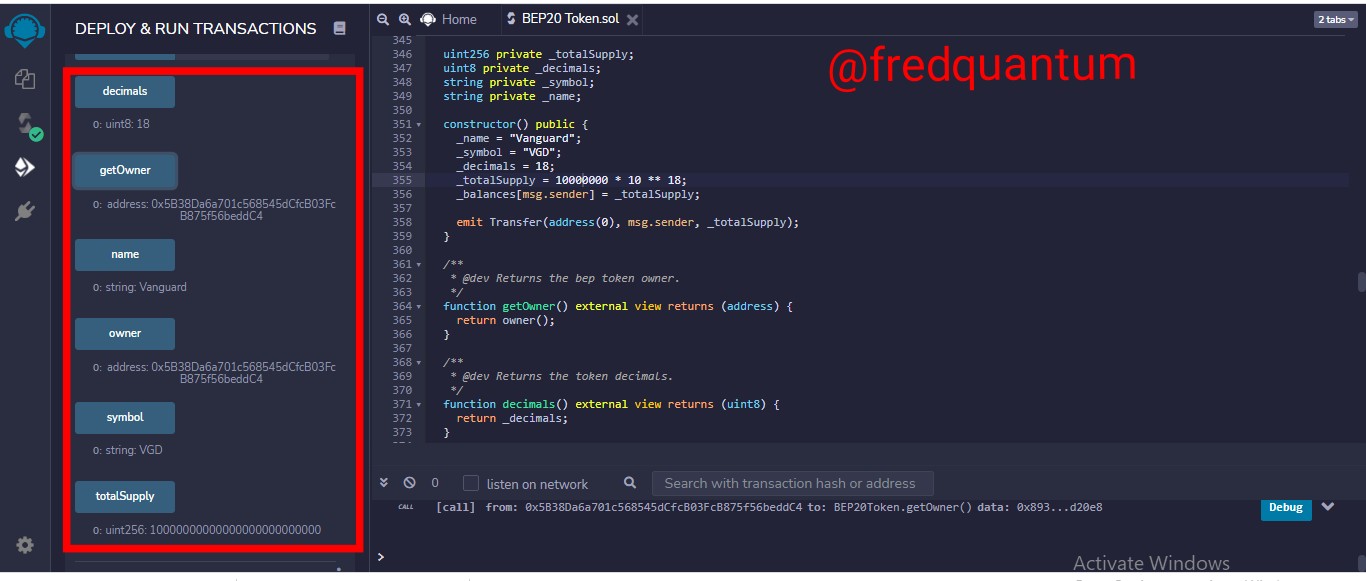
Project details | Source-https://remix.ethereum.org/
5- Demonstration of finishing up the creation of the Token and Import to MetaMask Wallet
To finish up, we would need to connect the wallet in question (MetaMask) to the Remix IDE and the steps involved would be given below.
- I launched the MetaMask wallet and on the account, I explored the options and selected Connected sites.
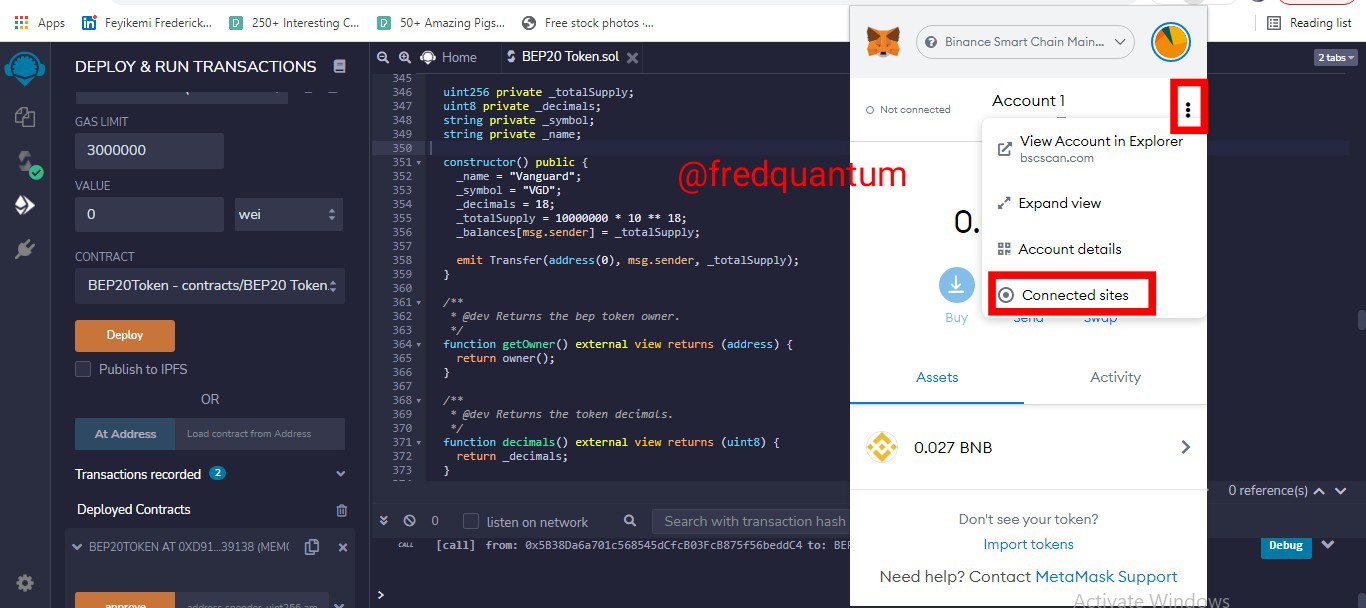
Source- https://remix.ethereum.org/ and MetaMask
- On the next interface, I selected the Manually connect to the current site button.
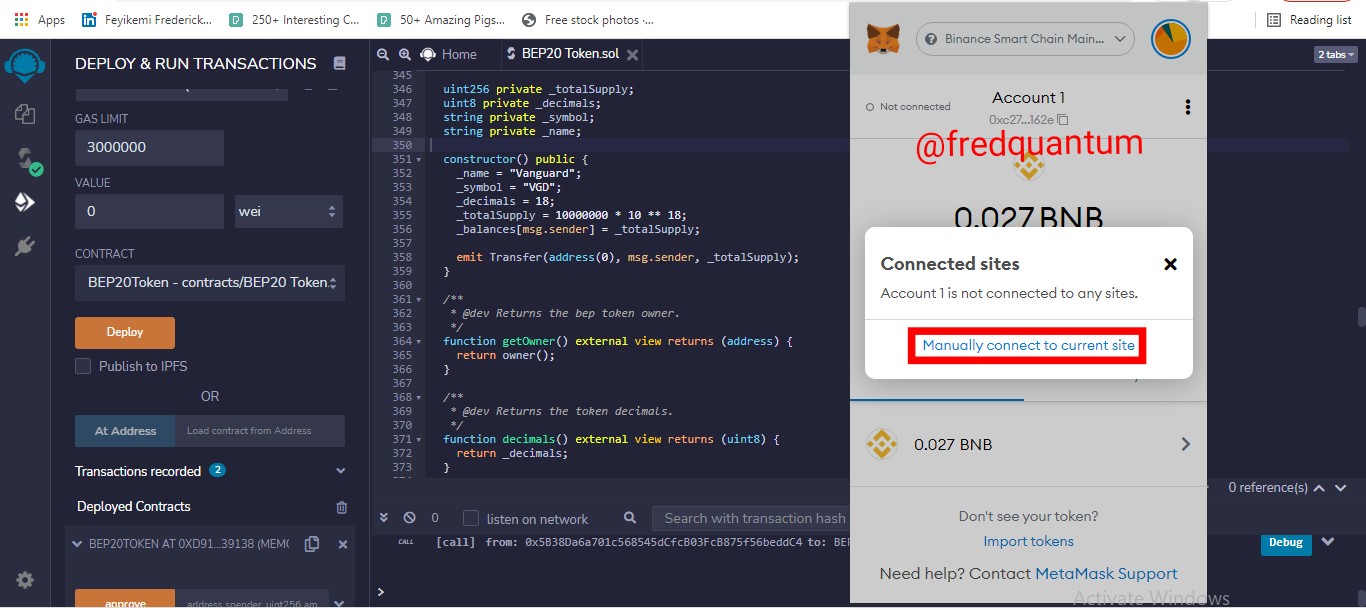
Source- https://remix.ethereum.org/ and MetaMask
- From the wallet, I clicked the Next button and confirmed the connection. See the screenshots below.

Source- https://remix.ethereum.org/ and MetaMask
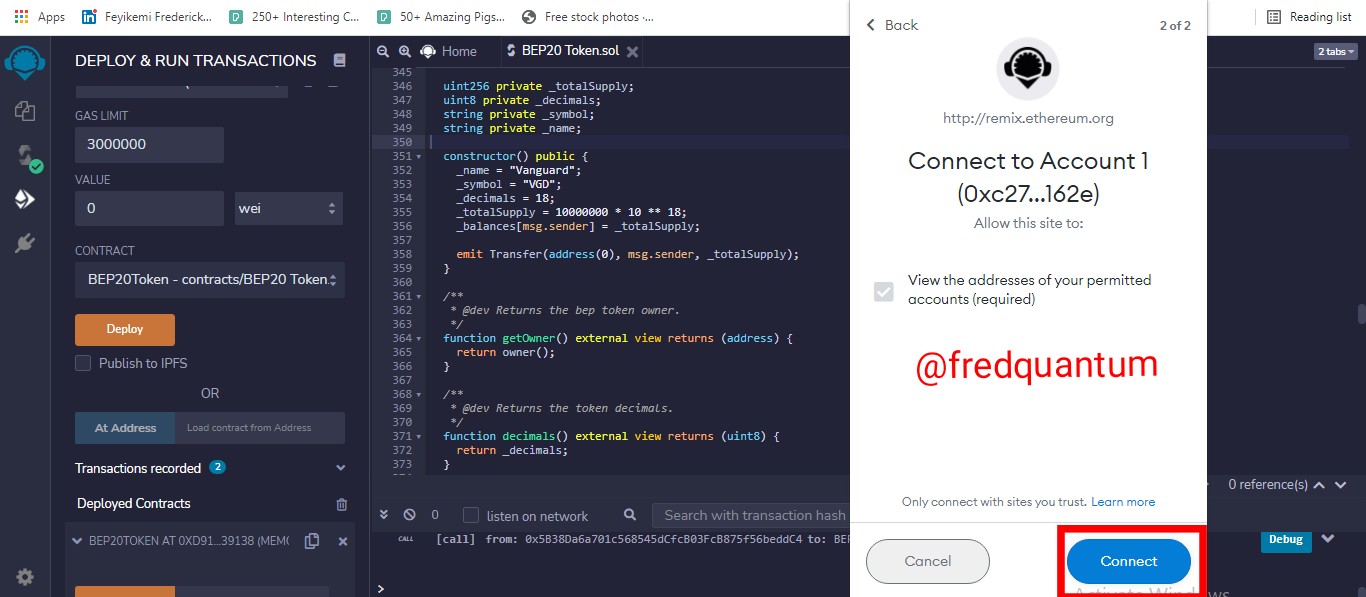
Source- https://remix.ethereum.org/ and MetaMask
- I've been able to connect MetaMask wallet with Remix IDE. Now on Remix IDE Environment's section, I switched to Injected Web3. See the screenshots of the process below.
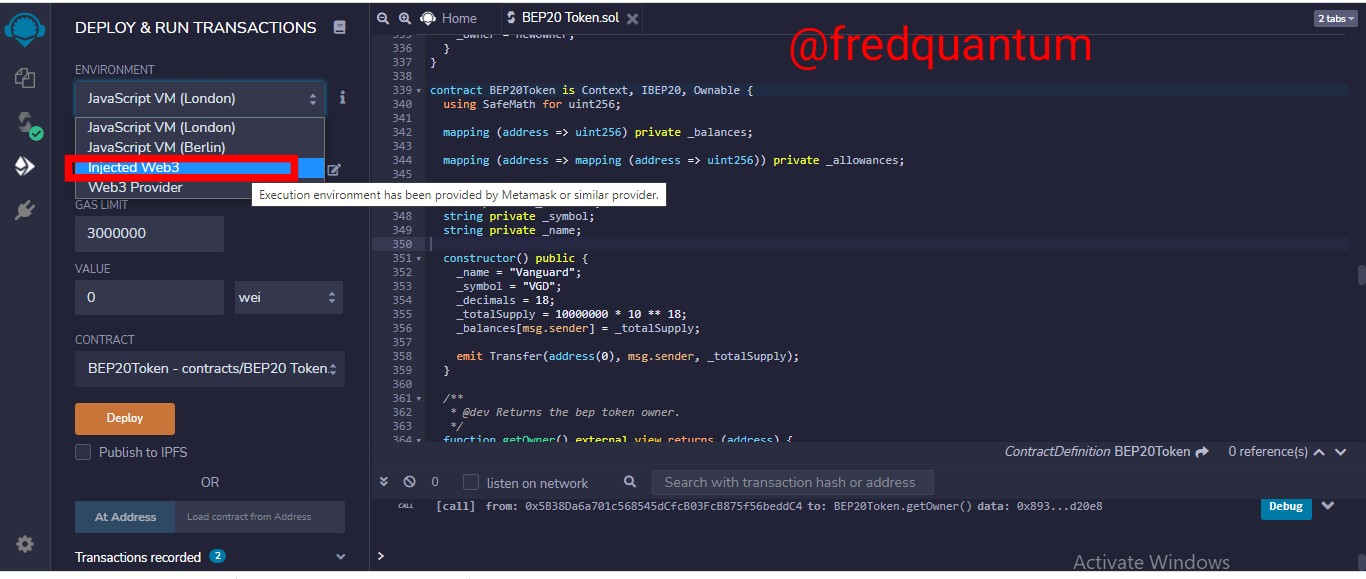
Source- https://remix.ethereum.org/
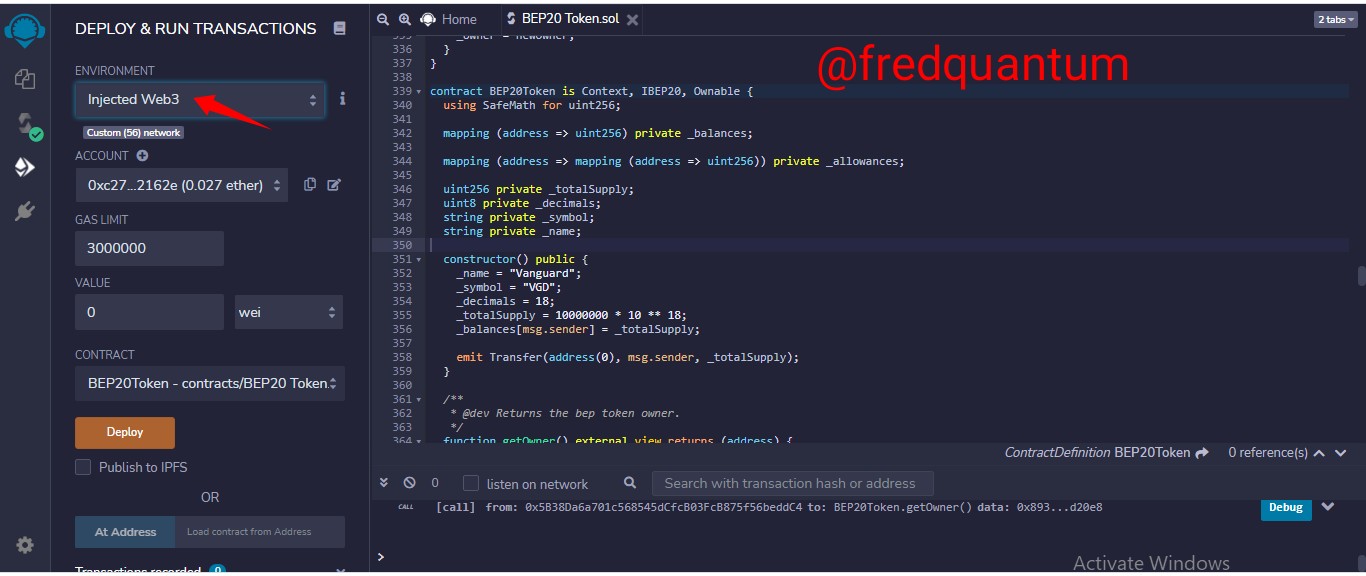
Source- https://remix.ethereum.org/ and MetaMask
- At this stage, I clicked the deploy button, the estimated gas fee is 0.00786593 BNB and I confirmed the transaction on the MetaMask wallet.
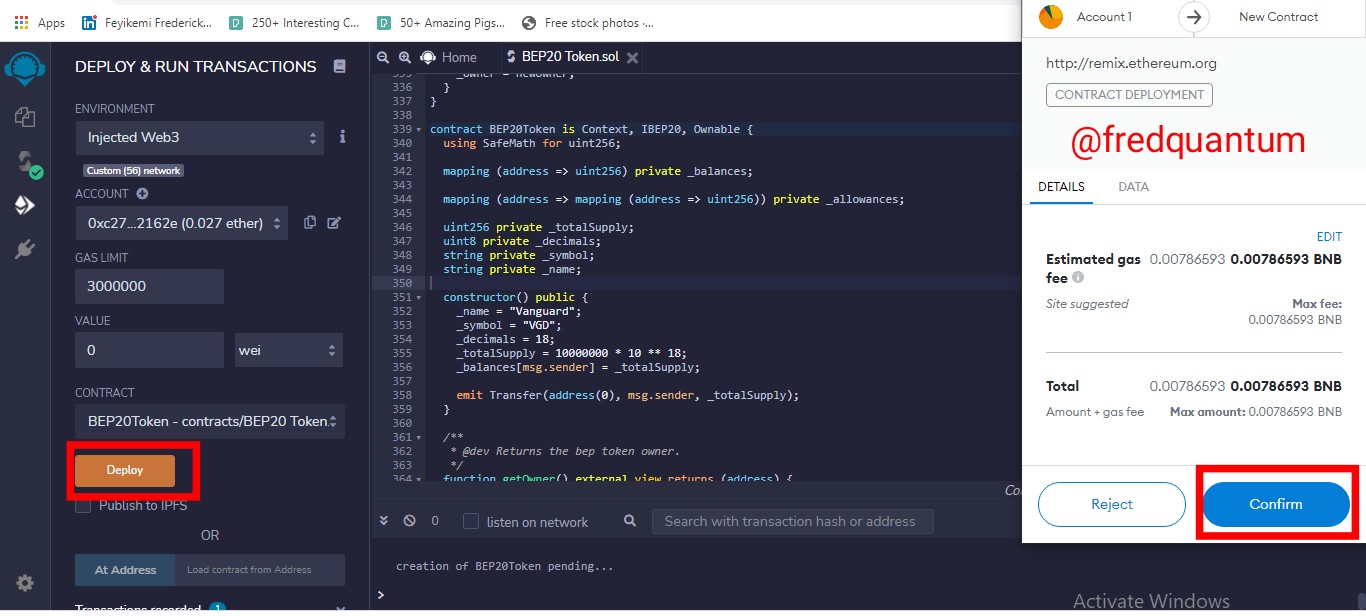
Source- https://remix.ethereum.org/ and MetaMask
How to Import the newly created token into MetaMask
In order to add the new token into the MetaMask wallet, it is required to get the contract address of the token. After the successful deployment of the token in Remix IDE, I was able to fetch the contract address which is 0x7f26d83806b09490b721278ffefc5ac6e82da443. See the screenshot below.
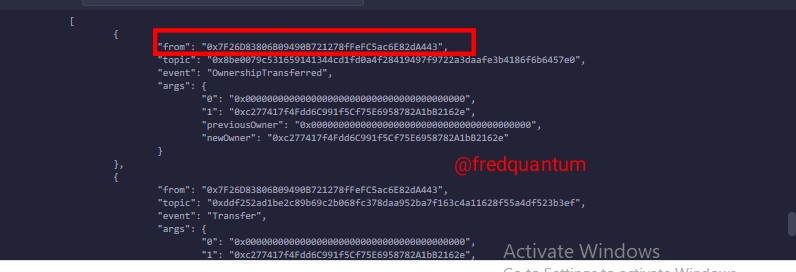
Source- https://remix.ethereum.org/
- To start the import process, I launched my MetaMask wallet and at the bottom of the page, I selected Import tokens, and on the next interface, I pasted the Contract address. The symbol and the decimals surfaced automatically, and I clicked the Add Custom Token button. See the screenshots below.
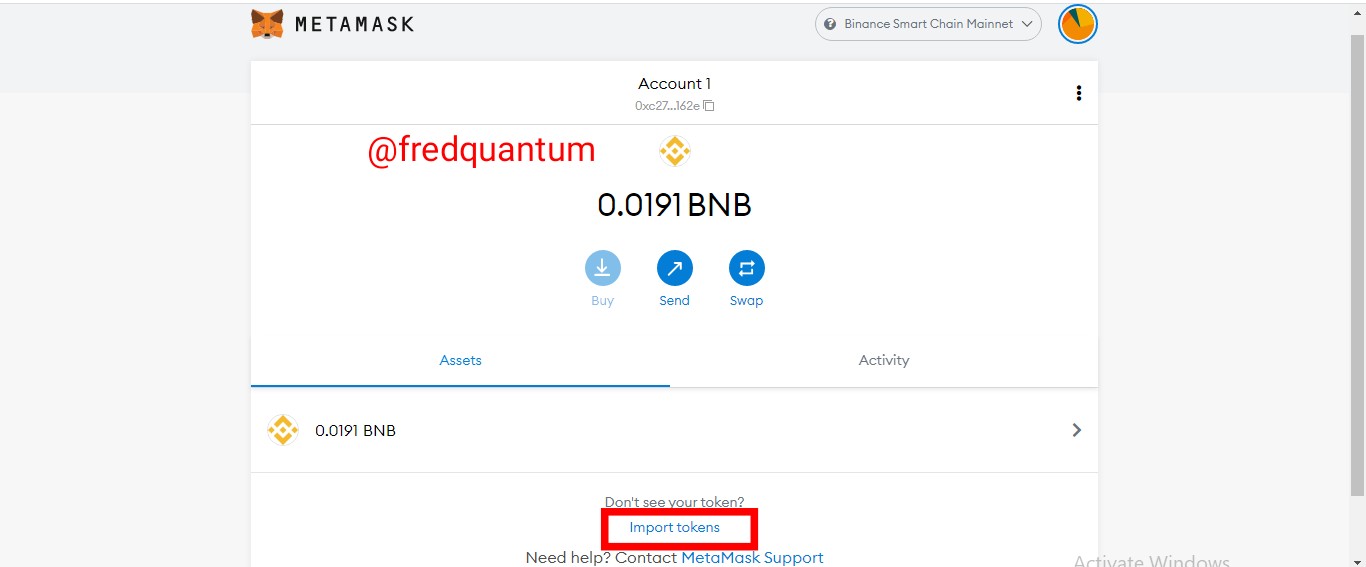
Select- Import Tokens | Source- MetaMask
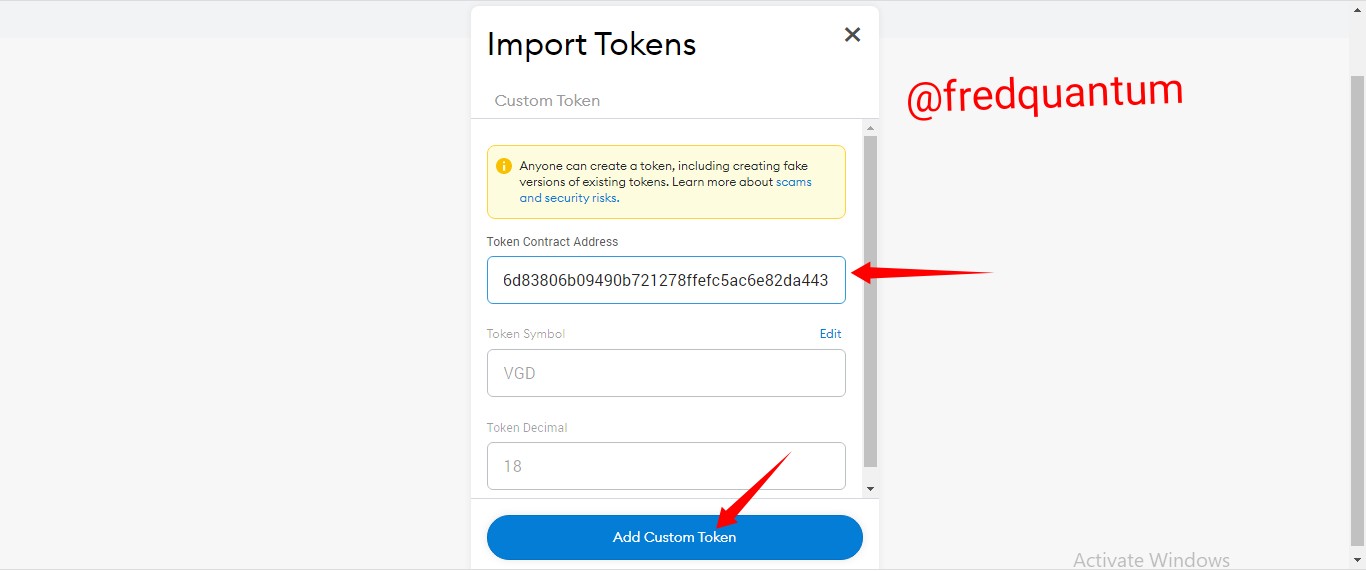
Select- Add Custom Token | Source- MetaMask
- On the next interface, my token surfaced with the total supply of 10 million VGD tokens and I clicked the Import Tokens button to confirm the adding process. See the screenshots below.
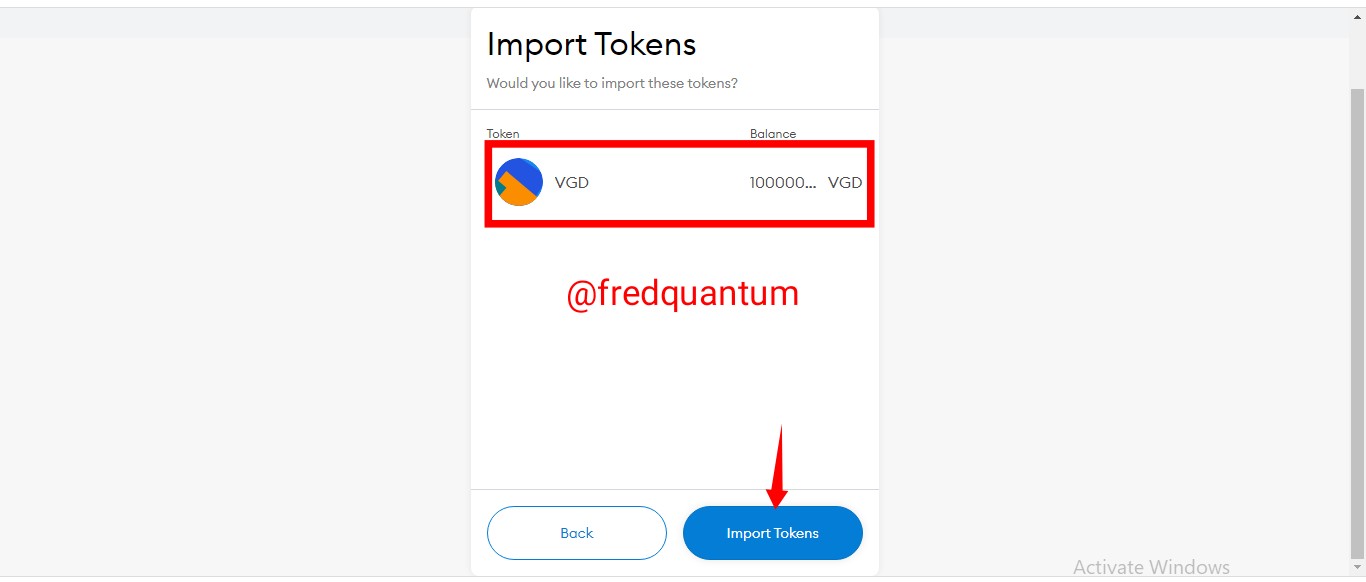
Select-Import Tokens | Source- MetaMask
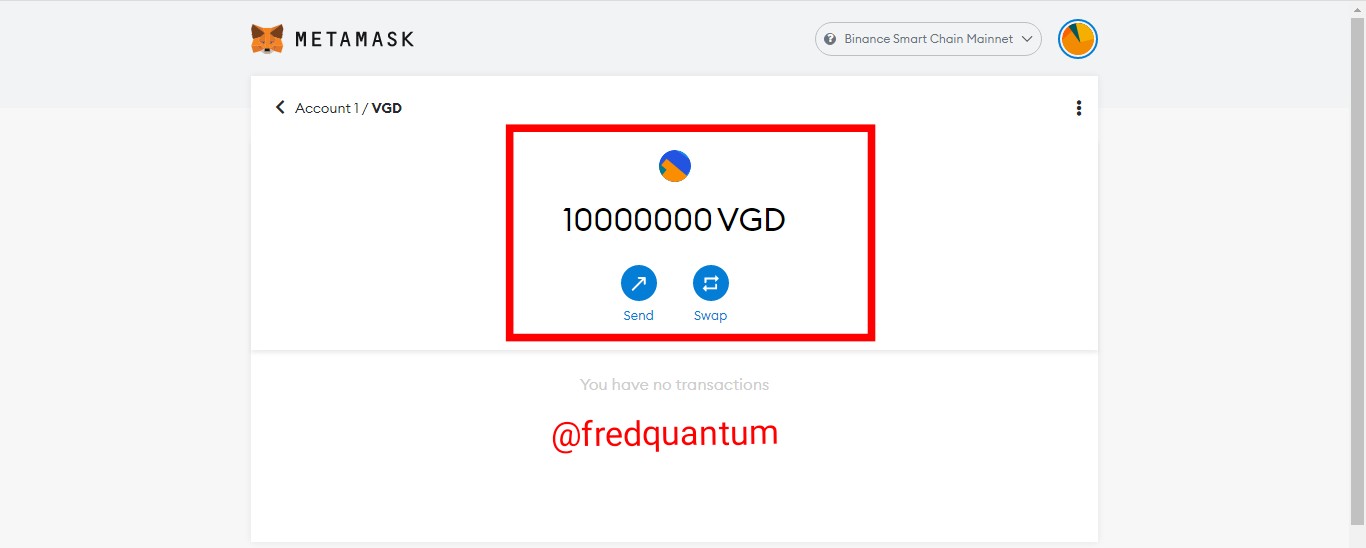
VGD Token Imported | Source- MetaMask
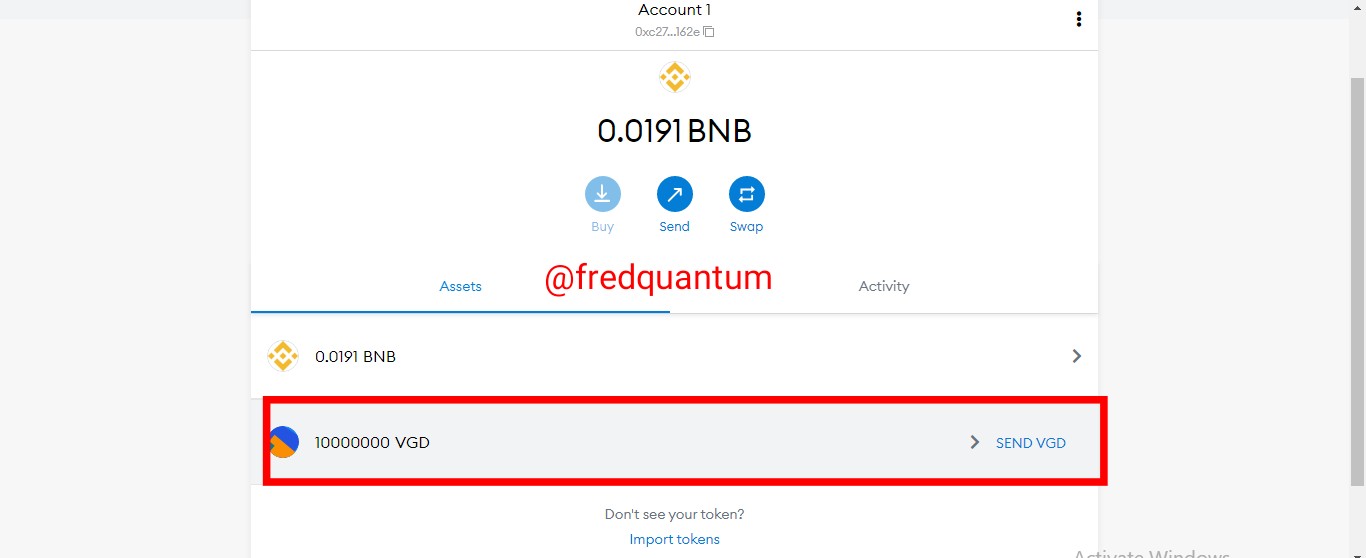
Tokens | Source- MetaMask
6- Verification of the Token Creation Transaction
At the end of deployment process in Remix IDE, a success output was shown at the run section which confirmed the transaction.

Source- https://remix.ethereum.org/
Selecting the debug drop-down above, we get access to the transaction details like the Hash and so on. The Hash of the transaction is 0x64251df940c06fc7d5918ec1ed9261b8bdffee84846932f18402dad03a411b6a/.
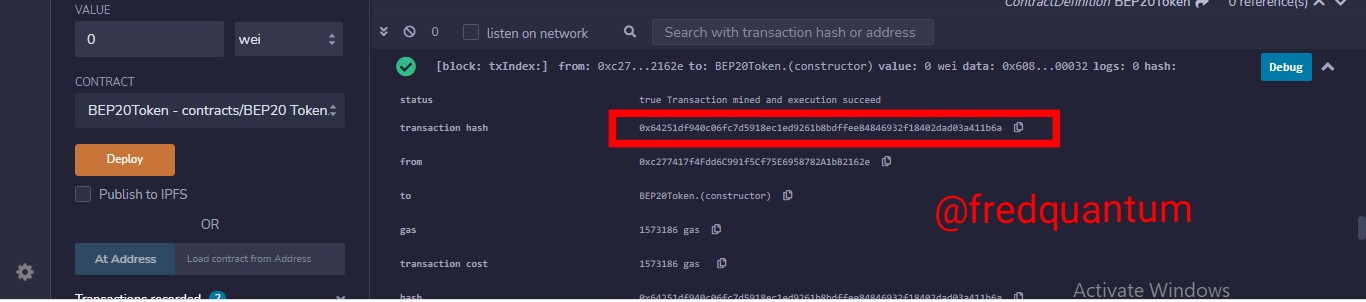
Source- https://remix.ethereum.org/
Scrolling down, a lot of other details can be seen, notably, we can fetch the Contract address.
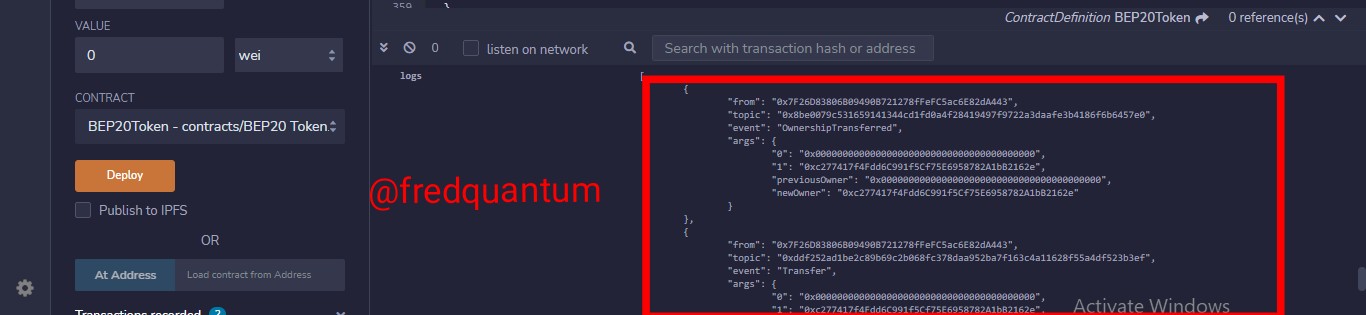
Source- https://remix.ethereum.org/
Verification on BscScan
And now that we have the transaction Hash of the transaction, we can easily verify the transaction on https://bscscan.com. The details of the transaction is shown below.
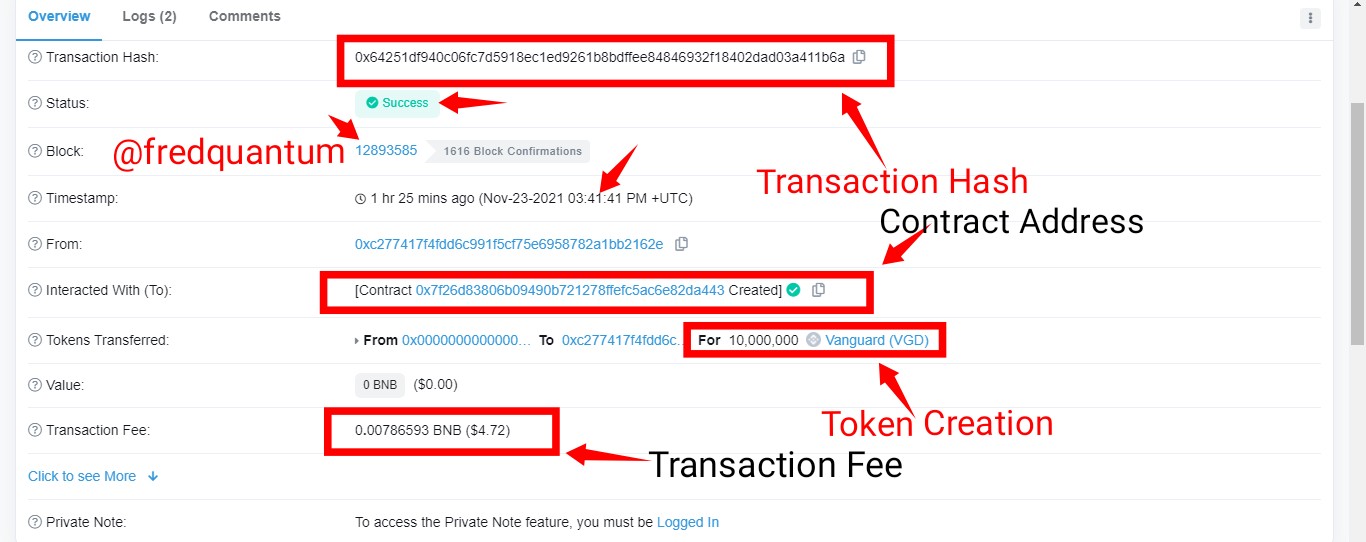
Source- https://bscscan.com
Some of the details above are the transaction Hash, status (success), block (12893585), contract address, transaction fees (0.00786593 BNB ~ $4.72), the transaction purpose (10,000,000 Vanguard tokens creation), timestamp and so. I have given most of these earlier in the context.
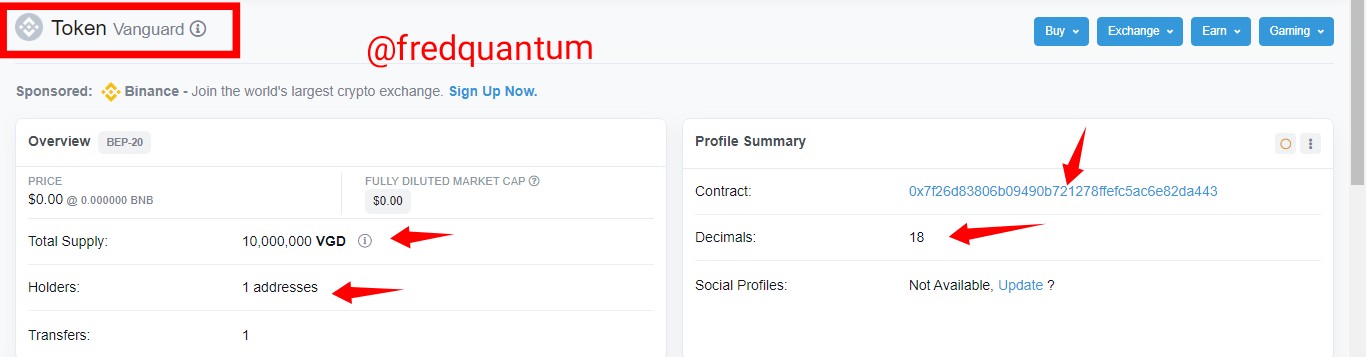
Source- https://bscscan.com
And above is the details of Vanguard which shows its contract address, total supply, number of addresses (1 at the moment), decimals and transfers.
Conclusion
In conclusion, there is a distinctive difference between token and coin which is that the former is built on an already existing blockchain while the latter is built on own blockchain. In this context, I have also been able to create a new token on the Binance Smart Chain, with the name Vanguard (VGD). The entire process was quite fun. Thanks to all that read this piece.
Written by;
@fredquantum
Sort: Trending
Loading...