[Risk Management and Trade Criteria] - Crypto Academy / S5W7- Homework Post for @reminiscence01
What do you understand by "Risk Management"? What is the importance of risk management in Crypto Trading?
Risk is normally always associated with negative energy because most people when they hear risk, forget of the part where you could potentially make profits, and choose to concentrate on the thought of the risk turning out to incur a loss instead.
The crypto market as much as it can make traders rich in a couple of seconds, can also be the cause of a trader going bankrupt if care is not taken. It is only a naive trader who enters positions in the market thinking the trade will 100% go in their favor. A professional trader is aware that a trade can turn side ways anytime and so makes plans to minimize his losses in case that happens. This ability to accept that a loss might be incurred in a trade and setting up back up plans to minimize loss during a trade setup is what is generally understood to be Risk Management.
There is no success or profit without risk. In the market, there is generally more risk in extremely volatile markets than non-volatile markets. A trader has to look for a market whose volatility suits his risk tolerance by weighing his potential gains against his loss. If he finds that his winning is worth the risk and he can physically, emotionally and psychologically handle the risk, the enter that particular market.
Knowing fully well that trading involves risks, traders calculate and control the amount of money they could potentially lose. Risk Management involves taking precautions and setting back up plans in case your trade goes south so that in case a loss is incurred at all, your entire investment or trading funds doesn’t get burnt in one single bad trade.
Importance of risk management
Avoidance of Bankruptcy: The nature of how fast the crypto market can make traders reach is just as same as that as it can make you bankrupt in seconds. This is due to the highly volatile nature of crypto markets. It is therefore best to have a risk management strategy in place to prevent your entire trading capital to get burnt in one trade.
Loss Control: A professional trader set risk management strategies to control how much loss or risk they’re exposed to. YOU decide how much you’re risking and whether or not the profit is worth the risk. Risk management prevents you from suffering unforeseen losses.
Reduces the chances of a traders falling to market psychology tricks like FOMO or FUD: With a risk management strategy, an investor stays put no matter what movement suddenly appears to be happening in the market out the blue, because they didn’t plan for it. This will prevent you from falling victim to market psychology tricks like FOMO or trading based on sentiment or emotion.
Automated marketing: When a trader uses strategies like stop loss and take profit, the trader is basically given their broker directions as to when to close a position. This position will be closed regardless of whether or not the trader is online at the time of execution. This will ensure that the trader does not miss out on important market moves.
Explain the following Risk Management tools and give an illustrative example of each of them.
a) 1% Rule.
b) Risk-reward ratio.
c) Stoploss and take profit.
a) 1% Rule.
The 1% rule simply teaches a trader to risk not more than 1% of his investment or trading capital in a single trade. This makes sense if you look it. Losing 1% of your trading funds still leaves you a big part of your investment to open more trades. Losing 1% of your investment also will be easier to recover mentally and psychology and be able to trade without sentiment in your next trade: this is more likely going to increase your chances of winning in your next trades.
The one percent rule ensures that when you do encounter losses(which are inevitable in the market) your entire investment doesn’t get flushed down the drain. You will merely be losing a negligible fraction of your trading capital as opposed to potentially losing everything or a greater part of your investment.
Most people think that the one percent rule means that you can not enter a single trade with more than 1% of your trading capital . You can enter a single trade with all your trading capital as far as you take precautions to not risk more than 1% of your entire trading capital
Illustrative example of 1% Rule
If I have $1,000 as my trading capital capital and I want to use the 1% rule to manage my trade risk this is how I do it. I calculate 1% of my $1,000 (1/100 x $1,000 = $10). Now that I have determined what 1% of my trading capital is, I open trades with a maximum risk of 10$ and nothing more.
This doesn’t mean I can only enter a single trade with a maximum of $10. I can enter a trade with $100 (10% of my trading capital) if I want, I just need to ensure that the risk involved with entering with the $100 is not more than $10 (1% of my trading capital).
So let’s say I want to open 6 positions, each with this $10 risk maximum. If unfortunately the market turns on me and I’m going to incur losses on all the 6 positions, I will be taking a loss of $60 ($10 x6). I can take this loss mentally and psychologically, and I will still have $9,940 to trade with and still stand a huge chance of making profit to make up for this loss.
b) Risk-reward ratio.
The risk-reward ratio like other ratios compares how much you stand to gain or profit for each dollar of loss potentially incurred. Professional traders use this to determine how much they would need to risk to earn a certain amount of profit and to determine if a certain level of risk is worth the returns. Traders generally stay out of trades that require high risks to earn small profits and rather enter trades where small risks generate high profits. It is generally best to keep a 1:2 risk-reward ratio where rewards are twice as much as risks, or minimum risk-reward of 1:1 where the risk equals the profit to be made.
The risk-reward ratio paints the trader a picture of how much they stand to lose if the market doesn’t go in the direction they anticipate(risk) versus how much they stand to gain if the market goes in their direction(reward). Investors use the stop loss and take profit strategy to set risk reward ratios.
Illustrative example
Say I have a $1,00 and I want to open a trade, First I will employ the 1% rule and only enter trades with a $10 risk. Now that I have chosen how much I want to risk, I need to determine which risk-reward ratio I want to use. I personally like to use the 1:2 risk-reward where profit equals two times the risk involved. This means that for the $10 risk I am taking, I stand to gain $20 profit.
c) Stoploss and take profit.
Stop Loss and Take Profit are limit orders that specify to your broker the price at which to close a position going in the unexpected direction (meaning loss incurred and to execute a stop loss) or in the predicted direction ( meaning profit yielded and to execute take profit). It has two parts, the stop loss part closes the position when it is going in the unexpected direction leading to a loss, and the take profit part closes the position in profit.
Trading tools like the EMA indicator and important levels like resistances and support can be used to determine where to place stop loss and take profit points. We can also use market patterns line trendlines, market structure and patterns like triangles, rectangles and wedges.
Illustrative example
Say I place a trade with stop loss and take profit levels, If price reaches the stop price of the stop-loss, the stop-loss limit order is executed to close the position, in which case a loss will be incurred. On the other hand if price reaches the target profit level, the take profit order is executed and the position is closed in profit. It is the difference between the stop loss and take profit that traders use to determine the risk-reward ratio.
Open a demo account with $100 and place two demo trades on the following;(Original Screenshots on Crypto pair required).
a) Trend Reversal using Market Structure.
b) Trend Continuation using Market Structure.
a) Trend Reversal using Market Structure (ATOMUSDT BUY ORDER)
Trade Criteria
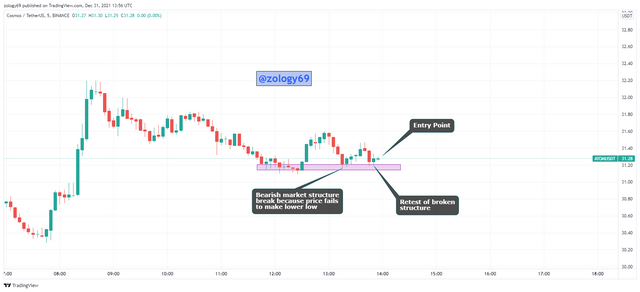
We can see from the 5-min ATOMUSDT price is making lower highs and lower lows and qualifies as a bearish movement due to the bearish market structure. However, the bearish market structure of lower highs and lower lows broke when price failed to create a lower low. Price retested the break point shortly after and started reversing back up again. An entry is made at the second candle in the bullish direction.
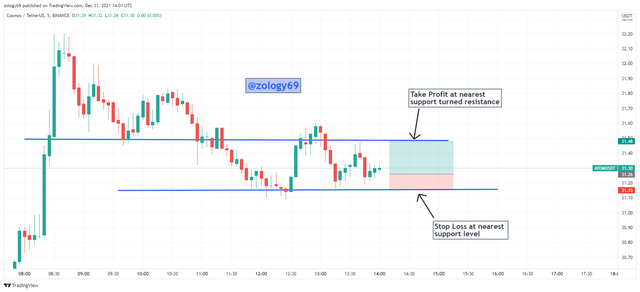
Exit Criteria
My exit criteria is shown by my stop loss and take profit positions. Stop loss was set at $31.10, the nearest support level. My Take Profit was also placed at $31.56, the nearest support turned resistance to be in 1:2 risk-reward ratio.
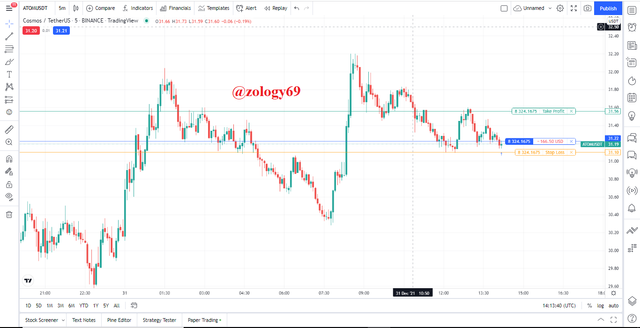
I then went ahead to place my trade in my tradingview paper trading account. We can see below my account balance at the moment to be $99952. Taking the 1% rule into account, I will be risking not more than of $999.52 (1% of my trading capital) in this single trade.

Let’s now look at how I placed my trade and the risk amount in $ and risk percent involved. By buying 8,324 units of ATOM, I risked $999 which was a 1% risk as can be seen in the screenshot below.

Below is proof of my order.

We can see my order executed on the chart below showing my entry price, my take profit target and my stop loss target.
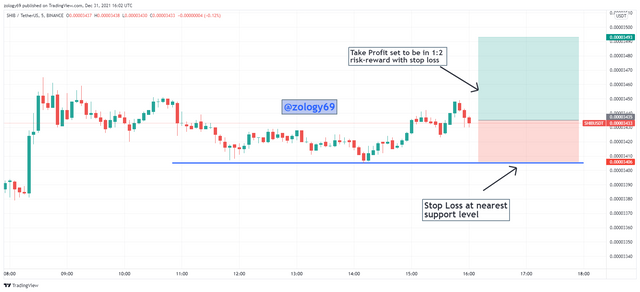
b) Trend Continuation using Market Structure.
Trade Criteria
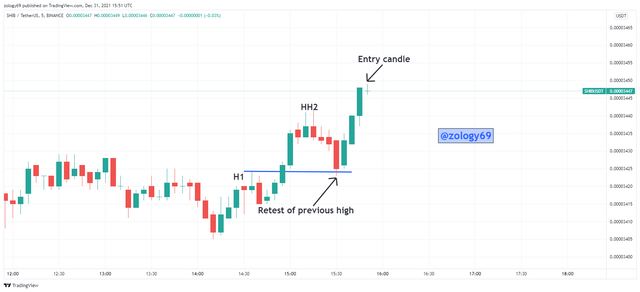
We can see from the 5-min SHIBUSDT price is making higher highs and higher lows and qualifies as a bullish movement due to the bullish market structure. We can see price makes a first high (H1) and another second higher high (HH2). After second higher high (HH2), price retested the previous high (H1) and continued moving back up again. An entry is made at the third bullish candle.
Exit Criteria
My exit criteria is shown by my stop loss and take profit positions. Stop loss was set at $0.00003406, the nearest support level. My Take Profit was also placed at $0.00003492 to be in 1:2 risk-reward ratio.
I then went ahead to place my trade in my tradingview paper trading account. We can see below my account balance at the moment to be $98869 since my account took a $999 loss(1% loss) in my previous trade. Taking the 1% rule into account, I will be risking not more than of $988 (1% of my current trading capital) in this single trade.

Let’s now look at how I placed my trade and the risk amount in $ and risk percent involved. By buying 3531420785 units of SHIB, I risked $988 which was a 1% risk as can be seen in the screenshot below.
.png)
Below is proof of my order.

We can see my order executed on the chart below showing my entry price, my take profit target and my stop loss target.
.png)
Being successful in trading is not just about using the right indicators or identifying the right entry and exit points. It also has a lot to do with your risk management strategies. Trading without a risk management strategy is trading to lose and can lead to you losing all your money or a good portion of your trading capital.
The 1% rule, stop loss and take profit are but a few of dozens of risk management strategies we have. We also have position sizing and traling stop loss. We can also even tweak the 1% rule to adjust our risk potential and incorporate it into our trading strategy for better results.
CC:prof @reminiscence01