Image Content Etiquette: How to manage images correctly and make your posts look great.


Introduction
An image is a great tool for a nay publication. Images not only make for a more comprehensive reading, they also help the reader visualize what the author wants them to know from the story. When used correctly, an image makes an article look great too - and complete. So in this article, I will share with you some helpful tips and things to always remember when adding images to your posts. We will look at the following four points as regards the use of Images:
- Image Orientation
- Image size
- Image Description
- Image Appearance
- Image Count
- Image Location Coordinates
1. Image Orientation
The orientation of an image is usually determined by looking at its sides. Unless the image has a square shape where the size of all sides are equal, there are basically two types of image orientation. They are landscape and portrait. Portrait orientation is when the length of the image is taller than the size of the width. The shape of our Smartphones is a common example of portrail orientation.
In landscape orientation, the length of the image is shorter than the size of the width. Basically, landscape orientation is the opposite of portrait. When you tilt your phone camera at an angle of 90 degrees, its takes the landscape orientation. Compare the two images below to understand the two orientations:
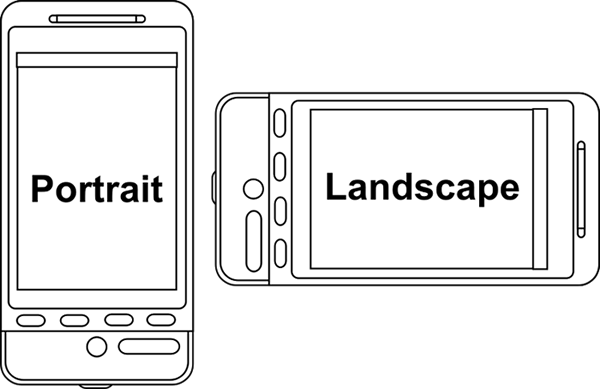
Image Orientations (Source)
Now that we have understood the two orientations, which should be used and when?
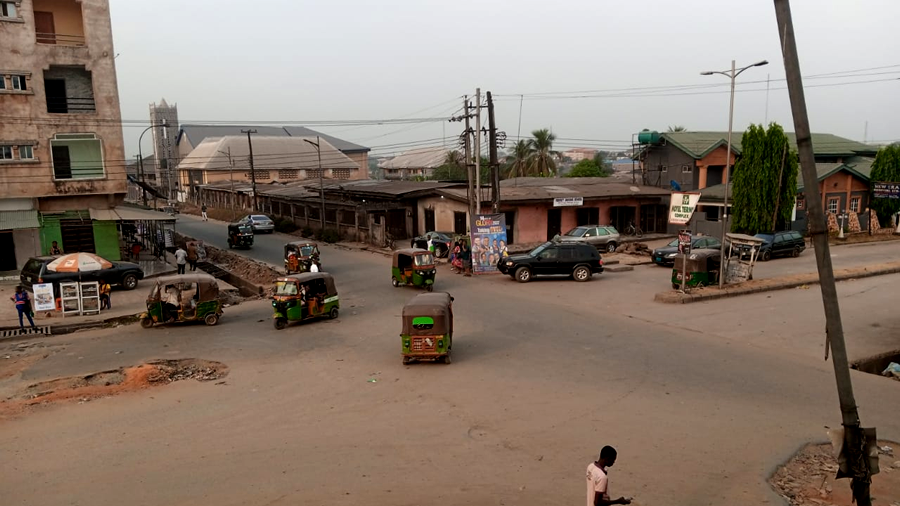
- Thumbnail Image: The first image you insert in your post is basically the thumbnail image. It is the image previewd before your post is opened. The frame of steemit thumbnail images was designed with landscape orientation. So basically your first image must have landscape orientation if you want all of its part to be visible in preview mode. Below is two preview of thumbnail images one is in portrait, the other is in landscape.

Portrait Orientation
The image above has portrait orientation. You will discover that parts of the image was cut off in preview mode. That is what happens when your thumbnail image is in portrait orientation. So having thumbnail images in portrait layout should be avoided.

Landscape Orientation
The thumbnail image above is in landscape, so all parts of the image is properly displayed in preview mode. This is a standard way to use thumbnail images.
- Other Images: We have seen above that your first image should always have the landscape orientation. The question now is: What about other images in the post. Should all have landscape orientation? The answer should be no. The image you want to capture determines the layout it should have. For example, images whose length is longer than the size of the width will best be captured in portrait mode.
It is not bad to have some images in portrait orientation. However, having too many images in your post in portrait orientation, will make your page length to be unnecessarily long and stretched. You should try to strike a balance. Its preferable to have more images in landscape orientation as they have longer widths that maximize the screen display of most devices.
2. Image Size
Another great thing to check out before inserting images in your post is image size. If your images are small, the reader will find it difficult to see them well. If your images are extreemly large, your page will be dragged beyond the normal screen size, thereby hiding some of the write-ups on the page. Having your iimages in the right sizes is very important if you want your post to look great. Now lets narrow it down to the following two categories - thumbnail images and other images.
- Thumbnail Image: Although we have said that thumbnail images should be in landscape orientation, the size also should be considered. How high your image is compared to its width is called aspect ratio. For thumbnail pictures (where the width should be longer than the height), the 16:9 aspect ratio has been made the most popular. It is the same display size used in Television screens, computer monitors and other displays.
When your thumbnail images use the 16:9 aspect ratio, it maximizes the screen display in preview mode, ensuring that all the items in your image are correctly displayed and visible. Below are popular sizes in the 16.9 aspect ratio (in pixels):
1920 x 1080
1280 x 720
854 x 480
640 x 360
These are standard sizes for the thumbnail image and they are highly recommended. Your thumbnail images should have one of the above sizes, and should not be below the 640 x 360 range. However, you can still choose your own size, but you must ensure it confirms with the 16:9 aspect ratio. You can use this tool Aspect Ratio Calculator to know what the height of your thumbnail image must be, once you enter the width.
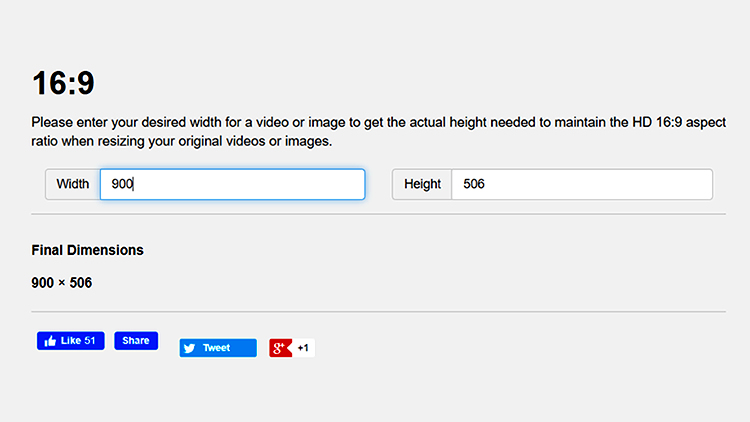
Screenshot from Aspect Ratio Calculator
- Other Images: For the other images in your post, the general rule is that your images should not be extremely large in width, otherwise it will push the screen beyond its size, thereby hiding some of the things on it. The same applies to the length. If the length of an image is too long, the page length will be expanded. Your reader will be forced to scroll through a long page of mostly images.
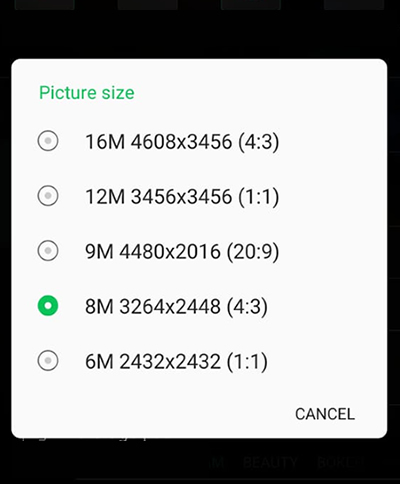
If your image has landscape orientation, always maintain the aspect ratio listed above and let your images have uniform size as much as possible. Most times, depending on the resolution of your device, your images will always need to be resized. Below is an example of the camera resolutions available in my Infinix S5 mobile device:
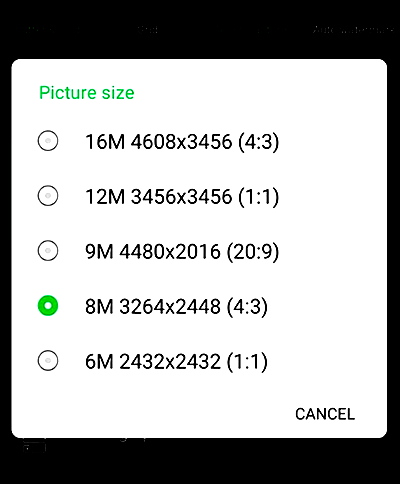
Screenshot from my Infinix S5 phone
From the above, you can see that my images shot with these resolutions would be too large if inserted in a page without resizing. Almost 100% of the time, I resize my images, reducing the sizes before using them in a post.
How to Resize your images
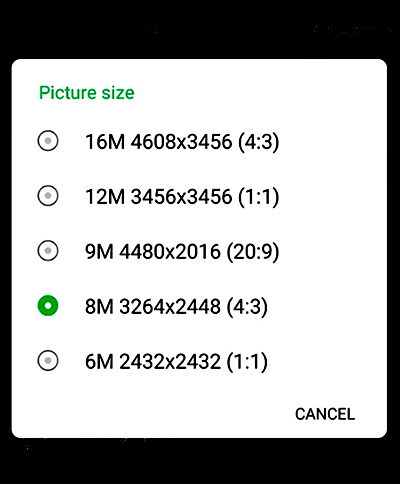
I have a desktop software which I use for resizing my images. But since most steemit users publish using their mobile phones, there are many apps that could be used to resize your images. Image Size Photo Resizer Is effective and can be downloaded freely from Google PlayStore. I will explain how to use it and resize images in another tutorial
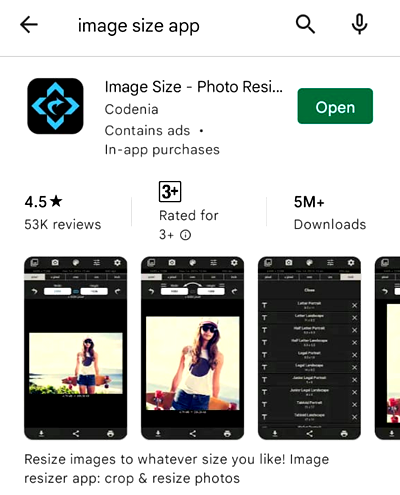
Screenshot from my Infinix S5 phone
3. Image Description
Another important aspect of great images is adding a description to your images. Unfortunately, many bloggers on Steeint fail to properly add description to their images. Adding a short secription to your image is a way to help the reader see what you want them to see or learn more about your Story. Standard media organizations like news media always add description to their images. So You should always add description to your images.
Some tips on adding image descriptions
- Descriptions should be short and clear.
- They should not be all caps.
- Descriptions should be formatted to appear different from the rest of your text.
- Descriptions are usually placed immediately below the image
- The Thumbnail Image usually should not carry a description. The post title should be a proper description of the thumbnail image.
As you would have noticed, all the images in this post have appropriate descriptions below them. So please always try to add proper descriptions to your images.
How I formatted my Image descriptions
You will notice that my image descriptions are smaller and bold. I used the bold and subscript tag to achieve that. Here is how I did it:

You can edit the writeup to whatever description you choose for your images. Please, always make it a duty to add short and clear descriptions under images in your post.
4. Image Appearance
How your images look matter so much in content publishing here on Steemit. The appearance of your images should make your work look professional. If you use a low-resolution camera, chances are that you will always produce poor-quality images. So plan to upgrade your camera device so that your images would look great. The brightness of your image and its contrast are two things you should watch out for. If they are not properly set, your images will appear either with too much light on them, or too little.
Can you edit the brightness/contrast of your images? That is very important. You must not use images exactly as you shot them from your camera, especially - again if your camera is not great. Great images are also shot at great angles. Do not tilt your camera to unnatural angels such that the viewer would have to tilt their neck in order to see you image. If you shoot from a moving platform such as a car, make sure you only capture when your hand is steady. Use flashlight for night-time images. Just make sure your images appear great and nice so your post would appear captivating to the reader.
Brightness/Contrast not touched
Brightness/Contrast touched
Again you can browse Google Playstore and see thousands of image editing apps that can help you to retouch your images before using them.
5. Image Count
How many images should be used in a post? The short answer is: there is no specific number. Content creation on Steemit is basically more of written text than images. Balance and caution should be applied when deciding how many images to use. We have painfully seen very short write-ups with overwhelming number of images. When you have 3 paragraphs of text and 8 pictures, that makes your work poor.
Since images are just descriptive of your story, you should use few images. For diary posts, and depending on the length of the story, not more than 3 to 4 images would be fine. Having too many images in a post turns it into a mess. When you visit standard publications, like news articles, you will find that few images are used. So if you want to make your blog page look great, you should not have too many images in your story. The few you use should look great and properly placed in context. In this way, the reader would not have to look too far away, to see an image describing what they just finished reading.
6. Image Location Coordinates
How do you make your your images of real locations verifiable and authentic? When you use give the reader opportunity to see the location in real map. Location coordinates make your image very genuine since the reader is just one click away from seeing the place live. What3words is a digital mapping application that could be used to add location coordinates to images. As much as possible, add these location coordinates. It not only makes your images come to life, it makes for more adventure as your reader is able to click and explore your image location in real time.
What3words has the online app and the Android version. Whichever one is fine for you, use it. We want to see more images that can be verified in real time. If you do not know how to use the What3words app, indicate in the comment section of this post and I will be glad to show you how it is used. Check the image below. Click the What3words link to see the location in a real map.
Azikiwe Road by East Street Aba. (View in Map)
Conclusion
After going through the information on this post, am sure you are now ready to seriously upgrade the quality of images used in your posts. We want to see a vast improvement the quality of images in posts published in SteemALive community. We are on a mission to improve the overall quality of our content, starting from images. @steemitblog is on the lookout for quality posts to be rewarded. As we have started with images, other aspects of our creative work will still be improved to reach an acceptable standard.
Thank you for reading through this content. I will be back with more.
Sir I'm interested in knowing how to use What3words
I've always Longed for ways I can improve the appearance of my images for my posts but this information right now has opened my eyes to know the best ways to make my images better and presentable
Thank you so much sir @focusnow this information is highly appreciated and is helpful
Wow very well detailed post, very educating thanks for sharing keep up the good work
𝕨𝕠𝕨 𝕤𝕚𝕣...
𝔽𝕚𝕣𝕤𝕥𝕝𝕪 𝕚 𝕞𝕠𝕤𝕥 𝕔𝕠𝕞𝕞𝕖𝕟𝕕, 𝕪𝕠𝕦 𝕣𝕖𝕒𝕝𝕝𝕪 𝕚𝕟𝕧𝕖𝕤𝕥𝕖𝕕 𝕞𝕦𝕔𝕙 𝕠𝕗 𝕪𝕠𝕦𝕣 𝕥𝕚𝕞𝕖 𝕔𝕣𝕖𝕒𝕥𝕚𝕟𝕘 𝕥𝕙𝕚𝕤 𝕤𝕦𝕡𝕖𝕣 ...𝕤𝕙𝕠𝕦𝕝𝕕 𝕚 𝕔𝕒𝕝𝕝 𝕚𝕥 𝕒𝕨𝕒𝕣𝕖𝕟𝕖𝕤𝕤 𝕠𝕗 𝕦𝕡𝕕𝕒𝕥𝕖?
𝕋𝕠 𝕪𝕠𝕦 𝕥𝕙𝕖 𝕥𝕚𝕞𝕖 𝕤𝕡𝕖𝕟𝕥 𝕨𝕠𝕣𝕥𝕙 𝕚𝕥 𝕓𝕖𝕔𝕒𝕦𝕤𝕖 𝕪𝕠𝕦 𝕗𝕖𝕖𝕝𝕤 𝕪𝕠𝕦𝕣 𝕗𝕖𝕝𝕝𝕠𝕨 𝕤𝕥𝕖𝕖𝕞𝕚𝕒𝕟𝕤 𝕕𝕖𝕤𝕖𝕣𝕧𝕖 𝕥𝕠 𝕓𝕖𝕤𝕥 𝕒𝕟𝕕 𝕓𝕖 𝕓𝕖𝕥𝕥𝕖𝕣.
𝕚 𝕤𝕒𝕝𝕦𝕥𝕖 𝕪𝕠𝕦 𝕞𝕒𝕤𝕤𝕚𝕧𝕖𝕝𝕪 𝕤𝕚𝕣
The information in this post is extremely superb and really a sure guide to all Steemians.
Can't wait to try some of them in my next post
Thanks @focusnow for the detailed post, i learnt alot especially about image appearance, size and thumbnail picture.
This article is fully explainatory I have learned more on the use of images. Thank you @focusnow.
@focusnow. Another very informative and educative update from you and it shows the high level of your concerns to the welfare of all steemians. Soon steemians will be computer literate. Thanks for sharing.
Thank u boss,noted.
@focusnow This post is very informative to both old and new members on Steemit.It is a fact that proper image presentation helps to make our work look neat and desirable to the eye.The impact of this post cannot be over-emphasized.