[DreamChain DApp] #22 Story Details 페이지 구현 1
이전글 - [DreamChain DApp] #21 Dynamic Routing 2
본 내용은 Ethereum and Solidity: The Complete Developer's Guide을 참고해서 작성되었습니다.
이번에는 Story Details 페이지를 꾸며 보겠습니다. 여기서 가장 중요한 것은 바로 특정 주소의 DreamStory 내용을 읽어오는 것입니다. 그래야 화면에 내용을 뿌려 줄 수 있겠죠. 오래전에 아래와 같은 페이지를 디자인했었습니다.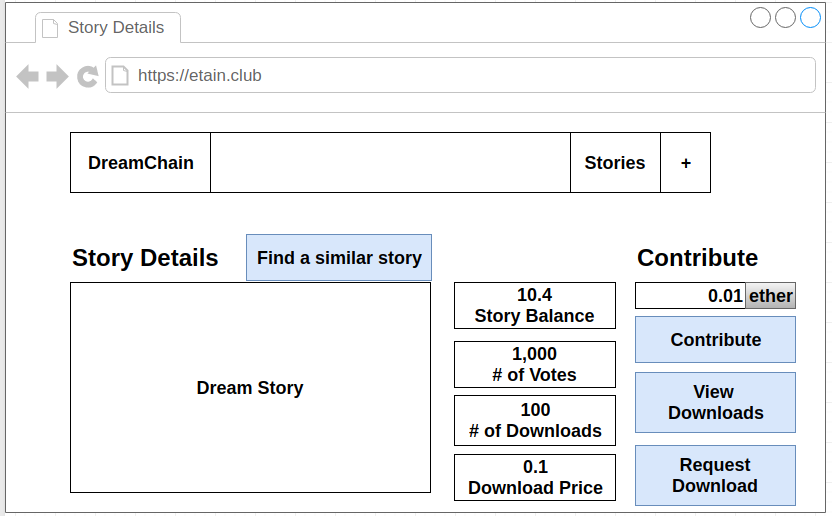
가능하면 이와 유사하게 페이지를 꾸며보겠습니다.
dream_story.js 생성
가장 먼저 할 일은 배포된 DreamFactory 컨트랙트와 인터페이스 하는 것입니다. 이전에 DreamFactory와 인터페이스 하던 것과 유사합니다. DreamFactory의 경우는 사전에 배포된 컨트랙트의 주소를 알기 때문에 하드 코딩으로 파일에 입력해서 사용했습니다. 그러나 DreamStory의 경우는 다릅니다.
DreamStory 컨트랙트의 주소는 DreamFactory 인스턴스가 동적으로 넘겨줍니다. 따라서 아래와 같이 새롭게 dream_story.js 파일을 생성합니다. 위치는 ethereum 폴더 밑입니다.
// import the web3 instance
import web3 from './web3';
// import compiled DreamStory which includes interface and bytecode
import DreamStory from './build/DreamStory.json';

// export a function that creates a new instance using the received address
export default address => {
    return new web3.eth.Contract(
      JSON.parse( DreamStory.interface ),
      address
    );
};
DreamFactory 인스턴스가 넘겨준 컨트랙트 address를 받아서 DreamStory 컨트랙트의 인스턴스를 생성합니다. 이 때 인스턴스를 생성하는 방법은 배포해서 얻은게 아니라 기존에 배포된 주소를 입력하여 새롭게 인스턴스를 생성했습니다.
story_details.js 수정
이전글에서 내용을 채우지 않은 채로 뒀던 story_details.js를 수정할 차례입니다. 좀 전에 만들었던 dream_story.js 파일을 이용하여 특정 DreamStory의 내용을 읽을 수 있습니다. 우선 파일 전체를 표시합니다.
// import react
import React, { Component } from 'react';
// import layout
import Layout from '../../components/layout';
// import DreamStory instance
import dream_story from '../../ethereum/dream_story';


// class based component
class StoryDetails extends Component {
  // get initial properties
  // the DreamStory address can be obtained from the argument props using the url
  // since the url includes the contract address
  static async getInitialProps( props ) {
    // get the DreamStory instance of the address
    const story= dream_story( props.query.address );
    // get summary of the story
    const summary= await story.methods.getSummary().call();
    // return the summary with labels
    return {
      address: props.query.address,
      balance: summary[0],
      votes_count: summary[1],
      downloads_count: summary[2],
      min_down_price_wei: summary[3],
      approvers_count: summary[4],
      author: summary[5],
      story_title: summary[6],
      story: summary[7]
    };
  }
  render() {
    return (
      <Layout>
        <h3>Story Details</h3>
      </Layout>
    )
  }
}

// export the component
export default StoryDetails;
DreamStory 인스턴스 획득
특정 주소의 DreamStory 인스턴스를 얻기 위해서는 좀 전에 작성한 dream_story.js를 이용합니다.
// import DreamStory instance
import dream_story from '../../ethereum/dream_story';
(생략)
  // get initial properties
  // the DreamStory address can be obtained from the argument props using the url
  // since the url includes the contract address
  static async getInitialProps( props ) {
    // get the DreamStory instance of the address
    const story= dream_story( props.query.address );
(생략)
페이지를 표시하기 전에 표시할 내용을 미리 읽어오기 위해서는 getInitialProps 함수를 사용해야 한다고 했습니다. index 페이지의 getInitialProps함수와 달리 여기서는 props라는 인자를 받고 있습니다. 그렇습니다. 이 인자에는 페이지 url 정보를 담고 있습니다. 그래서 props.query.address를 이용하면 url을 얻을 수 있습니다. 그런데 이 url이 바로 무엇인가요? 우리가 애초에 url을 컨트랙트 주소로 했습니다. 이 url에 포함된 주소를 dream_story에 넘기면 해당 주소를 갖는 컨트랙트의 인스턴스를 얻을 수 있습니다.
DreamStory 내용 접근
DreamStory의 인스턴스를 얻었기 때문에, 이제 인스턴스를 통해서 컨트랙트에 접근해서 정보를 읽을 수 있습니다. DreamStory에서는 아래와 같이 필요한 정보를 한 번에 읽어오는 getSummary함수를 만들었었습니다. 이 함수를 이용해서 정보를 얻어오면 됩니다.
function getSummary() public view returns ( uint, uint, uint, uint, uint, address, string, string )
{
    return (
      address(this).balance,
      votes_count,
      downloads.length,
      min_down_price_wei,
      approvers_count,
      author,
      story_title,
      story
    );
}
story_details.js 소스 전문에서 다음 부분이 컨트랙트 정보를 읽는 부분입니다.
// get summary of the story
    const summary= await story.methods.getSummary().call();
    // return the summary with labels
    return {
      address: props.query.address,
      balance: web3.utils.fromWei( summary[0], 'ether' ),
      votes_count: summary[1],
      downloads_count: summary[2],
      min_down_price: web3.utils.fromWei( summary[3], 'ether' ),
      approvers_count: summary[4],
      author: summary[5],
      story_title: summary[6],
      story: summary[7]
    };
여기서 summary의 결과를 의미를 부여하기 위해 풀었습니다. 이 정보를 받는 쪽에서 보다 편리하게 내용을 파악할 수 있도록 말이죠. 주의할 것은 getSummary 함수의 결과와 순서를 잘 맞춰야 합니다.
getInitialProps에서 설정한 내용은 인스턴스의 props에 저장되어 {this.props.address}와 같이 다른 곳에서 이용할 수 있습니다.
컴포넌트 구성
페이지 구성을 위해 semantic-ui-react에서 적절한 컴포넌트를 찾아봤습니다. new_story 페이지에서 사용했던 Input, TextArea를 그대로 사용하면 좋은데, 이것은 입력하는 용도라서 disabled라는 옵션을 줄 수 있는데, 내용이 흐리게 표시되어 쓰지 않는 걸로 했습니다.
대신에 Grid와 Container를 조합해서 Story 내용과 제목을 표시하게 하고, DreamStory 컨트랙트의 수치 정보들은 Card를 이용해서 나타내 보겠습니다.
페이지 전체 구성은 대략 이렇습니다.
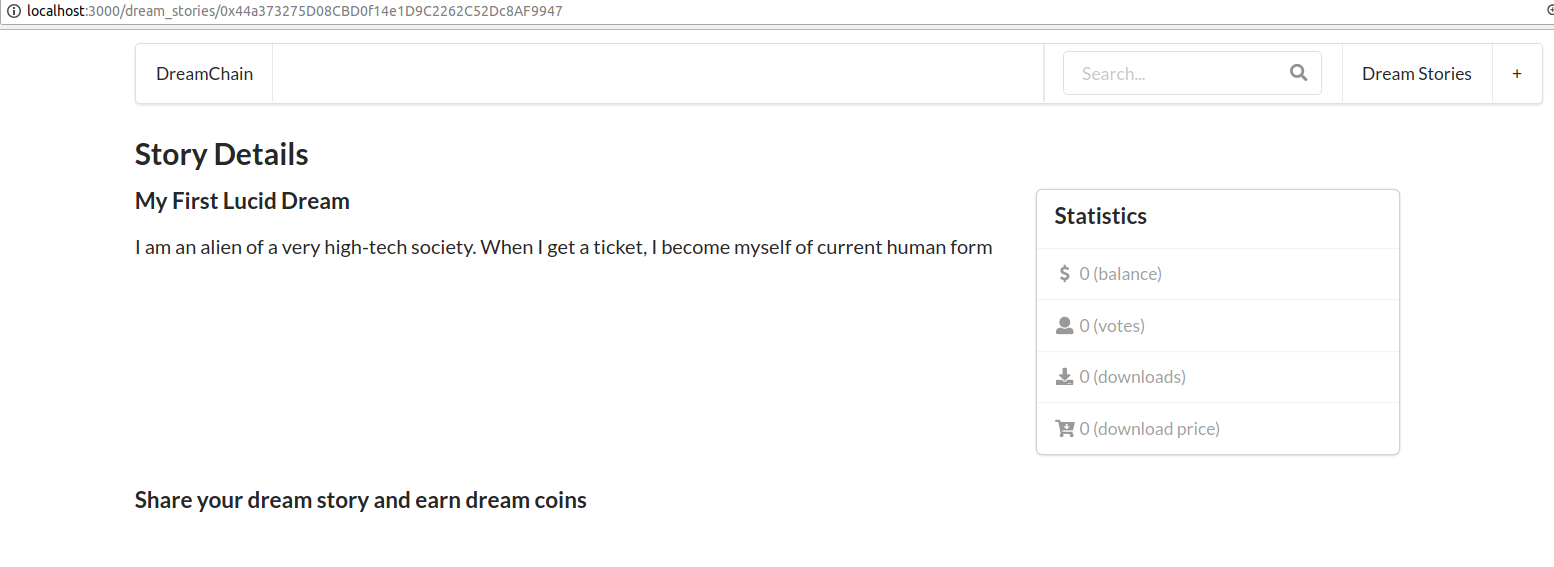
예쁘지 않나요? React가 생소해서 이것저것 시도해 보고 구성해 본 것입니다. 개인적으로 매우 만족합니다. 특히 Card에 작은 아이콘들이 너무 예쁩니다~ 페이지 구성은 원하는 스타일대로 구성하시면 됩니다.
사실 위 그림에서는 내용들이 다 들어가 있습니다. 컴포넌트 구성과 내용 채우는 것을 동시에 알아보겠습니다. story_details.js 파일을 아래와 같이 수정합니다.
// import Form, Button from semantic-ui-react
import { Card, Icon } from 'semantic-ui-react';
// import Grid, Input, Form, Message, Button
import { Grid, Input, Form, Message, Button } from 'semantic-ui-react';
// import Container and Header
import { Container, Header } from 'semantic-ui-react';
(생략)
render() {
    return (
      <Layout>
        <h2>Story Details</h2>
        <Grid>
          <Grid.Column width={10}>
            <Container text>
              <Header as='h3'>{this.props.story_title}</Header>
              <p>{ this.props.story }</p>
            </Container>
          </Grid.Column>
          <Grid.Column width={6}>
            <Card>
              <Card.Content header='Statistics' />
              <Card.Content extra>
                <Icon name='dollar sign' />
                {this.props.balance} (balance, ether)
              </Card.Content>
              <Card.Content extra>
                <Icon name='user' />
                {this.props.votes_count} (votes)
              </Card.Content>
              <Card.Content extra>
                <Icon name='download' />
                {this.props.downloads_count} (downloads)
              </Card.Content>
              <Card.Content extra>
                <Icon name='cart arrow down' />
                {this.props.min_down_price} (download price, ether )
              </Card.Content>
            </Card>
            { this.renderActionButtons() }
          </Grid.Column>
        </Grid>
      </Layout>
    )
  }
(생략)
필요한 컴포넌트들을 import합니다. 컴포넌트 배치는 코드를 보면 알 수 있습니다. 이 때, 컴포넌트에 채울 내용은 위에서 말씀드렸듯이 {this.props.xxxxx} 방식으로 합니다. story를 출력하는 곳에 {this.props.story}라고 입력하면 됩니다. 매우 쉽습니다.
아직 버튼과 관련된 내용은 구현하지 않았습니다. 이를 구현하기 위해서는 이전에 했듯이 트랙잰션을 처리해주는 부분과 버튼이 눌렸을 때 새로운 페이지로 이동하게끔 하는 라우팅이 필요합니다. 이부분은 다음에 이어서 써보겠습니다.
오늘읠 실습: 화면 구성을 본인의 입맛에 맛게 예쁘게 꾸며보세요.
(jjangjjangman 태그 사용시 댓글을 남깁니다.)
[제 0회 짱짱맨배 42일장]5주차 보상글추천, 1,2,3,4주차 보상지급을 발표합니다.(계속 리스팅 할 예정)
https://steemit.com/kr/@virus707/0-42-5-1-2-3-4
5주차에 도전하세요
그리고 즐거운 스티밋하세요!