[TUTORIAL] How to Install 3 CHAINCOIN MasterNodes on 1 VPS
OVERVIEW
Here’s is a quick tutorial on how to set up 3 Chaincoin Masternodes on one $5 Vultr VPS by adding 2 additional IP addresses per server.
Each additional IP address currently costs $2 per month which will reduce operating costs to $3 a month per Chaincoin Masternode.
This is not a FULL tutorial on how to setup a Chaincoin Masternode. This guide focuses on how to correctly configure the VPS for additional IP addresses. To see a FULL tutorial, please check https://steemit.com/masternode/@fredyendesigns/chaincoin-remote-controller-masternode-setup-guide
You can also ask our friendly support team at https://discord.gg/pw9N2PX
====================
DEPLOYING VPS
====================
- Create an account at https://www.vultr.com/?ref=7199771 (referral link, Thank You!)
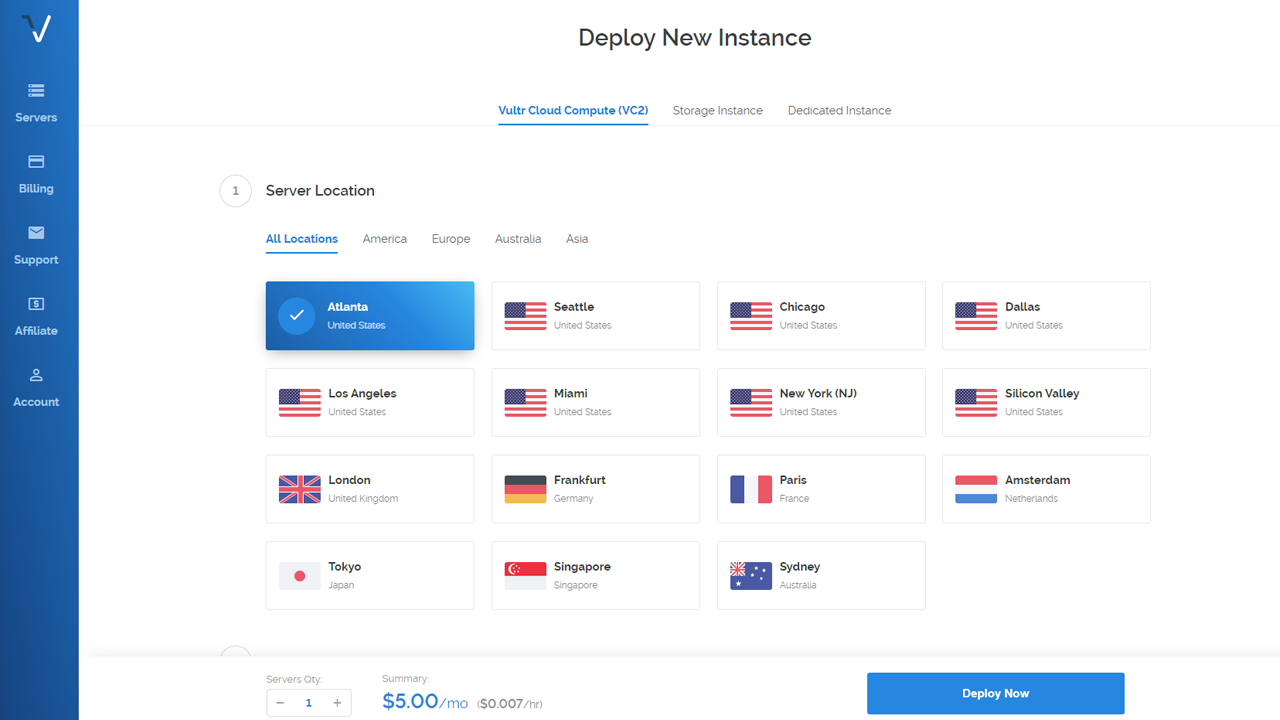
- Deploy new server, select location of server, select Ubuntu 16.04, select $5 server size, and enter hostname.
- Click DEPLOY NOW
====================
ADDING IP ADDRESSES
====================
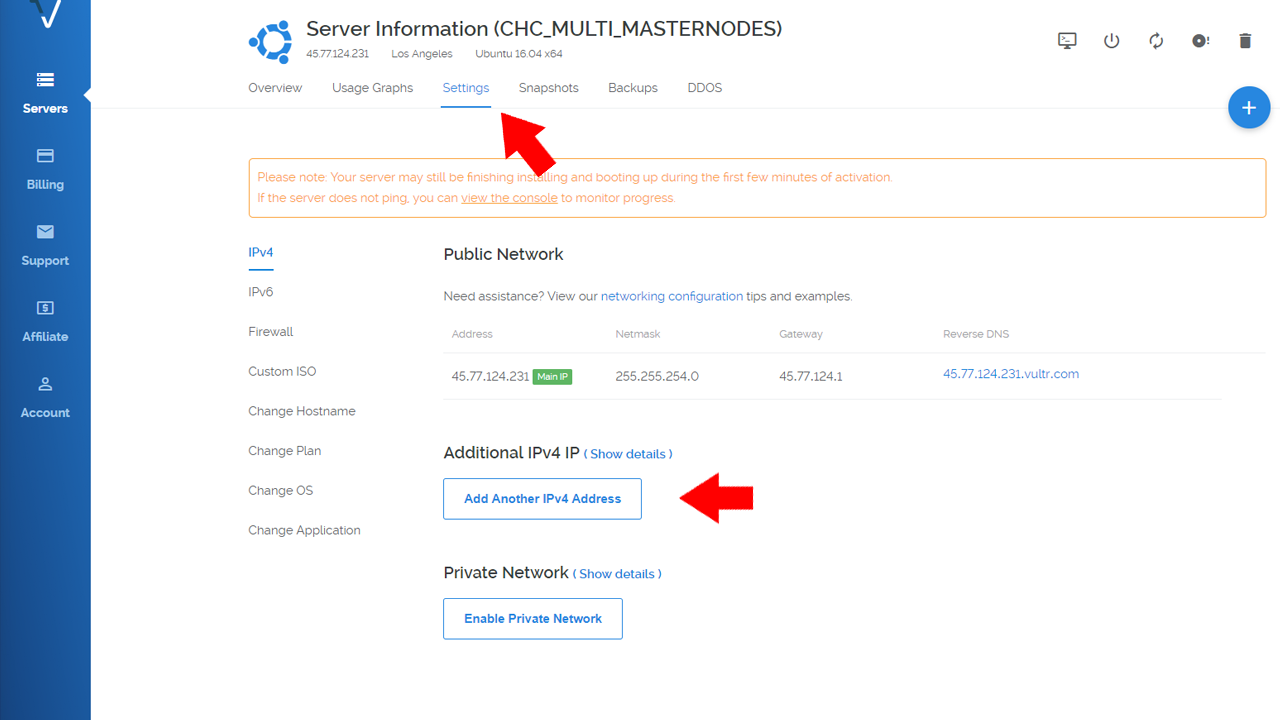
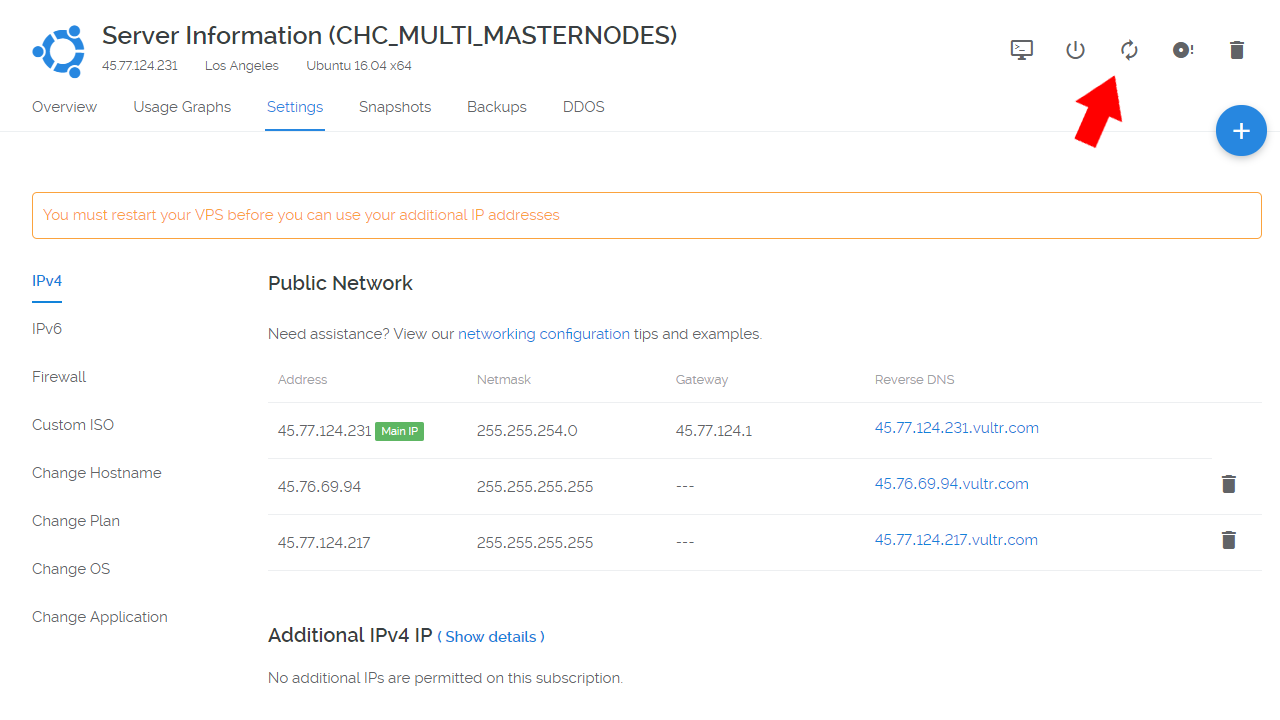
- When your server is running, head over to the “Settings” tab
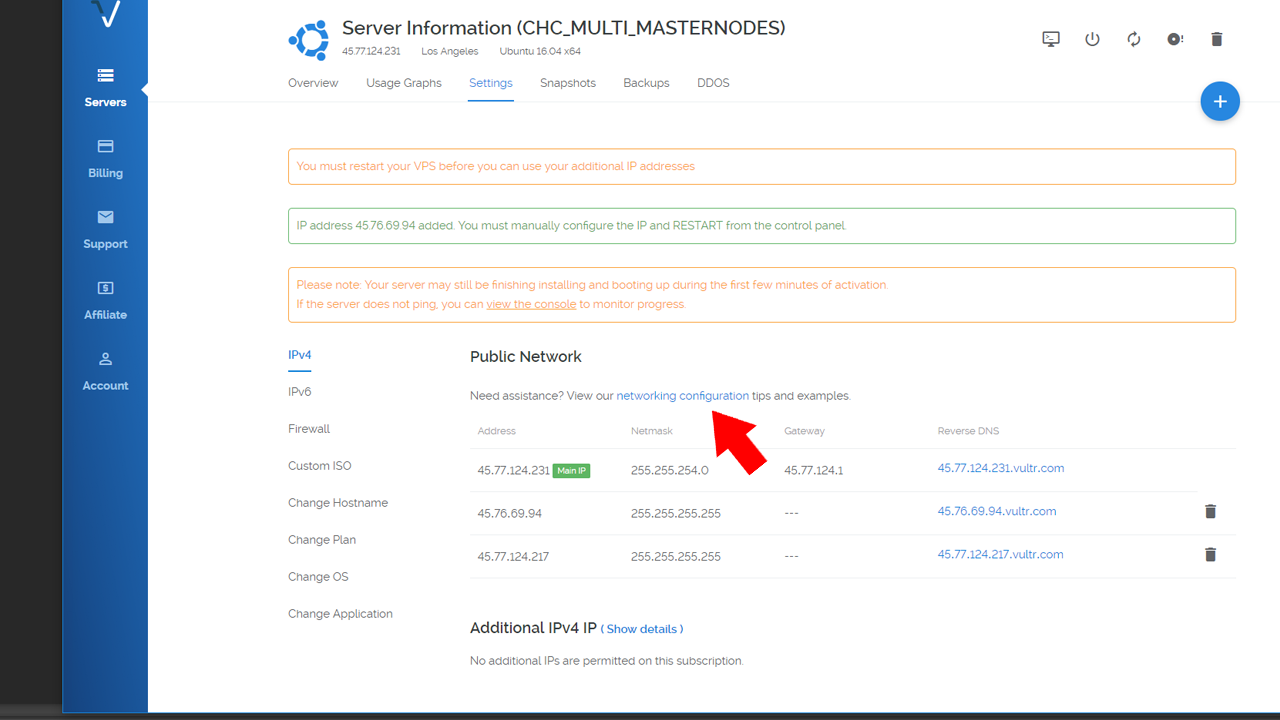
- Under “Settings”, choose “Add Another IPv4 Address”. You are allowed to add 2 additional IP addresses per server.
- Once your IP addresses are added, click “Network Configurations” and copy the lines of code for your Ubuntu install
====================
CONFIGURING OPERATING SYSTEM
====================
Next you need to SSH into your server. The software I use to accomplish this is www.putty.org
- Log in with your username and password found on Vultr dashboard.
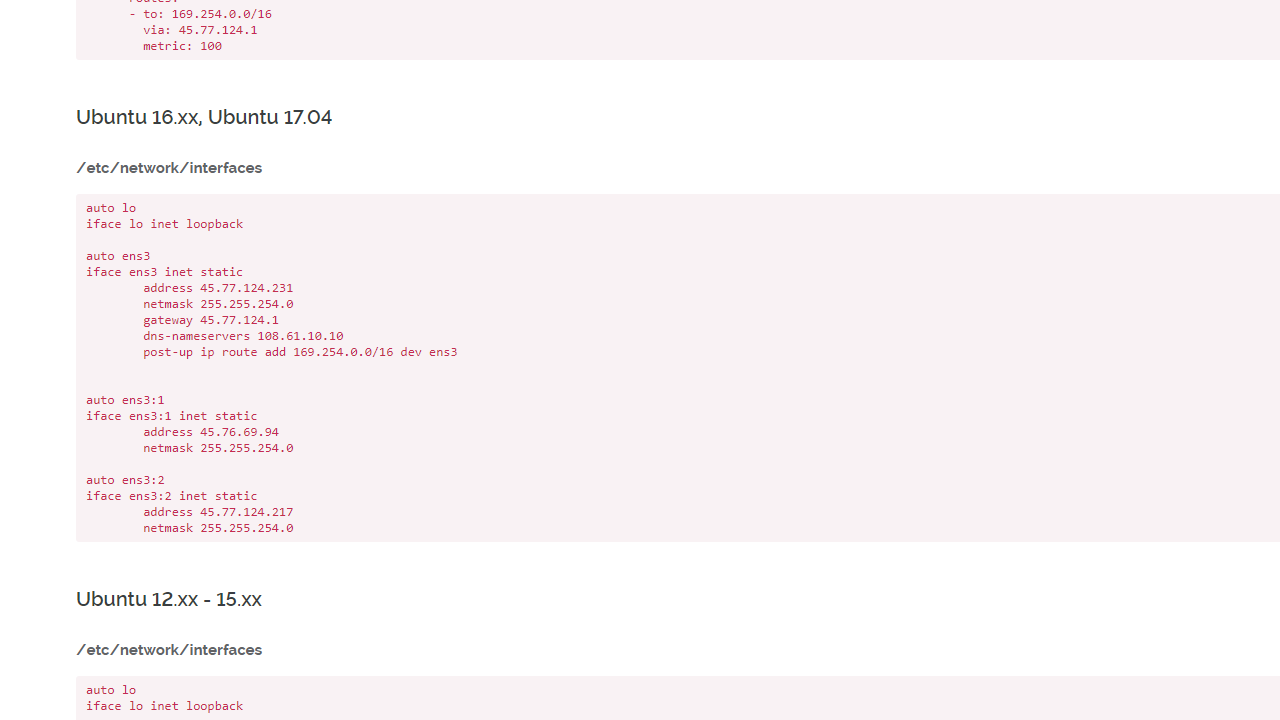
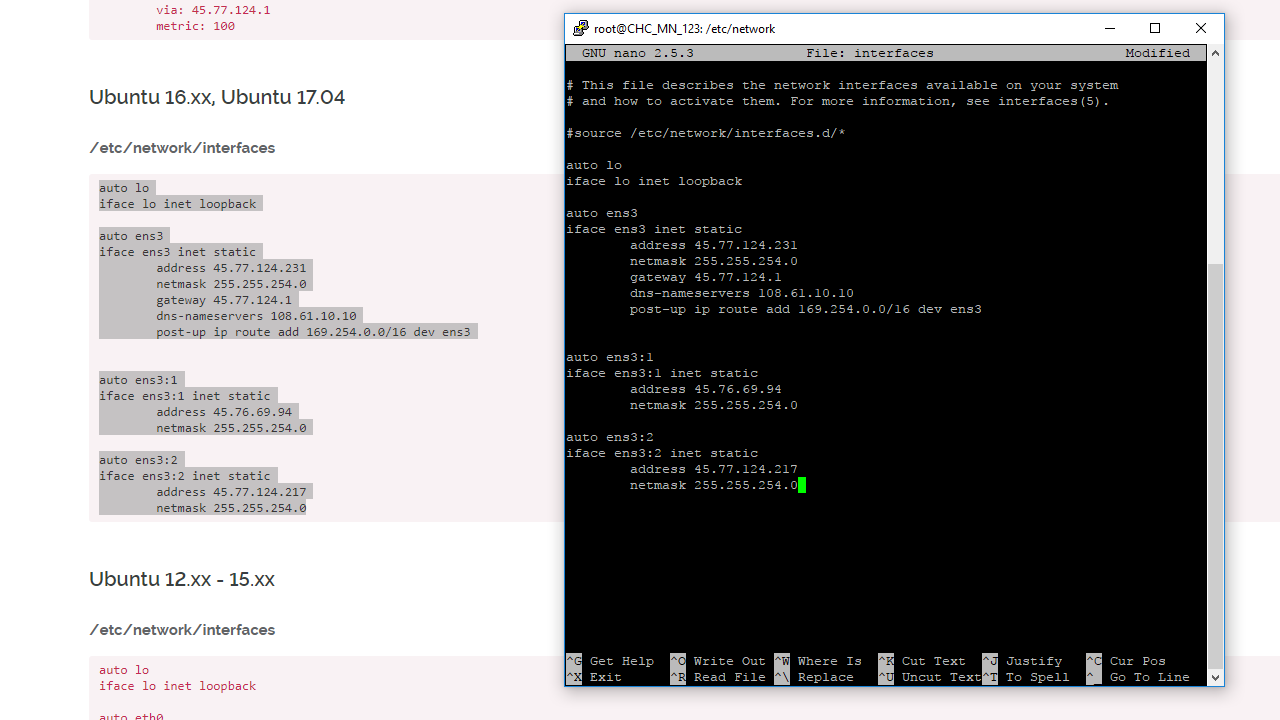
- We now need to edit and paste the “Network Configurations” code into the “interfaces” file by entering these commands into putty.
nano /etc/network/interfaces
Paste code into file and ctrl x to save file
Once you have edited the “interfaces” file, you will have to restart your VPS server from the VULTR dashboard and re-log into the server with putty
====================
INSTALLING CHAINCOIN ON VPS
====================
There are a few ways you can install Chaincoin Wallet onto your VPS. The method I prefer is using Chao’s One Liner script (See his Github here https://github.com/chaoabunga/mnscripts)
THANK YOU CHAO!!!
Copy this script
curl https://raw.githubusercontent.com/chaoabunga/mnscripts/master/install-chc.sh | bash
Paste into Putty and hit ENTER
This script will install Chaincoin onto your server as well as generate all the necessary configuration files. When the installation completes, it will automatically start your Chaincoin server. Wait until the blockchain is fully sync’d before moving forward.
You can check the status by entering this:
chaincoin-cli getinfo
====================
COPYING FILES TO ADDITIONAL IP ADDRESS
====================
Once Chaincoin blockchain is sync’d we can now copy the installation to the other 2 IP addresses. You must copy the installation to different directories in order for you to run multiple wallets.
We can do so by running these commands into Putty
chaincoin-cli stop
cp -r -p .chaincoin .chaincoin2
cp -r -p .chaincoin .chaincoin3
You will now have three .chaincoin directories when you list all from root directory (ls –a)

====================
EDITING CONFIGURATION FILES
====================
You can now edit the chaincoin.conf files to complete the remote controller masternode setup. Again, this is not a FULL tutorial. If you need assistance configuring these files, please see the FULL tutorial https://steemit.com/masternode/@fredyendesigns/chaincoin-remote-controller-masternode-setup-guide
===IMPORTANT===
If editing the first installation of Chaincoin, make sure to stop server first by entering
chaincoin-cli stop
To edit first chaincoin.conf file (from root directory):
nano .chaincoin/chaincoin.conf
To edit second chaincoin.conf file (from root directory):
nano .chaincoin2/chaincoin.conf
To edit third chaincoin.conf file (from root directory):
nano .chaincoin3/chaincoin.conf
Since all files were copied from the first installation, make sure to generate unique GENKEY for each installation.
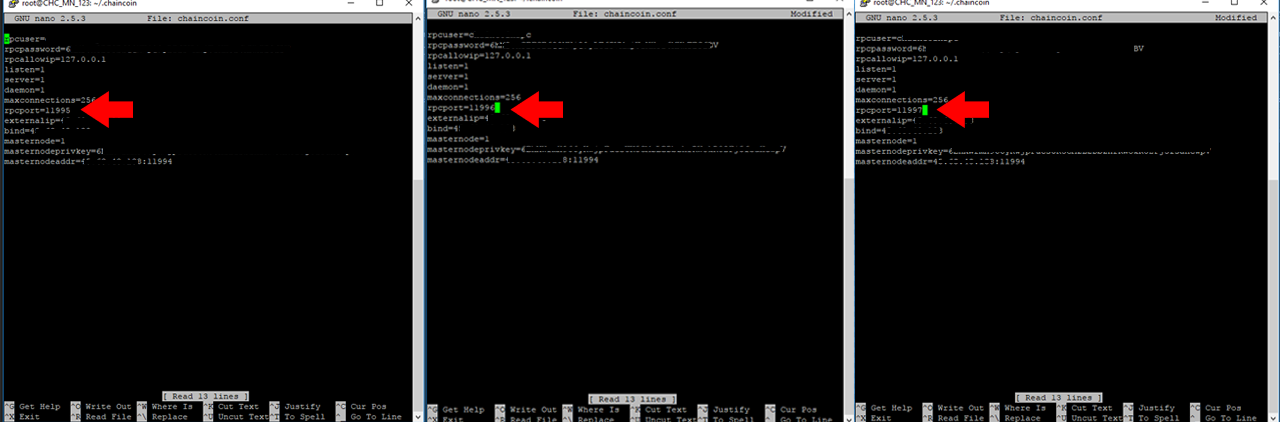
You will also need to change the rpcport so each installation uses different ports. By default, the original installation will use 11995. Change second installation to 11996, and third installation to 11997
Another very important step is to change the IP addresses. Make sure each installation has different IP addresses that you were given on Vultr.
====================
STARTING WALLETS
====================
After editing all config files, you can now start each wallet
First Installation:
chaincoind
Second Installation:
chaincoind -datadir=/root/.chaincoin2 –daemon
Third Installation
chaincoind -datadir=/root/.chaincoin3 –daemon
====================
CHECKING STATUS
====================
First Installation:
chaincoin-cli getinfo
Second Installation
chaincoin-cli -datadir=/root/.chaincoin2 getinfo
Third Installation
chaincoin-cli -datadir=/root/.chaincoin3 getinfo
You have now successfully completed the installation of 3 Chaincoin Masternodes on 1 VPS. This will cost you $9 a month to run 3 masternodes compared to $15 a month if ran on separate VPS instances.
If this guide has helped you save money, feel free to buy me a beer!
CHC Donation Address:
CPMVMqMoyzZQTu1YMS4aYocET9GU1oKZeJ
awesome
Guide stops working right after you edit the 2nd and 3rd conf file. The 2nd and 3rd MN wallet will not start. Is there anything missing from this guide? I've tried it multiple times and always get the same result.
try running this
chaincoind -datadir=/root/.chaincoin2 --daemon
and
chaincoind -datadir=/root/.chaincoin3 --daemon
The only difference I can see here is an additional hyphen before “deamon”. Doesn’t change anything. When I try to start the second wallet I get "Unable to bind to ... yadda yadda ... probably already running”. I would like this to work, but it doesn’t!
I currently have a one masternode working on Vultr. Would you recommend I start fresh with a new sever or upgrade the the one I have working?
just start a new one. easier and doesn't take up much of your time with the 1 liner.
Very good guide! :)
Thanks for guide but can we have a bit more detailed guide for noobs who can't use ubuntu :/. I got lost at "COPYING FILES TO ADDITIONAL IP ADDRESS".