Soil-free Microgreens: Installment 1 - Getting Started

I recently started a new adventure, attempting to grow microgreens at home, indoors. I hope to eventually start a business selling these microgreens, but first, I have to figure out what I'm doing. I will document and share the progress here, on Steemit, so we can learn together the best methods for starting a microgreens business from scratch. Please comment if you have any advice or if you want to share your own experience with growing microgreens.
Here is a list of materials I am using to get started:
Rack - shelving
LED tube lighting
Coconut coir matting
Bamboo rods
Food-grade containers (10"x20")
Organic sprouting seeds
Food-grade hydrogen peroxide
Purified water
2 Spray bottles (one for water, one for hydrogen peroxide)

First, I must start by giving credit where credit is due. The methodology I am attempting to use here is adapted from the technique created by City-Hydro in Baltimore, MD. Their website can be found here: http://www.city-hydro.com/
I learned about this awesome company and their cool technique for growing microgreens from the YouTube channel, Growing your Greens, in this video:
Also, in my research, I found another Steemian, BrimwoodFarm, who was inspired by the same video and has shared their experience as well. I found their posts to be a very helpful resource. You can find BrimwoodFarm here: https://steemit.com/@brimwoodfarm
The Process
I bought most of the materials for this project online. I found it particularly helpful to have the rack delivered, given that it is so large. However, I found a better deal at my local hydroponics store on the coconut coir and the food-safe containers. Some additional items I incorporated into the process include a dedicated pair of scissors, just for cutting the matting and disposable gloves to prevent any contamination of the matting once it's being handled for seeding.
First, I set up the rack in a location that would get plenty of air circulation. In the examples I've seen, using this method for growing microgreens, the growers have added fans within their shelving. I may have to do the same, later down the line, but as of today - 4 days into the process, I have not needed a fan. I fastened one four foot LED light (6000 lumens) under each of the five shelves using zip-ties.

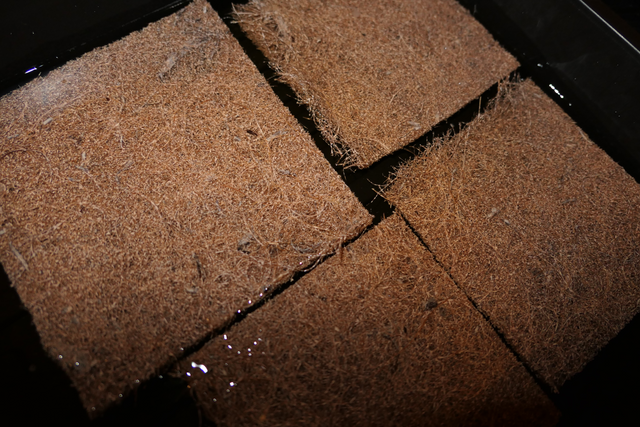
Next, I cut the coconut coir into 4-5" squares (trying different sizes to see which works best). Then I mixed together the food-grade hydrogen peroxide and used that to clean the containers. I placed the cut matting squares into a sanitized container and filled the container with purified water. I then covered the container and set aside to soak for 24 hours.
Once the coconut coir matting has been soaked for 24 hours in purified water, it is ready for seeding. First, I had to cut the bamboo rods to fit the container and sanitize them. Next, I placed the bamboo into a clean container and placed the soaked matting on top of the bamboo rods. The rods prevent the matting from making direct contact with the container. This will allow more airflow and help prevent any bacterial growth from developing inside the container.
I covered the matting with a single layer of organic radish seeds. Finally, I sprayed the seeds with food-grade hydrogen peroxide before covering and storing on the rack for germination. October 12, 2017 was my first official seeding. I opted to stick with one container to start, to evaluate whether the process I used needed any adjustment.

The next day, October 13th, I lightly watered the germinating seeds once in the morning and once in the evening (using purified water), keeping the seeds in darkness, unless watering.
I also cut two more containers worth of coconut coir and set them aside, to soak, for 24 hours.
By the second day, the radish seeds look like they are doing well, but could use another day of germination, so I cover them back up for a third day of darkness.

I seeded two more containers, one with organic peas and another with more radish seeds. So far, I am just working with radish and peas, although I plan to add more varieties of seeds, soon. I am currently researching the best place to obtain bulk sprouting seeds for a good price.

The peas were rather tricky to get on the matting. They roll! Rather than pouring the seeds onto the matting, directly in the growing container, I found it easier to seed a piece of matting in a sanitized small tupperware and then place the matting into the growing container after the seeds are on the matting. This prevents rogue peas from rolling away and being wasted.

After spraying lightly with food-grade hydrogen peroxide, I cover my two new containers and add to the rack for germination.
By October 15th, my first container of radish sprouts is looking great! It seems three days of germinations is perfect for the radish seeds. So, I remove the lid and fire up one of the LEDs to begin exposing the radish sprouts to light.

At this point the project is on a schedule of adding two new containers every two to three days, using the days in between to soak the matting and prep other materials. Following this timing, I hope to have a full rack within 10 days and I should be harvesting 1-2 containers of microgreens every other day. That's the goal, anyway. We'll see if it works out.
I will continue to post follow-ups every couple of days. Please subscribe to keep up with the project. Thank you!
Nice installment... !
Thank you! :)
I have seen @brimwoodfarm video and post before.
Microgreens interest me and I am seriously thinking about growing some of my own.
I applaud you on this business venture. Keep us up to date
@originalworks
The @OriginalWorks bot has determined this post by @figureitout to be original material and upvoted it!
To call @OriginalWorks, simply reply to any post with @originalworks or !originalworks in your message!
To enter this post into the daily RESTEEM contest, upvote this comment! The user with the most upvotes on their @OriginalWorks comment will win!
For more information, Click Here!
Special thanks to @reggaemuffin for being a supporter! Vote him as a witness to help make Steemit a better place!
Thanks, so much, @goldendawne I appreciate it! :)
Congratulations @figureitout! You have completed some achievement on Steemit and have been rewarded with new badge(s) :
Click on any badge to view your own Board of Honor on SteemitBoard.
For more information about SteemitBoard, click here
If you no longer want to receive notifications, reply to this comment with the word
STOP