📷 Photography Tutorial - How to Make a Custom Bokeh Lens

How to make a Custom Bokeh Lens
The ongoing #SteemitPhotoChallenge finally prompted me to sit down and post this tutorial about how I made my steemit-themed custom bokeh pictures. I have promised to do so for a while and maybe this bokeh-themed contest was the call-to-action I needed!
What is bokeh? Why is it there?
The word "bokeh" originates from the Japanese word "boke" (暈け or ボケ), meaning blur or haze. In photography this term describes the aesthetic quality of the out-of-focus parts of an image.
source: wikimedia
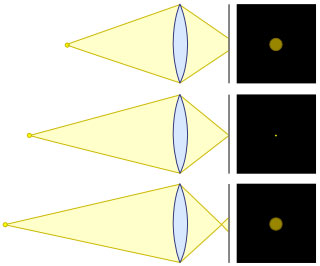
The appearance of the bokeh is created by the way light from an out-of-focus point in the image, passes through the lens and gets projected onto the sensor.
Light from an in-focus point will (ideally) be projected onto a single point of the sensor, but light from an out-of-focus point will be projected onto a whole area on the sensor.
The shape of the projected area is created by the shape of the narrowest opening on the light's path through the lens. Usually this is round or at least roundish polygonal due to the construction of the diaphragm in the lens.
(This, by the way, is also the reason why shooting at a smaller aperture results in a larger depth of field as the out of focus light will be spread on a smaller area!)
If we alter the shape of the smallest opening in the lens, we alter the visual appearance of the bokeh in our images!

source: wikihow
Now, you can take the easy route, google "custom bokeh tutorial" and just stick a cap on the front of your lens.
It will work! But if this was the ideal position for the "smallest opening" on the light's path through the optics, then that's where the diaphragm of the lens would be!
The resulting bokeh will be very inconsistent in different areas of the image and the bokeh-shape's clarity will not be ideal. But hey, it's easy and quick to do... so before you go on and follow me on the hard way, just know, you have options. ;)
The Hard Way - Step by Step:
proceed at your own risk ;)
What You Need
You'll need an old manual lens, in my case it's an "Auto Revuenon 55mm f1.7" (on ebay for less than $20).
You also need a cutting knife, a compass, some scissors and black cardboard (leftover packing material will do).

Step 1
Carefully unscrew the back-end of the lens without scratching the glas.
This works with almost any lens. They usually even have indentations meant for a tool. I helped myself with a pair of tweezers here.
Step 2
Now measure the opening of your lens. You'll also want to note how large the biggest aperture of the diaphragm is.
In my case I have an opening of 2.8cm diameter and the diaphragm's aperture is 2cm.
Step 3
Now use a compass to mark the two measurements on cardboard.
The outer circle will be the edge of the disc to insert into your lens, and the inner circle marks the area you can use for your custom bokeh shape.
Step 4
I printed a steemit logo to size and stuck it to my cardboard as a template.
To center the template it helps to use the needle of your compass for alignment.
Step 5
Now carefully trace the template and cut it out of the cardboard.
Then cut along the outer circle to create the finished custom-bokeh diaphragm replacement.

Step 6
Now just insert the disc into your lens and screw the back-end back in.
Remember to keep the aperture wide open when you shoot your own custom bokeh pictures.
Done
That's it! It looks harder than it is. The resulting bokeh should be of much better quality than with the easy lens-cap trick.
Remember, this works with almost any shape you can cut out. So be creative!
There you have it!
and here's what it looks like:
just some fairy lights with custom bokeh
see some custom-bokeh in action:
SPC entries two & three
SPC entry one
Steemin Hot Coffee
Spinning Sam
follow @fraenk
... it's free!

steem-on and prosper
I love talking to you!
If you have any questions, ask me!
If you try this out, show me!
This post received a 4.6% upvote from @randowhale thanks to @fraenk! For more information, click here!
that's the way I like you bro!
Very interesting! Thanks for sharing!
my pleasure!
I really love the effort you've put in @fraenk!
I have to admit I looked for some hidden #googlyeyes :)
heh, thanks!
yeah... i should have hidden some... dang...
Haha you should have! And then make us looks for them :p
yay! That is so cool! I will go for the easy way since I don't have any old lens.
And yea it is something I was trying a while ago with a heart shape. It didn't come up so nice, but then again the light wasn't so nice.
looking forward to see some of your own experiments... keep me posted!
It might take a while... but I will do something :D
nothing would make me happier than spurring the creative energies of a fellow earthling!
Very cool! Thanks for writing up and sharing the tutorial. Resteemed and followed :)
Thanks for your support... I've been thinking about making this post for a while... the SPC finally convinced me to get it done!
Excellent tutorial @fraenk, this has to be seen! Upvoted, resteemed & DPS.
Thank you!
Das ist ein echt guter Post und kommt in die Lesezeichen! :) Wenn ich ein altes Objektiv finde probiere ich es definitiv mal aus.
Danke! Bin gespannt!
Hey @fraenk, That's really cool that you took the time to first experiment and then to share your how-to process with everyone.
Thank YOU! It's the readers that make posting worthwhile!
You Received an UpVote from @worldclassplayer. To Learn More, See DetailsHere
thanks!
I got a bellyRub and this post has received a 1.04 % upvote from @bellyrub thanks to: @zeartul.
so kind! thank you @zeartul!
What do you like to do?