NaughtScape [02] - Back to the Drawing Board
Indirect Inspiration
After all the work covered in my last blog, starting the implementation of the player movement made me realize something. In order to implement objects in tiles I would need to change how the map was generated. With the current approach of manually placing vertices one by one in a loop I wouldn't know where to begin placing objects or 3D models in the correct locations.
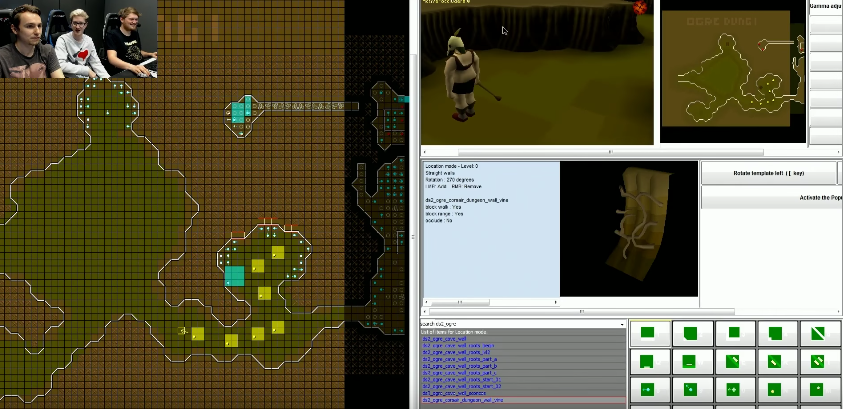
I wanted to be able to map out the landscape tile by tile, but also didn't want it to be too confusing or monotonous. Originally I had no idea how I would do this, then as I was watching an Old School RuneScape (OSRS) design stream during work I noticed something on their screen:
Time stamped link to the stream here
That is the custom OSRS map editor ! This stream was the first I had ever seen the map editor, and I had always wondered how they set everything up. It looks as though they map the environment in a 2D tile map and then import it into the game and generate the 3D world from the tile map. They can assign enemy or item spawn points, wall textures facing different directions, unique tile models, and pretty much everything else that is part of the world. I thought this idea solved what I wanted to do and had the added benefit of being the way the OSRS team went about building their maps.
Now I just had to figure out how to do it ...
Time for a Plan
Now the first thing to do after deciding that I was to create a tile map editor so I could map out my world in 2D. I remembered in the past coming across a tutorial for a 2D tile map editor in Unity, and thought that would be a good place to start. I found the tutorial on Lynda.com, which I luckily had access to through work.
This tutorial walked through creating a custom inspector and custom window that would allow me to easily place game objects representing tiles in a parent game object representing a tile map. The tutorial was built around the intention of creating a background for a 2D game, which presented some interesting problems during development.
The Plan So Far:
- Build tile map editor
- Develop method of connecting 2D and 3D visuals
- Create 3D models
Problem the First: Coordinates
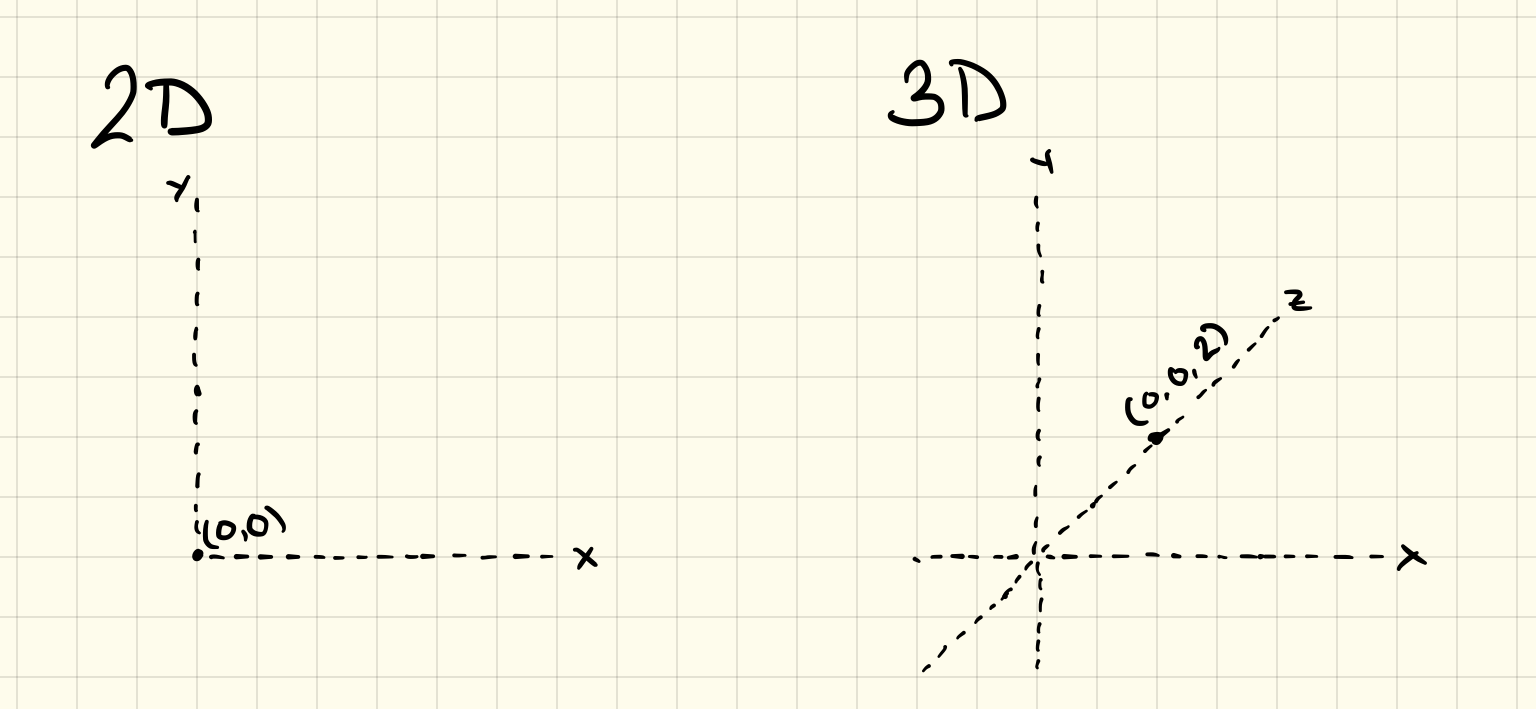
The "same" point in 2D and 3D space
The main problem I faced was with coordinates. In a 2D game you deal in (x, y) coordinates, but in a 3D game you deal in (x, y, z) coordinates. At first this doesn't seem like an issue, but as you can see from my diagram above the y axis goes vertically. When working in a 2D space you work within an x-axis and a y-axis, like on a piece of graph paper. This can measure width and height, but in a 3D space you can also work with depth. A 2D space doesn't really have a concept of behind, as you can see in my diagram both points are in the "same" location.
NOTE: You can put a Vector2 coordinate (x, y) into a Vector3 coordinate (x, y, z) and Unity will just assume that the z-axis is 0.
This means that when dealing with a tile map meant to be the ground in a 3D world, I needed to substitute the z axis in for almost all of the references of the y axis. This way I could keep the 2D tile placing, but on a parallel plane to what would be the ground. This took a better part of a day and a half to go through and get set up to working with the new coordinates, and partially took that long because I was following a video tutorial the whole time.
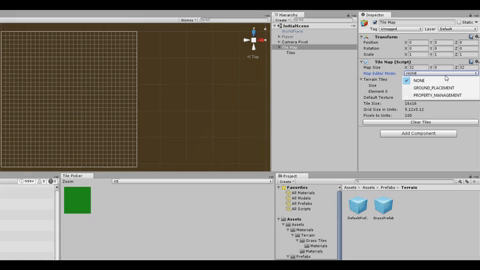
Placing Tiles
After making my way through the coordinate confusion it was time to start placing tiles ! The method of placing tiles from the tutorial was to spawn a brush on the mouse pointer, and have the chosen tile follow the pointer. When I wanted to place the selected tile in a square I could hover over it and hit shift to place a tile in the gird square I was hovering over. I could hold shift and drag the mouse to place a strip of tiles.
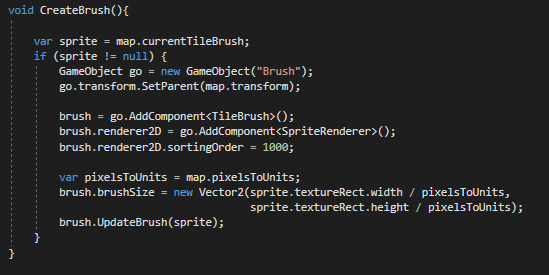
CreateBrush function from the tutorial
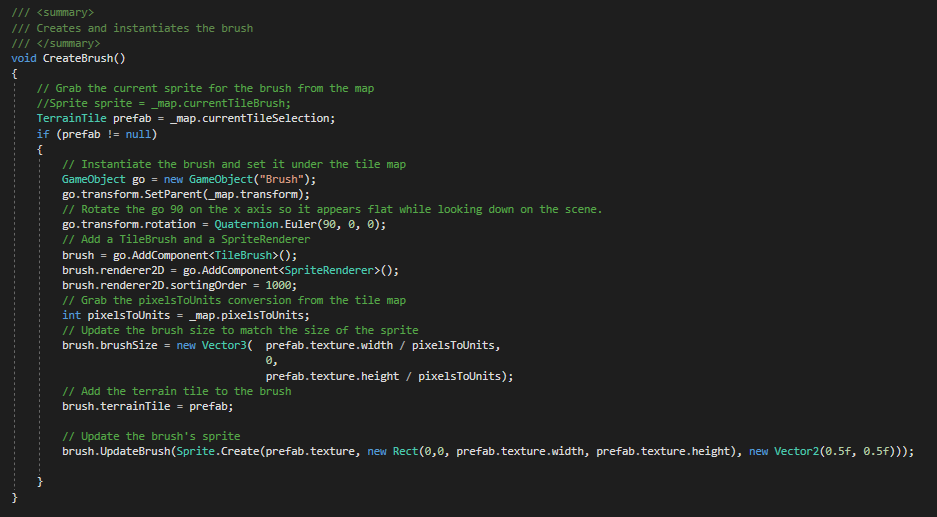
My modified CreateBrush function to work with the TerrainTiles. The main differences being the Vector2->Vector3 switch and the use of the z-axis. Also the
UpdateBrush()function is a little more complex. Because I am not storing aSpritedirectly, I had to create the sprite from theTexture2Dthat I am storing.
Originally the brush was created as soon as the tile map became the selected object, but I didn't like that so I created an enum to represent different states of navigation the tile map and set the brush to be created when switching to the GROUND_PLACEMENT mode.
Moving Forward
This is where I started diverging from the tutorial. After thinking over possible implementations I decided that I wanted to store the 2D texture in the same object as any 3D models I would like to link to the texture, along with other information, so I could reference everything from one spot. Then if I had multiple models for the same block, like multiple versions of a grass tile, I could add the functionality to choose which specific model to use.
The Plan for the New Tile Object:
Tile Object
- 2D Texture
- Model(s)
-- Model 1
-- Model 2 - Location
- NPC spawn
- Etcetera
At this point the TileMapneeded a sprite sheet that contained all of the textures I would use. I didn't like this and it wouldn't work with my desire to attach a single 2D texture to an object referencing many other variables. I started by creating the class that would replace the sprite sheet in the TileMap, a TerrainTile to hold a reference to both the 2D texture and the 3D model(s).
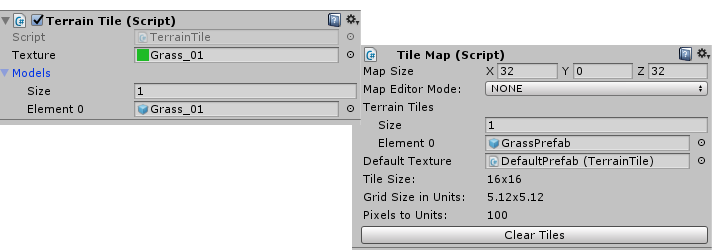
The
TerrainTileinspector with slots for a single 2D texture and many 3D models, also shown is the customTileMapinspector at the end of my refactoring.
To be able to use this new TerrainTile I replaced the public variable holding the 2D tile set in the custom TileMap inspector with a GameObject[]. I used this to hold the prefabs that I attach the TerrainTile class to. I then attached the TerrainTile class to an empty game object, gave it the name GrassPrefab, and attached a green square 2D texture and a single green square 3D model. I used this as a quick and easy testing model.
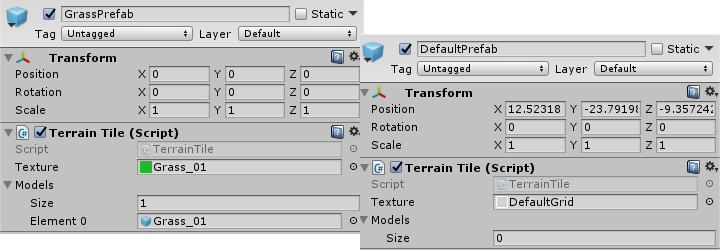
NOTE: I had to also create a DefaultPrefab that holds a single texture with the dimensions to base the tile map grid on. This was necessary to get rid of some errors I was getting where the brush didn't have size dimensions to work from.
VICTORY
At last I was at a milestone ! I had completed two whole items from my plan:
PLAN
Build tile map editorDevelop method of connecting 2D and 3D visuals- Create 3D models
At this point my brain was fried and was looking for a break. I was able to place the TerrainTile prefabs in 3D space, attach any number of 3D models to the tile, and have the ability to add extra information to the tile. I felt that was a good point to leave it for the time being. Next on my list is to create some 3D models that I can use to start testing the tile map. I'll also have to write all of the code to place the 3D models correctly.
If you have any suggestions for improvements, questions, or links to resources that would help me out feel free to leave a comment. Upvote if you liked the post or found it helpful, and follow me for future updates on NaughtScape, sometimes other programming, and occasionally other stuff. All of the source code can be found on my GitHub.
You could also add me in game on OSRS if you play ! My ign is MapleThunder
Bonus gif of the tile placement in effect
Wow! I am just amazed at how much goes into producing even just a simple game!! I thought GWBASIC in high school was complex lol. Obviously, it actually was basic hahaha
A lot more goes in under the hood than you would think, that's why AAA game companies usually have such a large staff and cost so much to make
This post has received a 0.28 % upvote from @drotto thanks to: @banjo.