Accessing And Transferring Files And Data Between PCs Without Using Cables Or Any Software
Hello guys,
Have you ever being in a situation where you needed to transfer a file from a friend’s computer to yours, but at that moment, you have no external hard drive, flash drive, Ethernet cable or even any PC to PC transfer software like shareit or any software you can think of? If you’ve been in such a situation, I guess you know how frustrating it is, because I have also had such an experience and it felt so frustrating.
Do you know that you can actually connect two or more computers and transfer files or data from one to the other wirelessly without needing any sort of drive, sofware or cable?
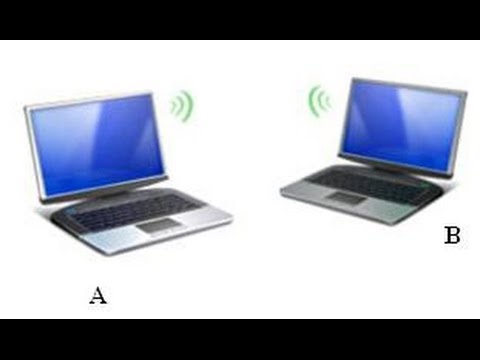
I guess you might be wondering how possible that could be. It’s okay to wonder, because I did also wonder. But you don’t have to wonder or even go through the stress of running about looking for a drive or cable when you are in urgent need of transferring files or data between computers anymore; because I’m going to show you how to wirelessly connect and transfer files between computers using command prompt otherwise known as cmd.
I assume that you all know what is command prompt or cmd in windows. But for those of you who have no idea of what cmd means, I will briefly explain what a cmd is all about.
Command Prompt also known as cmd, is a command line interpreter application available in most Windows operating systems. It is an alternative interface that allows you to enter typed commands for your computer instead of relying on the graphical interface. They're very popular among programmers and other technical users because a good command prompt is a lot more powerful and orders of magnitude faster to use than a graphical interface.
Read more on cmd
Now let’s head on to business. You have to be very attentive as I explain each step on wirelessly connecting computers in details.
Step 1.
Haven briefly understood what a cmd is all about, now you have to run cmd on your computer as an administrator. To do this;
- Open start menu on your pc
- Type in cmd or command prompt
- The cmd will pop up. Right click on it and run as an administrator.
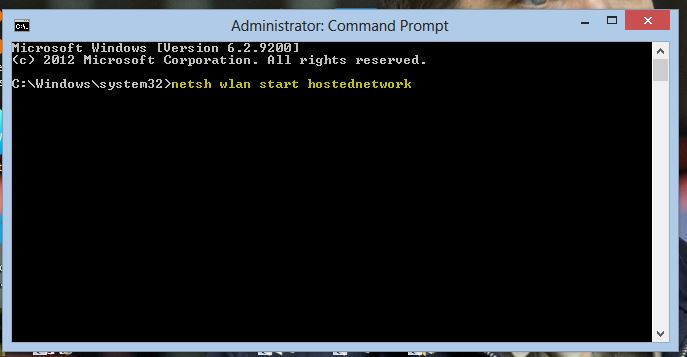
Step 2.
Now, as the cmd interface pops up, it should look like the screenshot below.
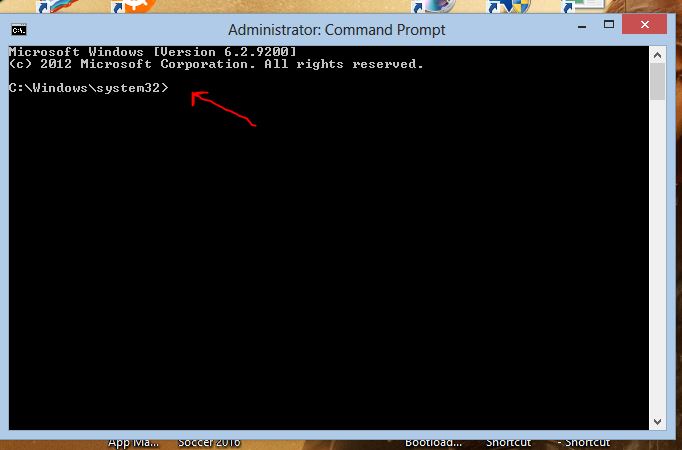
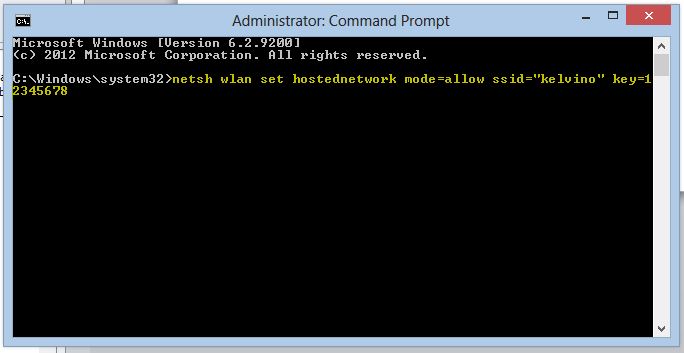
On the space indicated by the red arrow, type the following command with all the quotes, spaces and symbols to establish a hosted network.
netsh wlan set hostednetwork mode=allow ss id=”preferred network id” key=preferred network password not less than 8 digits
But for the sake of this tutorial I will use kelvino as my preferred network id, and 12345678 as my network password. Note that; your password can also include symbols and letter. But for the sake of this tutorial I will only use digits.
Now, the command should look like this;
Just like the highlighted text in yellow on the screenshot bellow.
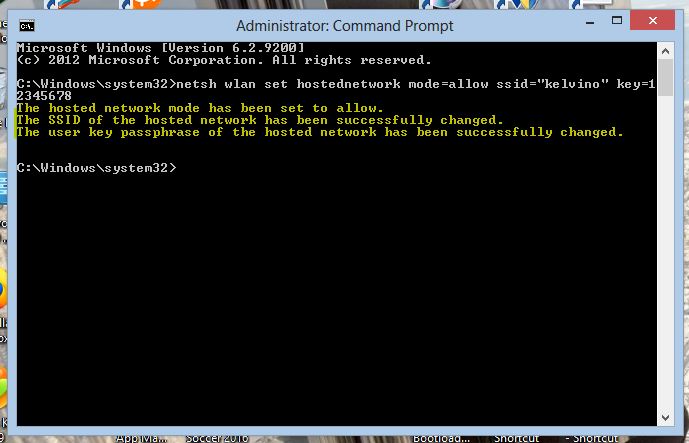
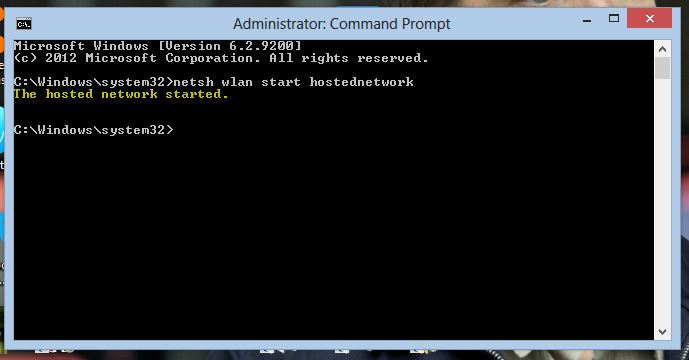
Now, after typing the command correctly as shown above with your preferred network id and password click enter. You should see a note as shown by the highlighted text on the screenshot bellow, which means that your hosted network has been successfully set. But if otherwise, it means that you probably didn’t type the command correctly. So you have to repeat the command again. And ensure that your pc is not on airplane mode.
Now, provided that the hosted network is set successfully, you won’t have to repeat step 2 the next time you want to connect your PCs in the future. That is; you only need to set your hosted network once because it doesn’t change even if you reboot the system. Except you would like to overwrite or otherwise change your previous entries.
Step 3.
Haven set your hosted network; we can now begin the sharing process. Please be a little patient because we are almost done.
Now, to start the hosted network, run your cmd again as an administrator as in step 1, and type the following command;
Just like the highlighted text on the screen shot bellow;
After you have typed the command correctly, press enter and you should see a note as that of the screenshot bellow, which means that your hosted network have been started successfully.
Step 4.
Haven started the hosted network; you will need to turn on the following settings on your computer, to grant the other computers which will be connecting to the hosted network you created access to be able to copy, overwrite and even make changes on files in your public folders.
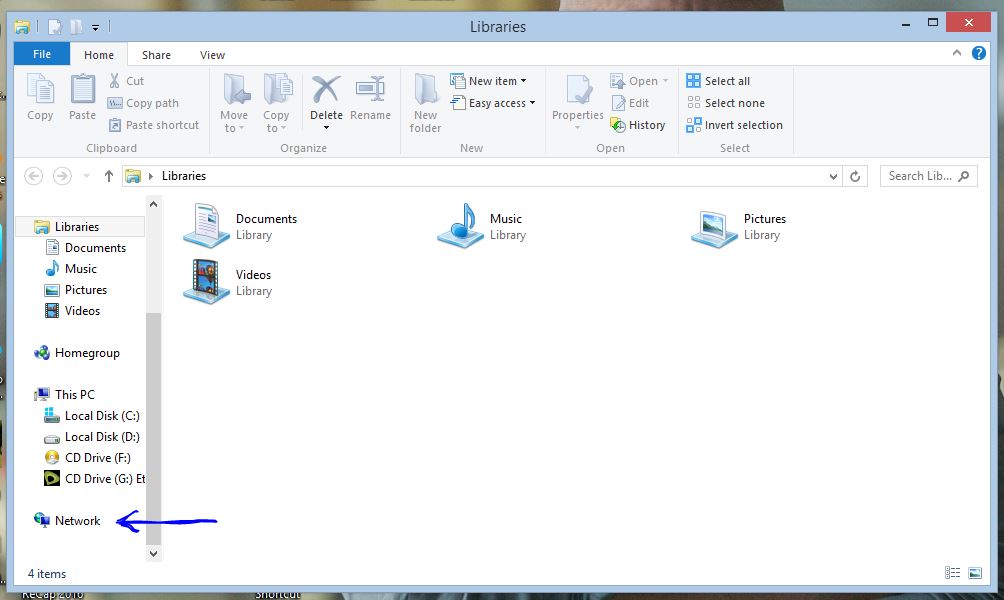
Now, open your explorer and follow the following screenshots to turn on the necessary settings;
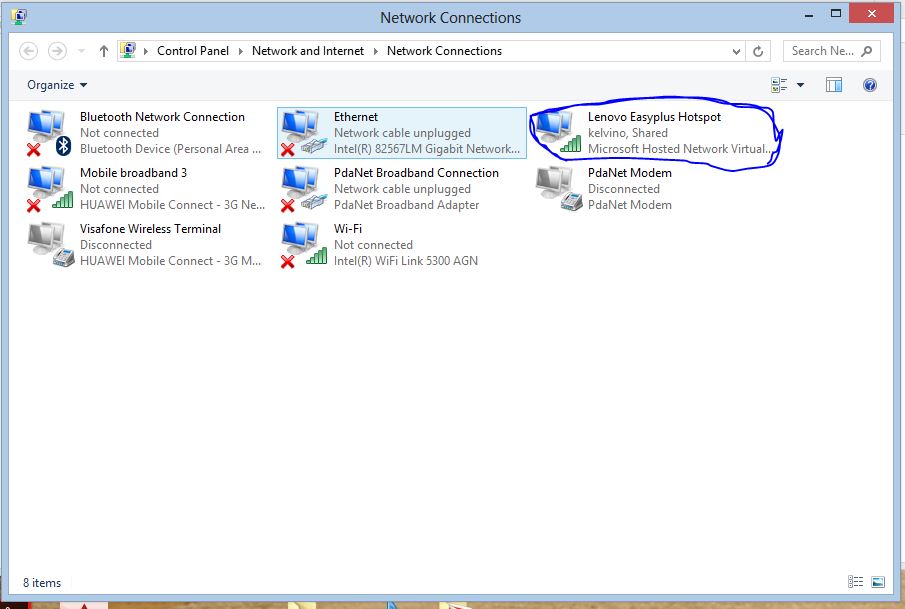
Right click on the network tray on your explorer as shown bellow, and open the properties.
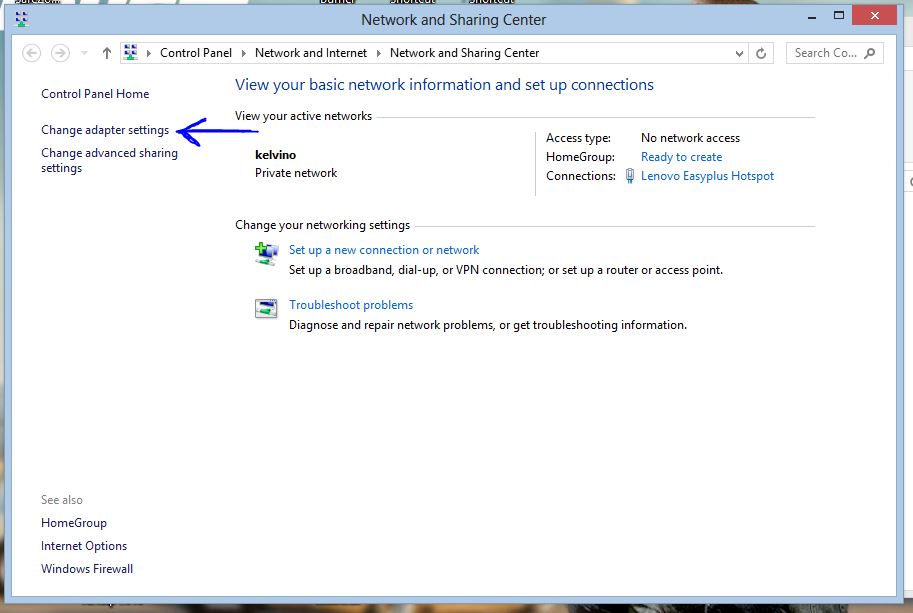
Now click on the setting indicated by the blue arrow on the next screenshot
Now, locate the network that you started which should bear the same id as that of your hosted network as indicated in the screenshot bellow. Right click on it and go to properties.
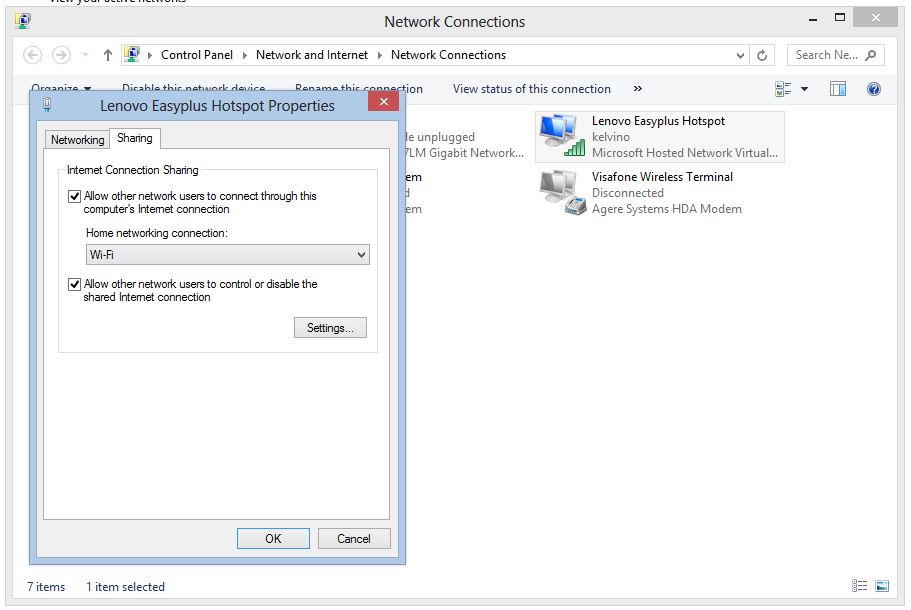
Now, click on sharing and allow the following settings as shown in the screenshot bellow.
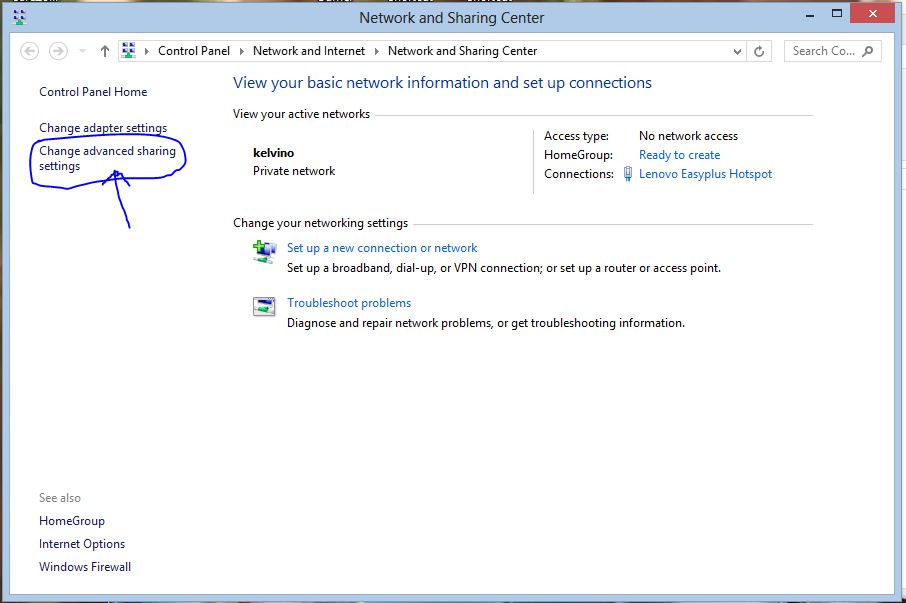
Now return back to the network sharing center and click on the setting circled on the screenshot bellow.
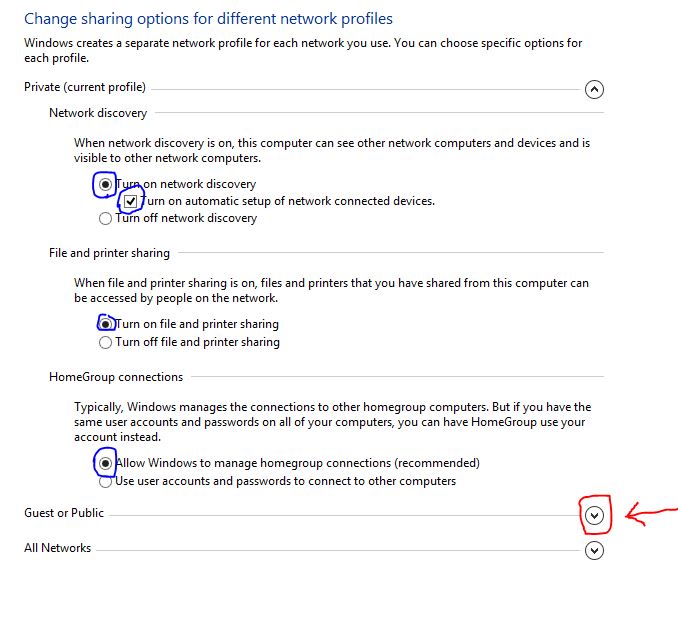
Now, ensure to check all the options as indicated by blue ink in the screenshot bellow, then click on the icon circled in red ink.
Once again, check the options circled in blue and click on the red to move to the next stage.
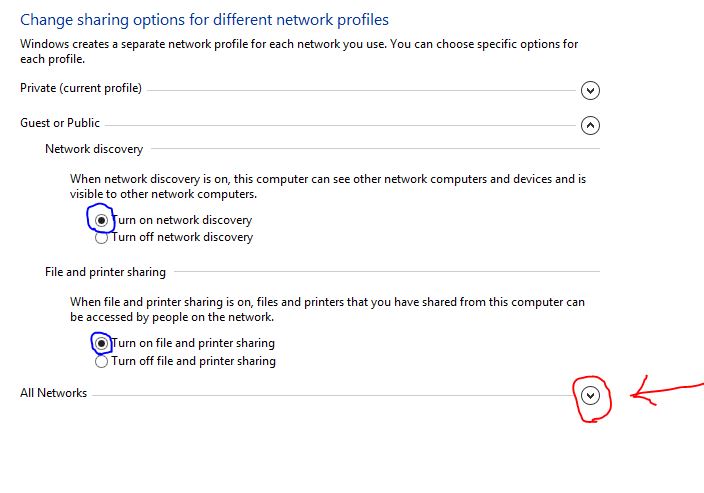
Now, notice how I circled the last two options with red marker on the screenshot bellow. When sharing files or data with another computer, you have to turn off password protected shearing, but when you are done, I advise you turn it on for security purpose.

Step 5.
Now, turn on wifi on the other computer you wish to connect with yours. Search and connect to the wifi network bearing your host id using your host password. After been connected successfully, repeat step 4 on the connected PC (that is; the other PC).
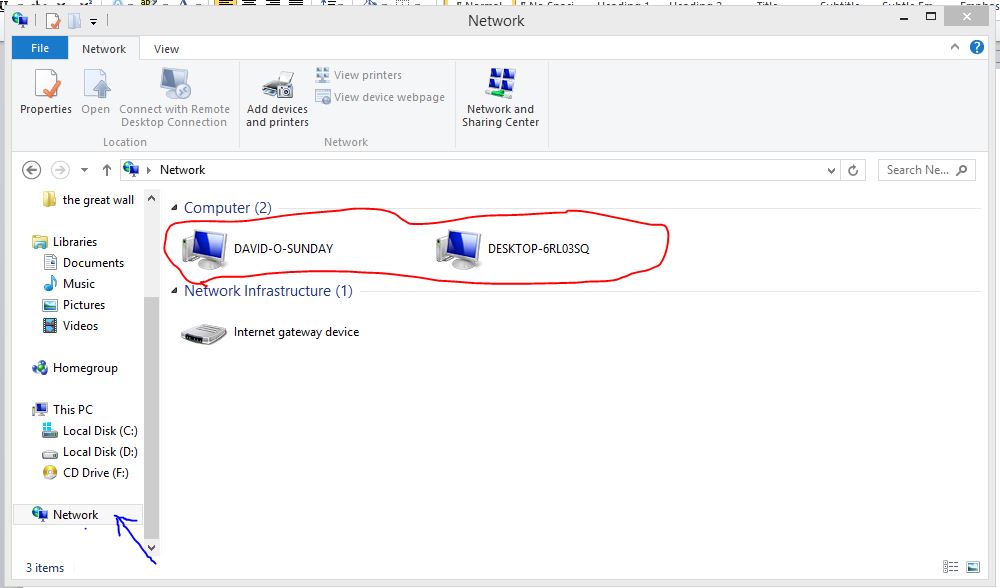
Now, the connection is complete and the two PCs are now synchronized together. You can now begin your file transfer by opening your explorer and clicking on the network icon to view the PCs connected to yours. Just like the screenshots below.
Conclusion
After much comparison and testing, I figured that this is the easiest and fastest way of connecting windows PCs wirelessly for file transfer. Although there are other alternate methods which I won’t be discussing but if you wish to know more about the other method click here
This tutorial is only applied to windows users. As for Mac Book users, watch out for my subsequent post.
If you have read this article to the end, I’d like to say thanks for your patience. I really commend your enthusiasm. And also, if you encounter any difficulties trying to connect PCs wirelessly, or better still if you have any contributions to make, please do indicate on the comment section. And don’t forget to hit that upvote button.
Image sources; 1- screehshots


Nice work... Done it before so it's 100% valid, thanks for this.
Thanks for stoping by.
Youre welcome