Step-by-Step Guide: How to Download & Setup Legacy Launcher on Windows (Minecraft LCE on PC) 🎮
Hey Steemians,
If you are a massive fan of classic gaming and nostalgia, you probably already know that the Minecraft Legacy Console Edition (LCE) community has been absolutely thriving lately. Thanks to amazing open-source developers, we can now experience the classic console era right on our modern Windows PCs.
To do this seamlessly, you need the right gateway: the Legacy Launcher. Today, I am putting together a foolproof, step-by-step tutorial on how to safely download, install, and configure the Legacy Launcher on Windows.
Let's dive right in!
📥 Step 1: Download the Official Windows Executable
Because this is a community-driven project, you want to make sure you are downloading the clean, uncompromised files directly from the source repository.
Head over to the official community distribution hub hosted via GitHub or their verified web landing page (gradengnostic.github.io/legacylauncherweb).
Look for the Windows Download option to grab the native setup executable file. If you are downloading directly from a repository release page, look for the green code button or the compiled assets section to capture the primary executable.
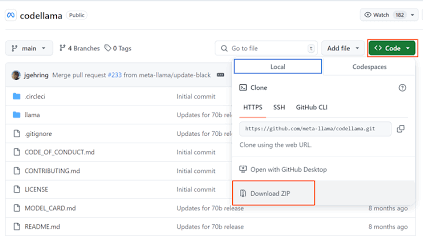
Click download and save the file to an easy-to-access location, like your Downloads folder or Desktop.
🛡️ Step 2: Bypassing the Windows SmartScreen Warning
Because the Legacy Launcher is an open-source, community-made project, it is an "unsigned native executable." This means your Windows operating system might get a bit overprotective when you try to open the installer.
Don't panic if a blue security card pops up on your desktop. This is standard for indie software developments. Here is how to pass it safely:

A hidden option will instantly reveal itself at the bottom right corner of the box, labeled "Run anyway."
Click "Run anyway" to bypass the filter and launch the actual installation window
⚙️ Step 3: Initial Setup & Profile Configuration
Once the launcher opens successfully, you will be greeted by an authentic, clean utility window featuring the iconic classic Minecraft Console Edition banner layout. Before you hit launch, you need to configure your profile parameters:
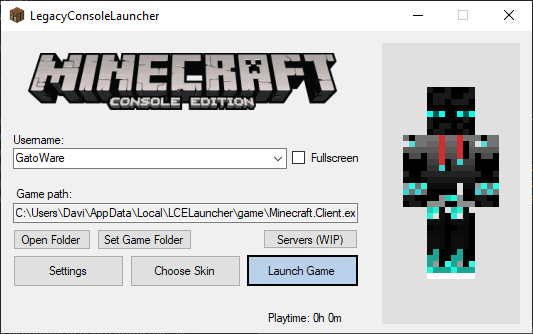
Create your Profile: Look at the main parameter fields. In the Username box, delete any default text and type in your preferred in-game handle. This will track your local playtime journey and store your unique save data.
Set your Path and Skins: The application will map out a default local file pathway to host the client files. If you want to customize your pixel character style before playing, you can use the interactive Choose Skin button to load a custom template.
Hit Launch Game: Click the large, central Launch Game button. The application will automatically pull down the necessary repository assets, establish your directories, and boot up your retro environment.
💡 Quick Troubleshooting Tips for Windows Users
If you run into any performance issues while trying to play, keep these three golden rules in mind:
Keep Graphics Drivers Updated: Because LCE runs through custom optimization setups on PC, having outdated NVIDIA, AMD, or Intel drivers will cause the client to instantly crash on boot.
Controller Integration: The launcher features native gamepad and controller support. For the most authentic console experience, plug your controller into your PC before you launch the application so it maps your inputs correctly.
GitHub
Check Firewall Permissions: If you are trying to join community servers via free multiplayer services, make sure you allow Java or the launcher itself through your Windows Defender Firewall if prompted.
Are you planning on diving back into the console version of Minecraft this week? What was your favorite classic console feature that modern Bedrock or Java is missing? Let me know in the comments below!