Imperative Programming in F#
What Will I Learn?
You'll see the basics to beginning imperative programming in F# and an actual application that is going to be very imperative.
Requirements
The F# Compiler, Core Library & Tools https://github.com/fsharp/fsharp
Difficulty
Intermediate
Tutorial Contents
- Some F# imperative basics
- Arrays
- Records
- Classes
- Enumerations
- Control flow
- If/Then/Else
- While Loop
- For loop
- A Windows Forms Application explained
Imperative Programming in F#
F# is a fully supported .NET language. This means that it is available in Visual Studio. If you are running Visual Studio, you can still use F#, but you have to install it first from the MSI available on Microsoft's website.We'll take this opportunity to become familiar with a bit of the F# syntax. You'll see the basics to beginning imperative programming in F# and an actual application that is going to be very imperative. Most of the syntax will be new, but the concepts should be either familiar or very simple to understand.
Some F# imperative basics
So, let's discuss some simple data constructs, classes, and control flow. By the end of this subtopic you should feel comfortable starting up an editor and digging into the code. You should also begin to be able to read at least the code that you find in other resources.
Arrays
Arrays in F# are just like arrays in other languages. They are mutable by default. What good would an array be if they were immutable? Think about the effects of mutability for quick access of an item in the middle of the array. Arrays are defined as follows:
Let arrayName = [|item1;item2;item3|]
They are used a lot less in F# than what you might be used to. F# and functional programming languages tend to focus more on lists. Lists are defined the same as arrays, only without the "|" next to the brackets.
Records
We often want to be able to assign an identifier to groups of values and give each of those values a name. Take, for instance, if we want to store some data in a database table, we will give the table a name and then give each column in the table a name. We can replicate this type of organization using a record. Many simple objects can be defined using records, as seen in Listing 1.
1. Record syntax
 [ attributes ]
type [accessibility-modifier] typename = {

    [ mutable ] label1 : type1;

    [ mutable ] label2 : type2;

    ...

    }

    member-list
We define a record using the keyword "type" and the assigning an identifier as shown below. Following the "=" is where we define the named parts, or fields and their types after a colon. Each field and type is separated with a ";". Listing 2 will show different ways of creating new instances of record types.
2. Creating an instance of a record
 let student = {Name = "Josh"; City = "Chicago"; Age =


37}

let student2 = {new Person with Name="Joe" and City="Pune" and Age=37}

val student : Person

val student2 : Person

student2.City <- "Sydney"

val it : unit = ()
As you can see, there are two ways of creating a new instance. You can do the simple way, or the long way which is seen in . Fields which have been defined as mutable can be updated with the left arrow (<-). The return value of an update is of type unit.What's interesting about records is that properties are automatically created for the fields defined. This is one of the many ways that F# saves keystrokes. You can see that this is true by using an MSIL disassembler such as Ildasm.exe (Microsoft) or .NET Reflector (redgate). In the next subtopic we will learn to write classes that will behave like C# classes.
Classes
Classes are a basic object-oriented (or as we are most used to seeing today, class- oriented) way of organizing code. They are used to define or extend .NET objects. We use classes in F# when we are focused on interoperability with external libraries and not as the default choice. Listing 3 shows the class definition syntax as shown in the MSDN Developer Center.
3. Class definition
 type[access-modifier]type-name[type-params]


(parameter-list)[as identifier ] =

   [ class ]

     [ inherit base-type-name(base-constructor-args) ]

     [ let-bindings ]

     [ do-bindings ]

     member-list

      ...

   [ end ]
Classes are defined with the keyword type. The parameters are constructor parameters. Types are also created using the type keyword. The lines between the class and end keywords define the class. The keywords themselves are optional. The inherit keyword is how you can go about defining a base class. The keyword let is used to define the local functions and fields of the class. The do bindings are important because they contain the code you wish to execute upon the construction of the object.
Members make up the public interface of a class. They are instance and static method declarations, interface declarations, abstract bindings, and property and event declarations. Members are public by default, and unless otherwise specified. They define the public interface to the type. You can define types that are dependent on each other using the keyword and. It is important to know at this point that you can define classes and use them the same way you do in other .NET languages. They are used far less in F# than in other languages because of the availability of other constructs such as records, and discriminated unions which you will see in the next chapter.It is common to need to delimit several distinct value possibilities of the same type as an enumeration in imperative programming. We will walk through that in the next subtopic.
Enumerations
Enumerations or enums are the same in F# as they are in C# or VB.NET – a way of describing a set of named values of a specific type. Each named value is called an enumerator. Each enumerator behaves as a constant. An identifier that is of the enumerator type can be assigned any of the enumerator's values. Listing 4 shows an example of enumeration in F#. The keyword type is used in the definition, as seen in #1, followed by the name of the enum and the specified values. You can see the use of the enum in #2 and the return value in #3 is of type Direction.
4. Enumeration example
  type Direction =

   | North = 360

   | South = 180

   | East = 90

   | West = 270

let right = Direction.East

val right : Direction = East
The keyword type is used in the definition, followed by the name of the enumeration and the specified values. You can see the use of the enumeration and the return value is of type Direction. The enumeration can now be used just as any type would throughout the application.Enumerations are very similar to the discriminated union type in functional languages. They are defined in pretty much the same way, but they are closer to the union type in the C language.
We have looked at enumerators, classes, functions, and data constructs but all of this can be very limited without the ability to control the flow of the application. We'll discuss the different types of control flow in the following subtopic.
Control flow
We've talked a bit about creating containers for data and basic functions, but all of that can be pretty useless without some way to control the flow of the code. In this subtopic, we'll take a look at conditionals and looping constructs. Note that we'll look at the basics that are common in imperative languages to give you a look at how to do what you are already familiar with in other languages.
If/Then/Else
If/Then/Else works much like it does in other languages. The expression after the if is evaluated. If the result is true, it will execute and return what is after the then. If the result is false, it will fall down through the elif expression. If none of the values are true, it will evaluate the expression after the else. All branches of conditional expressions must have equivalent types. This means that an expression after an else cannot return an int, while all of the expressions after the if or elif return a string. They must match. The syntax is written in Listing 5. You can see an example of printNumberfunction, which takes in a parameter num and returns a unit. Notice that the way the scoping works is the same as in other functions. Whitespace determines what will happen in which case. The string will print every time the function is called regardless of the parameter passed.
5. If/Then/Else
 if <expr> then <constr-expr> else  <constr-expr>

let printNumber num =

    if num < 5 then printfn "%i" num

    elif num > 0 then printfn "Greater than 5"

    else printfn "Neither "

         printfn "Done"

    printfn "This prints every time"
Any expression that returns a Boolean value can be after the if, or elif. You can also use the Boolean operators shown below between expressions.
Boolean operators in F#
Operator - Description
Not - Boolean negation
|| - Boolean or
&& - Boolean and
The next control flow construct that is important is a while loop. We'll discuss it in the following subtopic.
While Loop
The while loop is a common imperative control flow construct. As long as the expression after the while evaluates to true, the expression before the done will execute. The syntax and an example can been seen in the listing below. You can see in the example that the conditional operators can also be used as listed in Table 1.
6. While loop
while <expr> do <expr> done

let loop() = while not complete do someFunction() done
While loops always are of type unit. You can see the do expression within the looping construct, telling the compiler that the following code is imperative and will return a unit.The for loop goes hand in hand with the while loop but it is used much more often in functional expressions. We'll take a look at it in the next section.
For loop
The for loop is a way to execute some code a certain number of times. The syntax is shown in the listing below #1. The code between the do and thedone will execute once for each of the items in 0 to allOfThem. The for loop in F# is much the same as that in other .NET languages. Like while loops, for loops also return unit. The do keyword is used again before the imperative expressions. You can also use for..to and for..in to specify executing the function once for each item in a collection.
7. For loop syntax and example
for <ident> = <expr> to <expr> do <expr> done 	#1

let performFunction =			#2

    for counter in 0..allOfThem do    someFunction counter    done
This will cover many of the basics needed to start an imperative application. We should use the syntax that we know to build something familiar. In the next topic we'll look at building an application.
A Windows Forms Application explained
Now that we have a solid understanding of imperative F# code, we can take a look at an actual application. The code written in this topic will be very imperative. There will be some syntax that may not have been covered but the concepts should be familiar. I'll point out where new syntax is important. Before we start, I should mention that, although I prefer code with my tests first, I'll not show the tests in all of my code samples. Tests will be available with the code included on the book's Web site.First, let's take a look at what we are going to build. This will help you understand the outcome and allow you to consider what the code might look like according to what we already know. Below is a screenshot of the completed form.
Figure 1: Screenshot of a running application
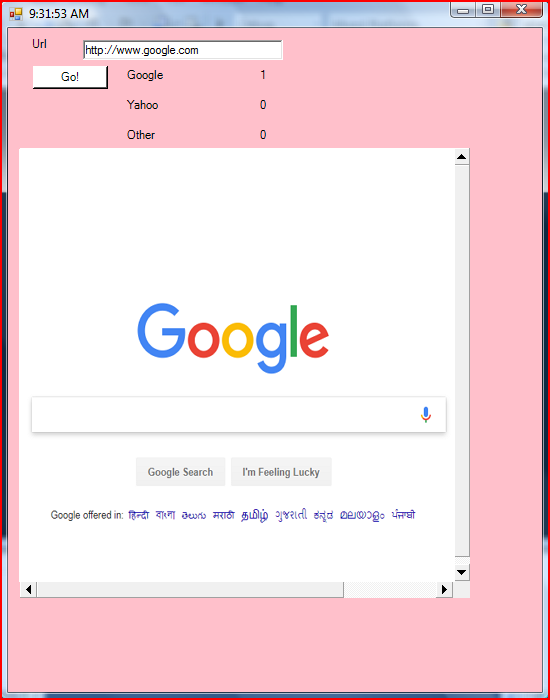
You can see that the form itself is fairly simple. It contains a few text boxes, labels, a button, and a web browser control. Remember that there is no designer for F#, so the code must all be written manually. This isn't the most exciting task, but I think it gives a good comparison of syntax. You'll notice that F# is much more concise than other languages that we're used to seeing.Our task will be to count the number of times the user types the Yahoo, Google, and other addresses into the URL text box and clicks Go. We'll tally each count and display it to the screen. Can you imagine what the C# or VB.NET code looks like?To get started, we'll create a new F# application from a template. Open Visual Studio, click File from the menubar, and then New Project. In the Templates list, select F#, click New Application, and click OK. This will open a new project and a file where we can type some code.
8. Add code to reference external libraries
open System

open System.Windows.Forms

open System.Drawing
The first code we'll need is a few open statements shown in Listing 8. We use open like we would using in C# or imports in VB.net. It's the way we access external libraries. After you have added an open statement for a namespace or module, you must also add the reference to the project. Do this by right-clicking the Reference section within the project and select Add Reference, as seen in Figure 2.
Figure 2: Adding a reference to a project by right clicking References under the project in the Solution Explorer

The next thing we need is a place that we can store the information about the different sites that we want to track. A simple record should work just fine. We will also need a simple helper function to create a Uri from a string. Finally, we will create 3 addresses. Examine the code in Listing 9. Our address type is fairly simple. It has a Name, Url, and Count. The Count is marked as mutable. This is so that we can update it to add one each time the Url is used. Next, we have a function called url. It takes in a string and creates a new Uri from that parameter. The new keyword is used just as it would be in other languages. The last three lines create address records. Notice that the second field, Url is the application of the url function. The string Url is passed to the url function and the Uri is returned. You could replace the function with the Uri value and the result would be the same.
9. A record type to store information about addresses.
type address = {Name:string; Url:Uri; mutable


Count:int}

let url uriString = new Uri(uriString, UriKind.Absolute)

let google = {Name ="Google"; Url=url "http://www.google.com"; Count=0}

let yahoo =  {Name="Yahoo"; Url=url "http://www.yahoo.com"; Count = 0}

let other = {Name ="Other"; Count = 0; Url=null}
Next, we'll create a form in Listing 10. Again, we use the new keyword and then set some values in the form's constructer. The form's Text is set to the function that gets the time and Visible is set to true. The size is really the only hard part here. Without a designer, you must play around to get things the size that you want.
10. Code for a new Form
let form = new Form(BackColor =


System.Drawing.Color.Pink,

                    Visible = true,

                    Size = new Size(550,700),

                    Text = System.DateTime.Now.ToLongTimeString())
Now it's time for the controls. The code is listed below in Listing 11. The first thing we need is a textbox, so that the user can enter a Url. Then we will need several labels for the counts and textbox description. Since we have so many labels to create, we can simplify the process by creating a function. It will take in the coordinates for location in the form of a tuple of x and y axis points.
What is a tuple
A tuple is a sequence (or ordered list) of finite length. An n-tuple is a tuple with n elements. Tuples are usually written within parentheses. For example, (2, 7, 4, 1, 7) is a 5-tuple. A tuple in F# is pretty much the same thing; only tuples can contain any type, including functions. The values contained within the tuple are accessed by their position and not a name or an index.
The function will also have a string parameter that will be the text of the label. You can see how this function is used and all of the lines below. This saves us from typing quite a bit of code. You might see how F# syntax makes it easier to think a little bit differently about doing even basic things.
11. Textbox Code
let textBox1 = new TextBox(Text =


"http://www.google.com",

                   Location = new Point(75, 12),

                   Size = new Size(200, 12))

let label (x,y) text = new Label(Location = new Point(x,y), Text = text)

let label1 = label (22, 9) "Url"

let label2 = label (117, 40) "Google

let label3 = label (117, 70) "Yahoo"

let label4 = label (117, 100) "Other"

let label5 = label (250, 40) "0"

let label6 = label (250, 70) "0"

let label7 = label (250, 100) "0"
We'll also need a WebBrowser control. I've decided to do this one a little bit differently. Examine the code in Listing 12. You can see an identifier browser assigned to a multiline expression. We create a new WebBrowser with an empty constructer. Then, in the next lines we update the mutable properties using the left arrow We use the url function which was created earlier and pass it the starting string for the WebBrowser's Url. Finally, we return the browser.
12. WebBrowser Control Code
let browser1 =

    let browser = new WebBrowser()

    browser.Location <- new Point(12, 120)

    browser.Url <- url http://www.google.com

    browser.Size <- new Size(450, 450)

    browser
We now need to create a couple of EventHandlers to handle the button clicks. The code is listed in Listing 13. First, we need to be able to change the browser's Url to the Url entered in the textbox by the user. We use an anonymous function that takes in two parameters and then updates the browser's url. We have a lot going on so let's break it down so that it is easier to digest.We'll use the keyword fun that was talked about in section 2.#. EventHandlers have two parameters a sender and eventargs.
We can ignore both of those values while still matching the signature required by using the underscore. The underscore is like a wildcard. It's acting as a placeholder in this situation. We'll see it again when we look at pattern matching in the next chapter. Next we have the right arrow (- >) which acts sort of like the equal sign in our lambda. We want to update the url so we'll use the left arrow (<-) to update the mutable value. We must change the string value entered into the textbox into a Url and we can do that using that function the url function that was defined at the beginning of this topic.
In the next function, we create a function that will be called by the EventHandler. We have a multilined function that again takes 2 parameters whose values are ignored. We get the value of the textbox's string as a Url. Then look at the if expression. If the Url value matches the Url in the google record, we update the Count in that record. After the Count is updated, we get the string value and display it in the corresponding label. We do the same thing to check against Yahoo and other address records. We now have two EventHandlers to handle the work needed when the button is clicked.
13. EventHandler Code
let changeUrlEvent =

    new EventHandler(fun _ _ ->browser1.Url<- url textBox1.Text))

let updateCount _ _ =

    let userUrl = url textBox1.Text

    if userUrl = google.Url  then

        google.Count <- google.Count + 1

        label5.Text <- google.Count.ToString()

    elif userUrl = yahoo.Url then

        yahoo.Count <- yahoo.Count + 1

        label6.Text <- yahoo.Count.ToString()

    else other.Count <- other.Count + 1

         label7.Text <- other.Count.ToString()

let updateCountEvent = new EventHandler(updateCount)
You might remember that we have not actually created the button yet. You can see the code in Listing 14. This is done much the same as the browser. The important part here is adding the EventHandlers. We had to define the EventHandlers first as they cannot be referenced before they are defined. The button is returned in the last indented line.
14. Button Code
let button1 =

    let button = new Button()

    button.BackColor <- Color.White

    button.Text <- "Go!"

    button.Click.AddHandler(changeUrlEvent)

    button.Click.AddHandler(updateCountEvent)

    button.Location <- new Point(25, 38)

    button
Now, it's time to add all of our controls to the form. I have taken two approaches, shown in Listing 15. We need to look at all of the controls as Controls rather than as their specific type so that we can work with them in a list. For now, it is important to remember that every item in the list must be of the same type. A function takes in a parameter and returns the Control type.
Then, all of the labels are put into a list and a higher order function is used to map the function in #1 to each item in the list. This is the same as calling the ctrl function and passing in each item in the list as a parameter. This is a big concept that makes FP very appealing. The return value is a list of Controls.The next line is a for loop. We take a list of remaining controls and concatenate it to the list of labels. Then, for each Control in the entire list, we call the form.Controls.Add function. Our form is complete!
15. Adding the controls to the form
let ctrl x = x :> Control
let addControls =

  let labels = List.map ctrl [label1;label2;label3;label4;label5;label6;label7]
  for control in [ctrl button1;ctrl textBox1;ctrl browser1] @ labels do

    form.Controls.Add control
One last thing remains. We must run the application. The code for this can be seen in Listing 16. An attribute must be set for STAThread.
16. Run the application
[<stathread>]

do Application.Run(form)
And, now for a complete show, see Listing 17.
17. Complete code listing for Windows Form Application
open System

open System.Windows.Forms

open System.Drawing

type address = {Name:string; Url:Uri; mutable Count:int}

let url uriString = new Uri(uriString, UriKind.Absolute)

let google = {Name = "Google"; Url=url "http://www.google.com"; Count=0}

let yahoo =  {Name="Yahoo"; Url = url "http://www.yahoo.com"; Count=0}

let other = {Name = "Other"; Count=0; Url = null}

let form = new Form(BackColor = System.Drawing.Color.Pink,

                    Visible = true,

                    Size = new Size(550,700),

                    Text = System.DateTime.Now.ToLongTimeString())

let textBox1 = new TextBox(Text = "http://www.google.com",

                   Location = new Point(75, 12),

                   Size = new Size(200, 12))

let label (x,y) text = new Label(Location = new Point(x,y), Text = text)

let label1 = label (22, 9) "Url"

let label2 = label (117, 40) "Google"

let label3 = label (117, 70) "Yahoo"

let label4 = label (117, 100) "Other"

let label5 = label (250, 40) "0"

let label6 = label (250, 70) "0"

let label7 = label (250, 100) "0"

let browser1 =

    let browser = new WebBrowser()

    browser.Location <- new Point(12, 120)

    browser.Url <- url "http://www.google.com"

    browser.Size <- new Size(450, 450)

    browser

let changeUrlEvent =

    new EventHandler(fun _ _ -> browser1.Url <- url textBox1.Text)

let updateCount _ _ =

    let userUrl = url textBox1.Text

    if userUrl = google.Url  then

        google.Count <- google.Count + 1

        label5.Text <- google.Count.ToString()

    elif userUrl = yahoo.Url then

        yahoo.Count <- yahoo.Count + 1

        label6.Text <- yahoo.Count.ToString()

    else other.Count <- other.Count + 1

         label7.Text <- other.Count.ToString()

let updateCountEvent = new EventHandler(updateCount)

let button1 =

    let button = new Button()

    button.BackColor <- Color.White

    button.Text <- "Go!"

    button.Click.AddHandler(changeUrlEvent)

    button.Click.AddHandler(updateCountEvent)

    button.Location <- new Point(25, 38)

    button

let ctrl x = x :> Control

let addControls =

  let labels = List.map ctrl [label1;label2;label3;label4;label5;label6;label7]
  for control in [ctrl button1;ctrl textBox1;ctrl browser1] @ labels do

    form.Controls.Add control

[<stathread>]

do Application.Run(form)
See if you can read and understand what is going on in each line. If it all seems to make sense, you are ready to learn more about functional programming.
Summary
We looked in depth at some of the imperative ideas and some data constructs available in F#. We learned about records and enumerations and how they look in F#. We ended the article with a Windows Forms application that used some of the syntax that we have learned and showed a bit of interoperability among languages on the .NET platform.
Posted on Utopian.io - Rewarding Open Source Contributors
I usually just post memes. LOL
Thank you for the contribution. It has been approved.
You can contact us on Discord.
[utopian-moderator]
Hey @cheretta I am @utopian-io. I have just upvoted you!
Achievements
Suggestions
Get Noticed!
Community-Driven Witness!
I am the first and only Steem Community-Driven Witness. Participate on Discord. Lets GROW TOGETHER!
Up-vote this comment to grow my power and help Open Source contributions like this one. Want to chat? Join me on Discord https://discord.gg/Pc8HG9x