Top Ways to Fix WIFI Issues on MacOS
Some MacOs Sierra users are practically pulling their hair out after updating their Macs to the latest system version because doing so caused them to lose wifi connectivity. After scouring the interwebs for a possible fix, I have come across a few steps that will more than likely fix this issue.
I'll start with making a backup because it's always super important to do this incase you need to undo things. As a side note these files do get recreated automatically.
Step 1. Create a folder on your desktop like "WifiFixBackup". This will be your backup folder.
Step 2. Go to Finder and pull down the "Go" menu, then choose the "Go To Folder" option.
Step 3. Type the following directory path & click "Go"
/Library/Preferences/SystemConfiguration/
Step 4. Find the following files and place them in this new folder then drag & drop the originals in the trash.
Step 5. You now want to restart your mac & turn on your wifi & try to access the web.
What you are doing here is getting rid of your old wireless preferences and telling MacOS High Sierra to replace them by creating new wi-fi preferences. This is enough to solve most problems with wifi networking.
THESE NEXT STEPS ARE OPTIONAL & CAN HELP SOLVE YOUR PROBLEM AS WELL
Step 1. Create a new wifi location.
Step 2. click the “Advanced” button at the bottom of the Network preference panel.
Step 3. Select the “TCP/ IP” tab and click on “Renew DHCP Lease”
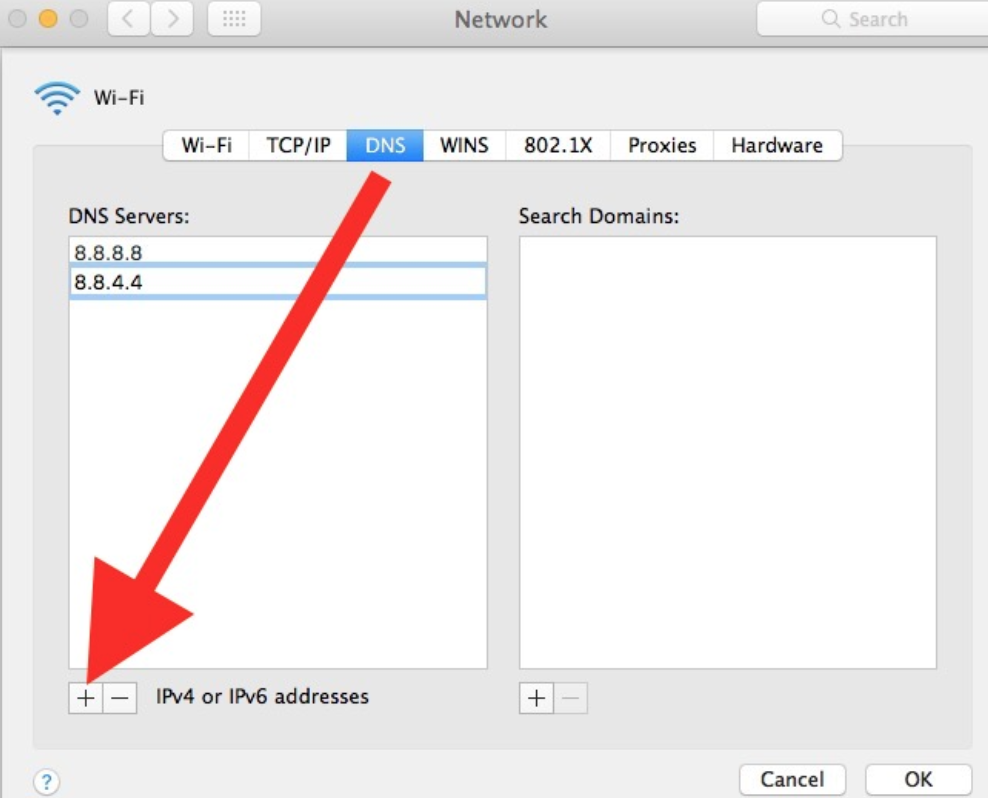
Step 4. Go to the “DNS” tab, and click on the [+] plus button then enter the following IP addresses (each IP should be on its own line). These are all Google DNS servers by the way, you can use whatever you like if you don't want to use Google.

Step 5. Go to the “Hardware” tab and make sure that the ‘Configure’ option is set to “Manually”
Step 6. Then change the "MTU” option to “Custom” and set the number to “1453”
Step 7. Click "OK" & click lastly "Apply".
This should solve the majority of wifi problems, it's been used for years as the goto way to troubleshoot this bothersome issue.
If none of this works for you then you can try this trick i happen to come across.
Open your terminal on your Mac ( use shortcut : cmd+spacebar and then type "terminal").
type into your terminal: "defaults write com.apple.NetworkBrowser DisableAirDrop -bool Yes"
So there it is. Hope this helps.
Took me some time to find & test these solutions so i would appreciate it very much if you upvote this post.
Cheers


